Connect with us

Home Decor

How to Make an Easter Egg Tree With Decoupaged Eggs

Published

on

easter egg tree tutorial

To make an Easter Egg tree with decoupaged eggs, gather craft eggs, decorative napkins, Mod Podge glue, a craft brush, and a floral cone. Prepare eggs by painting them white, selecting napkin designs, and decoupaging them with pastel hues. Arrange eggs on branches in a stable vase, varying heights for visual appeal. Use green paint on twigs for a natural look. Showcase your creation prominently and share on social media. Tips on materials and techniques guarantee success. Master the art of Easter egg trees with detailed steps and expert advice, elevating your festive decor effortlessly.

Key Takeaways

  • Paint foam eggs white as a base.
  • Select Easter-themed napkins or rice paper for designs.
  • Decoupage designs onto eggs with Mod Podge.
  • Position eggs on painted twigs in a floral cone.
  • Display tree prominently with complementary decorations.
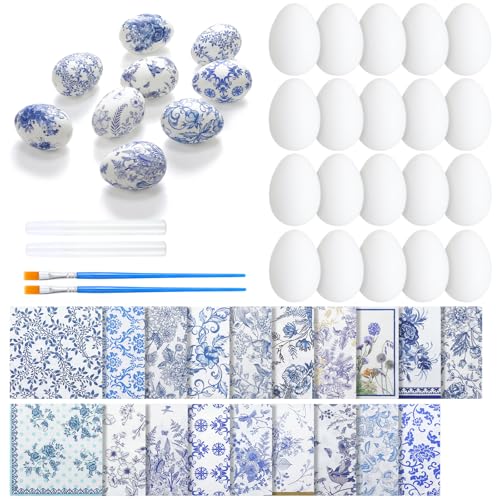
Gather Necessary Supplies

Let's gather all the supplies needed for making our Easter Egg Tree. For the decoupage Easter eggs, we'll need craft eggs, decorative napkins or rice paper, Mod Podge glue, a craft brush, and a floral cone. These items are essential for creating beautifully decorated eggs for our tree. Make sure to have scissors handy to cut the napkins or paper smoothly for the decoupage technique.

In addition to the decoupage supplies, make certain you have all the necessary materials for assembling the egg tree. This includes craft paint for customization, beads for embellishments, wire for hanging the eggs, twigs for a natural touch, and a vase for stability. Having these items ready will make the assembly process smoother and more enjoyable.

Prepare your crafting space with good lighting and a flat surface to work on. Organize your materials in a way that allows easy access while crafting. Clear any clutter or distractions from your workspace to stay focused on creating your Easter egg tree.

Let's get everything together to start this fun and creative project!

Prepare Foam Easter Eggs

egg cellent easter craft idea

Let's start by painting the foam Easter eggs with white acrylic paint to create a smooth base for the decoupage designs.

Remember to select decorative napkins or rice paper for the decoupage process, ensuring intricate and colorful patterns.

Advertisement

Using Mod Podge or similar decoupage glue will securely attach the cut-out designs onto the foam eggs, resulting in a beautiful Easter decoration.

Egg Painting Techniques

To prepare foam Easter eggs for painting, begin by selecting a shape from decorative napkins to cut out and decoupage onto the eggs using Mod Podge glue. Once the cut-out designs are securely attached, paint the foam eggs with a coat of white acrylic paint. This step creates a clean and uniform base for the subsequent painting process.

After the white paint has dried, apply Mod Podge as a glue to attach the cut-out images firmly to the eggs. To enhance durability and achieve a smooth finish, consider adding additional coats of Mod Podge over the decorated eggs. This protective layer not only secures the designs in place but also guarantees a polished final look.

Decoupage Supplies Needed

Selecting the appropriate supplies is essential when preparing foam Easter eggs for decoupage. Foam Easter eggs, known for their lightweight and smooth surface, provide an ideal base for intricate designs.

To begin, you'll need Mod Podge glue, a versatile adhesive important for securing napkin designs onto the foam eggs. Using a foam brush to apply the Mod Podge glue guarantees an even and smooth application, facilitating the adherence of the decorative napkins.

Advertisement

Cutting out shapes from the napkins allows for precise and customized designs on the foam eggs, enhancing their visual appeal. Additionally, applying a base layer of white acrylic paint on the foam eggs before decoupaging helps the napkin designs stand out vibrantly.

Incorporating these supplies and techniques will enable you to create beautifully decorated foam Easter eggs, perfect for crafting an Easter egg tree that will impress and delight.

Cut Out Napkin Designs

intricate paper napkin art

When cutting out napkin designs for the Easter eggs, make sure to choose decorative napkins featuring festive Easter motifs like bunnies, flowers, or eggs. Using sharp scissors, carefully cut out the desired designs from the napkins. It's crucial to cut the designs close to the edges for a clean and precise look on the eggs.

Selecting smaller designs can make cutting and applying them to the egg surface easier. Confirm the cut-out designs are proportional to the size of the eggs for a balanced appearance.

Incorporating these Easter decor elements into your decoupaged eggs can create a charming and seasonal touch to your Easter Egg Tree.

Paint Eggs With White Acrylic

easter egg painting tutorial

Let's now start preparing the eggs by applying a coat of white acrylic paint for a clean and neutral base. White acrylic paint serves as the foundation for the decoupaged Easter eggs, enhancing the vibrancy of the napkin designs. This step not only guarantees that the colors and patterns of the napkins or rice paper pop but also contributes to a cohesive look for the Easter egg tree. The use of white acrylic paint facilitates better adhesion of the decoupage medium, allowing for a seamless application of the intricate designs onto the eggs. A light coat of white acrylic paint can greatly improve the overall appearance of the eggs, providing a smooth and even surface for the subsequent decoupage process.

Benefits of White Acrylic Paint
Enhances color vibrancy
Ensures cohesive appearance
Facilitates adhesion of designs

Decoupage Napkin Designs

creative craft with napkins

For a vibrant and festive touch to your Easter egg tree, consider selecting napkin designs featuring charming Easter motifs like bunnies, flowers, or eggs.

When choosing napkin designs for your decoupage projects, keep in mind these essential tips:

Advertisement
  1. Intricate Designs: Opt for napkins with intricate patterns that can be easily cut out and applied to the eggs, adding a detailed and visually appealing look to your Easter decorations.
  2. Pastel Colors: Select napkin designs in pastel colors to maintain a cohesive and festive theme for your Easter egg tree, creating a soft and welcoming ambiance.
  3. Secure Attachment: Guarantee the napkin designs are firmly attached to the eggs by using an adequate amount of decoupage glue, preventing peeling or lifting of the designs over time.
  4. Variety and Interest: Experiment with a variety of napkin designs to introduce diversity and visual interest to your decoupaged eggs, making your Easter egg tree truly unique and eye-catching.

Seal Eggs With Mod Podge

protecting eggs with sealant

How can we effectively seal decoupaged eggs to protect the designs and enhance their durability?

When it comes to preserving the intricate designs on our decoupaged eggs, using Mod Podge as a sealant is crucial. Mod Podge not only safeguards the colors from fading but also extends the lifespan of the decoupaged eggs. By applying a coat of Mod Podge over the design, we guarantee a smooth and glossy finish, adding a professional touch to our Easter decorations.

One of the advantages of sealing eggs with Mod Podge is its ability to secure the napkin or rice paper design firmly onto the egg surface. This protective layer acts as a barrier against wear and tear, making the eggs more resilient to handling. It's a straightforward and efficient method to maintain the decorative elements intact for an extended period, ensuring that our Easter Egg Tree remains a beautiful centerpiece for years to come.

Assemble Egg Tree

decorate easter tree creatively

To assemble an Easter egg tree, we need to focus on three key points: the egg tree base, egg placement, and decorating techniques.

First, select a sturdy vase filled with stones to hold the painted twigs securely in place as the base of the tree.

Next, string the decorated eggs onto branches using loops for hanging, ensuring they're evenly distributed for a balanced look.

Egg Tree Base

Let's start by painting twigs with green craft paint to add a vibrant touch to our Easter egg tree base.

Advertisement

Here's how you can assemble your egg tree base decor:

  1. Painting Twigs: Choose sturdy twigs and apply green craft paint evenly to give them a fresh look, mimicking the essence of spring.
  2. Arranging in Vase: Once dry, place the painted twigs in a sturdy vase filled with stones for added stability, ensuring your egg tree stands securely.
  3. Hanging Eggs: Use strings or wire loops to hang the decorated eggs on the branches, creating a delightful visual display that showcases your creativity.
  4. Decor Variety: To enhance the aesthetic appeal, incorporate a mix of egg colors and designs, making each egg stand out and contribute to the overall charm of your Easter egg tree.

Egg Placement

We carefully position the decorated eggs on the branches of our Easter egg tree, ensuring a balanced and visually pleasing arrangement. By hanging the eggs at varying heights and angles using strings, we create an engaging visual display that captures the essence of the holiday season. It's essential to securely attach the eggs to the branches to prevent any accidental falls, maintaining the integrity of the design.

When assembling the egg tree, consider incorporating a mix of different egg sizes and designs. This variety adds depth and interest to the display, making it more dynamic and eye-catching. By mixing and matching the eggs, you can create a personalized and festive decor piece that reflects your creativity and style.

Once the eggs are in place, step back and assess the overall look of your DIY Easter egg tree. Make any necessary adjustments to achieve the desired aesthetic before showcasing it as a beautiful and unique addition to your holiday decorations.

Decorating Techniques

For assembling the Easter egg tree, start by painting twigs with green craft paint to add a vibrant touch to the decor piece.

Here's how to create your own Easter egg tree at home:

Advertisement
  1. Paint twigs with green craft paint for a fresh and colorful base.
  2. Arrange the painted twigs in a vase filled with stones to guarantee stability when assembling the tree.
  3. Hang the decoupage Easter eggs on the branches using strings to add a festive and personalized element to your home decor.
  4. Display your DIY Easter egg tree proudly as a beautiful and unique decor piece for the holiday season.

Display Your Creation

celebrate your creative output

Enhancing the visual impact of your Easter egg tree can be achieved by strategically placing it in a prominent location within your home. Consider showcasing your creation on a mantle, as a table centerpiece, or in the entryway to guarantee maximum visibility and admiration from guests.

To elevate the presentation of your Easter egg tree, utilize a decorative basket or stand that complements the overall design. This not only adds height but also adds a touch of elegance to the display.

In addition to the tree itself, incorporating other Easter decorations around it can create a cohesive and festive atmosphere in your home. By surrounding the tree with complementary elements such as Easter bunnies, pastel-colored ribbons, or spring flowers, you can enhance the overall aesthetic appeal of the display.

Lastly, don't forget to share your Easter egg tree creation on social media or with friends and family. By doing so, you can inspire others to get creative and join in the Easter festivities.

Tips for Success

building a successful career

When creating an Easter Egg Tree, it's important to pay attention to material selection, master the decoupage technique, and strategize how to display your tree effectively.

By choosing smaller designs for effortless cutting and secure attachment with decoupage medium, you can avoid wrinkles and lifting issues.

Remember to mix decoupaged and non-decoupaged eggs and vary their angles for a visually engaging and dynamic display.

Advertisement

Material Selection

Selecting the right materials is crucial to creating a vibrant and visually appealing Easter Egg Tree. To guarantee success in this craft project, consider the following materials:

  1. Foam Easter Eggs: Opt for foam eggs as they're easy to decoupage and hang, providing a lightweight option for your tree.
  2. Decorative Napkins: Choose napkins with colorful and intricate designs to add a festive and eye-catching element to your eggs.
  3. Mod Podge Glue: Utilize Mod Podge glue for strong adhesion and to protect the designs on the eggs, ensuring longevity and durability.
  4. Mix of Finishes: Experiment with a combination of matte and gloss finishes to create visual interest and depth in your Easter Egg Tree.

Remember to apply Mod Podge with a craft brush in a thin layer to achieve smooth and even coverage on the eggs.

These materials will help you create a stunning and unique Easter Egg Tree that will be a delightful addition to your seasonal decor.

Decoupage Technique

Let's explore some essential tips for achieving successful decoupage on Easter eggs.

When using the decoupage technique, opt for delicate rice paper or decorative napkins to adorn your eggs with intricate designs. Apply a thin layer of decoupage medium to the egg surface before carefully placing the chosen design. Smooth out any wrinkles gently using your fingers or a soft brush to guarantee a polished and seamless finish.

To enhance the durability of your decoupage eggs, seal them with multiple coats of decoupage medium. This protective layer not only secures the design but also provides a glossy sheen. Remember to let each coat dry completely before applying the next one to prevent smudges or uneven finishes.

Advertisement

Get creative with your decoupage technique by experimenting with different designs, colors, and finishes. Personalize your Easter eggs by mixing and matching various elements to create a unique and eye-catching display.

With these tips in mind, you can master the art of decoupage and create stunning eggs for your Easter egg tree.

Displaying Your Tree

We recommend positioning your Easter egg tree in a well-lit area to showcase the intricate decoupaged designs beautifully.

When displaying your tree, consider the following tips for success:

  1. Placement: Choose a prominent spot such as a mantel, side table, or as a centerpiece to make an Easter egg tree the focal point of your decor.
  2. Variety: Use a mix of egg sizes and designs to add visual interest and depth to your tree, creating an engaging display that can't wait to be admired.
  3. Decorative Accents: Enhance the overall look of your tree by adding decorative elements like ribbons, bows, or faux flowers that complement the decoupaged eggs.
  4. Stability: Ensure the stability and security of your tree by using a sturdy base or vase to hold the twigs and eggs in place, making sure your Easter egg tree stays intact throughout the festivities.

Conclusion and Final Touches

crafting a strong conclusion

To complete the Easter egg tree, adding ribbon, bows, or glitter as a final touch will enhance its charm and festive appeal. These embellishments can bring a pop of color and shine to your tree, creating a visually appealing centerpiece for your Easter celebrations.

Consider incorporating miniature decorations like bunnies, chicks, or flowers to further enhance the Easter theme and add whimsy to your display. Experiment with different egg designs, colors, and patterns to create a personalized and unique tree that reflects your style and creativity.

Advertisement

Display the Easter egg tree as a centerpiece on a table or mantel to showcase your handiwork and spread joy to all who see it. Sharing your Easter egg tree creation with friends and family can inspire creativity in others and bring a sense of joy and festivity to your home during the Easter season.

Let your imagination run wild and create a stunning Easter egg tree that will be a memorable part of your holiday decor.

Frequently Asked Questions

How to Make Eggs for an Easter Tree?

To make eggs for an Easter tree, paint foam eggs with a base color, cut out designs from napkins, and use Mod Podge to adhere them. Seal with more Mod Podge for protection. String eggs onto branches for a festive touch.

How to Dry Decoupage Eggs?

To dry decoupage eggs effectively, we let them dry completely between Mod Podge layers on a flat surface. Proper ventilation helps speed up drying while avoiding touching them prevents smudging. A hairdryer on low can be used cautiously for quicker drying.

How Do You Decoupage an Easter Egg?

To decoupage an Easter egg, we apply Mod Podge glue to a foam egg, carefully place Easter designs cut from napkins, seal with Mod Podge using a brush, and add layers for protection. Painting the eggs white first can enhance the look.

Advertisement

Can I Use Mod Podge on Eggs?

Yes, we can use Mod Podge on eggs for decoupaging. It helps adhere decorative designs and provides a protective seal. Achieve different finishes like matte or gloss. Mod Podge is a versatile glue for various crafting projects.

Conclusion

To wrap up, crafting an Easter egg tree with decoupaged eggs is a fun and creative way to celebrate the holiday. With the right supplies and a little bit of patience, you can bring a touch of springtime beauty into your home.

So gather your materials, tap into your inner artist, and let your imagination bloom with this delightful DIY project. Get cracking and start crafting your own unique Easter egg tree today!

Continue Reading
Advertisement

Home Decor

How to Create a Country-Inspired Gallery Wall Without Looking Cluttered

Unlock the secrets to designing a stunning country-inspired gallery wall that feels cohesive and inviting—discover essential tips to avoid clutter!

Published

on

By

country inspired gallery wall tips

To create a country-inspired gallery wall without looking cluttered, stick to a cohesive design. Choose a limited color palette of soft, earthy tones and mix frame styles for character. Use rustic materials, like distressed wood or metal frames, to enhance the country vibe. Incorporate inviting elements such as neutral backgrounds to highlight artwork and layer varied textures like burlap or ceramic. Arrange personal mementos alongside country-themed art for authenticity. Keep decorative items to a minimum to maintain harmony. If you're keen to discover more tips and tricks, you'll find plenty of ideas just ahead!

Key Elements

essential components identified

When creating your gallery wall, focus on the key elements of color scheme, materials, and textures.

You want to choose soft, earthy tones that evoke a country vibe while mixing different frame styles to add character.

Balancing these aspects will help you achieve a cohesive and inviting display.

Color Scheme

To create a cohesive country-inspired gallery wall, choose a color palette that features warm, earthy tones like soft greens, muted blues, and rustic browns. These colors evoke a natural feel and will help tie your art pieces together. Incorporating neutral colors such as beige or cream can serve as a backdrop, allowing your artwork to stand out without overwhelming the space.

Limit your color scheme to three main colors and one or two accent colors to maintain a harmonious and balanced look throughout the gallery wall. Consider using accent colors inspired by farmhouse decor, like deep reds or faded yellows, but apply them sparingly. This subtle approach adds visual interest without creating clutter.

Advertisement

Additionally, think about the textures of your frames and artwork. Opt for distressed wood or rustic metal to enhance the country aesthetic while keeping the overall design cohesive.

Materials

Natural materials like wood, burlap, and metal are essential for cultivating the rustic charm of your country-inspired gallery wall. Choose frames made from natural wood finishes or those with a distressed paint look to enhance this aesthetic. These options not only complement your chosen artwork but also help maintain a cohesive appearance.

When selecting your artwork, aim for pieces that reflect country themes, such as landscapes or vintage farm tools. This will create a narrative that ties the gallery wall together. Additionally, consider incorporating personal mementos, like family heirlooms or handmade pieces, to add a unique touch and authenticity.

To keep your gallery wall from feeling cluttered, opt for a cohesive color palette. Stick to muted tones like soft whites, earthy greens, and warm browns, which will harmonize with your materials and frames.

Textures

Incorporating a variety of textures is essential for achieving the inviting and layered look of a country-inspired gallery wall. You can start by using natural materials like wood, linen, and burlap, which enhance the rustic charm that defines country decor.

Advertisement

Layer different textures, such as woven baskets or ceramic pieces, alongside your framed art to create visual interest without overcrowding the space.

Don't forget to take into account distressed or reclaimed wood frames; these not only complement the country theme but also add depth to your display.

Textile art, like quilts or fabric wall hangings, introduces softness and warmth, making your gallery wall feel more inviting.

To elevate the organic texture of your arrangement, mix in elements like greenery or dried floral arrangements. These details bring a fresh look, grounding your wall in nature while adding an extra layer of texture.

By thoughtfully combining these elements, you'll create a cohesive and charming gallery wall that reflects your personal style while remaining true to country-inspired aesthetics.

Advertisement

Embrace the textures, and watch your wall come to life!

Essential Fixtures and Furniture

key home essentials list

To bring your country-inspired gallery wall to life, you'll want to focus on essential fixtures and furniture that complement the theme.

Consider incorporating a rustic wooden shelf unit, an antique farmhouse-style mirror, and a vintage lantern accent piece to enhance the overall look.

These elements not only add character but also create a warm and inviting atmosphere for your artwork.

Rustic Wooden Shelf Unit

Enhancing your country-inspired gallery wall, a rustic wooden shelf unit brings warmth and texture that beautifully complements the overall aesthetic.

Opt for a piece made from reclaimed wood or featuring a distressed finish to truly capture that rustic charm. This choice not only ties the shelf unit into the gallery wall but also adds a cohesive look to your decor.

Advertisement

To maximize visual interest, incorporate varying shelf heights. Use these levels to display a mix of artwork, plants, and decorative items. This approach prevents a cluttered appearance while showcasing your personality through different pieces.

Position framed art above the shelf unit, creating a layered effect that draws the eye without overwhelming the space.

Consider adding hooks or small baskets to the shelf unit. This allows for functional storage or the display of smaller art pieces, enhancing the rustic style while keeping everything organized.

Antique Farmhouse-Style Mirror

An antique farmhouse-style mirror adds both functionality and charm, instantly brightening your country-inspired gallery wall. This piece doesn't just reflect your style; it enhances the overall aesthetic by adding depth and light. Look for mirrors with distressed finishes or ornate frames to capture that rustic charm typical of farmhouse decor.

When positioning the mirror, think strategically about where it can reflect natural light. This placement can make your space feel larger and more inviting, an essential quality for a cozy gallery wall. You might also consider using a mix of mirror shapes, like round or oval, to create visual interest while maintaining a cohesive farmhouse look.

Advertisement

Finding an antique mirror can be an adventure in itself! Check out flea markets or estate sales—you'll often discover unique options that are budget-friendly and rich in character. Incorporating one of these mirrors into your gallery wall not only enhances its design but also tells a story, making your display even more personal.

Vintage Lantern Accent Piece

Vintage lanterns serve as perfect accent pieces, adding rustic charm and warmth to your country-inspired gallery wall. They enhance the nostalgic feel, especially when you choose lanterns with warm finishes like distressed metal or antique brass. This not only brings out the rustic elements but also helps you create a cohesive color palette throughout your display.

When arranging your lanterns, position them at varying heights to create visual interest. This approach draws the eye without overcrowding the overall design. You can even use the lanterns as functional lighting sources by incorporating LED candles or fairy lights, which will provide a warm, inviting ambiance that complements your gallery wall.

For a unique touch, consider sourcing your vintage lanterns from thrift shops or flea markets. These places often have one-of-a-kind pieces that add character and authenticity, making your gallery wall truly special.

Lighting Ideas

creative illumination inspiration

When it comes to lighting your country-inspired gallery wall, you've got some charming options.

Soft, warm pendant lights and rustic wall sconces can create that cozy vibe, while an antique-style chandelier can serve as a stunning centerpiece.

Advertisement

Don't forget string lights for added ambiance—they'll make your artwork shine even brighter.

Soft, Warm Pendant Lights

Enhancing your country-inspired gallery wall with soft, warm pendant lights creates a cozy atmosphere that beautifully complements rustic decor. These lights provide ambient lighting, making your artwork and decor feel inviting. Opt for pendant lights made from natural materials like wood or woven textures to further enhance that country aesthetic.

Adjustable pendant lights are a great choice, allowing you to spotlight specific art pieces without overwhelming the overall design. This flexibility lets you draw attention to your focal points while keeping the space balanced and harmonious. Additionally, selecting pendant lights with dimmable features helps you control the brightness, setting the perfect mood for any occasion while maintaining that warm, inviting ambiance.

To add depth and interest to your gallery wall, consider hanging pendant lights at different heights. This approach contributes to an organized yet eclectic look, ensuring your display avoids a cluttered appearance. With the right soft, warm pendant lights, you'll elevate your country-inspired gallery wall, creating a charming focal point that invites admiration and comfort.

Rustic Wall Sconces

To complement your soft, warm pendant lights, incorporating rustic wall sconces can elevate the ambiance of your country-inspired gallery wall, adding both illumination and charm.

Advertisement

These sconces provide a warm, ambient glow that enhances the natural textures of wood and other materials in your decor. When selecting sconces, opt for those made from materials like wrought iron, reclaimed wood, or antique finishes to maintain a cohesive rustic aesthetic throughout your gallery wall.

Strategic placement of the sconces is essential; aim for about 60-66 inches from the floor to highlight key art pieces or photos effectively. Dimmable sconces are a smart choice, allowing you to adjust the lighting based on the time of day or your mood, creating a versatile display that adapts to different settings.

Consider sconces with candle-like features or vintage bulb designs to add character and warmth without cluttering your space. By thoughtfully integrating rustic sconces into your gallery wall, you not only enhance the overall country-inspired vibe but also create an inviting atmosphere that captures the charm of rural living.

Antique-Style Chandelier Centerpiece

An antique-style chandelier instantly transforms your country-inspired gallery wall into a mesmerizing focal point, drawing the eye while infusing vintage elegance into the space. To enhance the rustic charm of your decor, choose a chandelier in warm, earthy tones like bronze or wrought iron. This choice not only complements your artwork but also harmonizes with the overall aesthetic.

When hanging your chandelier, aim for a height of 30-36 inches above the art pieces. This placement creates a balanced visual weight, ensuring that the chandelier enhances the gallery wall rather than overwhelming it. The soft, ambient lighting provided by the chandelier makes your artwork more inviting, highlighting textural details that might otherwise go unnoticed.

Advertisement

Opt for a chandelier with multiple bulbs to adjust the brightness according to your needs. This flexibility allows you to maintain a well-lit space that feels cozy and warm without becoming cluttered or overly bright.

String Lights for Ambiance

Drape string lights along the edges of your gallery wall to create a warm, inviting ambiance that beautifully highlights your artwork. Choosing warm white or soft yellow string lights complements the rustic tones typical of country-inspired decor, enhancing the overall design without adding clutter.

For versatility, opt for battery-operated or plug-in string lights, allowing you to arrange them creatively while fitting seamlessly into your gallery wall. If you want to adjust the mood, consider string lights with dimming options. This flexibility lets you change the ambiance based on the time of day or occasion, ensuring your space always feels right.

Additionally, think about wrapping string lights around wooden frames or art pieces. This not only adds depth and texture but also creates a cohesive look that draws attention to your gallery wall.

Decorative Elements

aesthetic design features

To truly embrace the country-inspired aesthetic, you'll want to incorporate decorative elements like a rustic ceramic vase or a woven basket filled with dried flowers.

Framed vintage farm tools can add a touch of history and charm to your gallery wall.

Advertisement

Together, these pieces create a cohesive and inviting display that reflects your personal style.

Rustic Ceramic Vase

How can rustic ceramic vases elevate your gallery wall by adding texture and a natural touch?

Incorporating rustic ceramic vases into your display creates texture and depth, enriching the visual experience. By choosing vases in varying sizes and earthy tones, like terracotta or muted greens, you can maintain a cohesive and inviting aesthetic that aligns perfectly with country-inspired decor.

Positioning these vases at different heights along the wall draws the eye upward, adding visual interest without overcrowding your space. Use them strategically to frame smaller artworks or photographs, guiding the viewer's gaze through the display. This approach provides a sense of flow and harmony while showcasing your unique style.

To enhance the organic feel of your gallery wall, consider filling the vases with dried flowers or branches. This not only adds a touch of nature but also avoids the clutter associated with live plants.

Advertisement

Woven Basket With Dried Flowers

Incorporating a woven basket filled with dried flowers instantly adds a touch of rustic charm and texture to your gallery wall. To achieve the perfect look, choose a basket made from natural materials like rattan or willow. This choice enhances the organic feel essential to country decor while maintaining a cohesive aesthetic.

When selecting dried flowers, consider options like lavender or eucalyptus. Not only do these flowers provide a beautiful pop of color, but they also evoke warmth and nostalgia, key elements in country-style interiors.

To keep your gallery wall visually interesting, position the woven basket at varying heights among your other decor elements. This approach prevents a cluttered appearance and draws the eye across the entire arrangement.

A simple twine or ribbon can be used to tie the dried flowers together, adding an extra layer of rustic charm without overwhelming the overall design. This attention to detail guarantees your gallery wall remains cohesive while still showcasing the unique elements of country decor.

Framed Vintage Farm Tools

Framed vintage farm tools, like old plows and sickles, bring a rustic charm and unique character to your country-inspired gallery wall. To showcase these pieces effectively, consider using shadow boxes or deep frames that add depth and texture, enhancing visual interest without overcrowding your space.

Advertisement

Pair your framed vintage farm tools with complementary artwork, such as farm landscapes or botanical prints, to create a cohesive narrative that celebrates rural heritage. This combination not only ties your gallery wall together but also tells a story that resonates with visitors.

When selecting frames and tools, stick to a limited color palette of natural hues—think browns, greens, and creams. This approach maintains a unified aesthetic while allowing the unique textures of each item to shine.

Flooring

home improvement flooring options

When choosing flooring for your gallery wall, consider reclaimed hardwood floor planks to create that warm, rustic vibe.

If you want a unique twist, barn-style painted concrete can add charm while remaining practical.

Distressed painted wood flooring also complements the country theme, enhancing the overall aesthetic without detracting from your artwork.

Reclaimed Hardwood Floor Planks

Sourcing reclaimed hardwood floor planks not only adds character to your space but also promotes sustainability by repurposing materials that have a rich history. These planks are typically salvaged from old buildings, barns, and warehouses, making them an eco-friendly flooring option that aligns with sustainable building practices. By choosing reclaimed hardwood, you're not just enhancing your home's aesthetic; you're also reducing waste that might otherwise end up in landfills.

Advertisement

One of the standout features of reclaimed hardwood is its unique grain patterns and color variations. Each plank tells a story, contributing to the rustic charm that defines country-inspired decor. This distinctive look can transform your space, making it feel warm and inviting.

Installing reclaimed hardwood flooring is also a smart investment. Many buyers appreciate the authenticity of vintage materials, which can increase your home's overall value. While prices may range from $5 to $15 per square foot, the timeless appeal and character of reclaimed hardwood make it a worthwhile addition to your home.

Embrace sustainability and style by incorporating these beautiful planks into your interior design.

Barn-Style Painted Concrete Floor

Building on the warm and inviting atmosphere created by reclaimed hardwood, a barn-style painted concrete floor can further enhance the rustic charm of your country-inspired gallery wall.

This type of flooring provides a textured, durable surface that beautifully complements the eclectic mix of art pieces you'll display. By choosing a color palette inspired by natural elements, such as earthy tones and muted hues, you can create a cohesive look that ties the floor together with your artwork.

Advertisement

For added visual interest, consider incorporating stencils or patterns in your painted concrete design. This not only enhances the floor's appeal but also aligns with the eclectic style of your gallery wall, ensuring a clean and organized appearance.

Opt for a matte finish to reduce glare, allowing your art to shine without distractions from reflective surfaces. Additionally, selecting a durable, slip-resistant paint is essential for functionality, especially in high-traffic areas.

With these elements in place, your barn-style painted concrete floor will serve as a stunning foundation for your country-inspired gallery wall, making it a perfect blend of style and practicality.

Distressed Painted Wood Flooring

Distressed painted wood flooring brings a warm, inviting texture to your country-inspired gallery wall, enhancing its rustic charm. This flooring type often features weathered finishes that perfectly complement vintage frames and art pieces, helping you achieve a cohesive look throughout your space.

Lighter or muted paint colors on the distressed wood can reflect light, allowing your art pieces to stand out without overwhelming the visual appeal of the room.

Advertisement

When choosing distressed wood flooring, you'll find it versatile enough to harmonize with various color palettes. This means you can easily incorporate different shades of paint or artwork while maintaining that quintessential country aesthetic.

Plus, if you're on a budget, opting for refinishing existing floors or selecting affordable laminate alternatives can give you the same distressed effect without breaking the bank.

Incorporating distressed painted wood flooring into your gallery wall design not only adds character but also creates a warm backdrop that showcases your art beautifully. By focusing on these elements, you can create a stunning, country-inspired gallery wall that feels both curated and inviting.

Conclusion

Creating a country-inspired gallery wall can be a fun way to showcase your style without feeling cluttered. By focusing on key elements, choosing essential fixtures, and incorporating the right lighting, you can maintain an inviting atmosphere.

Don't forget to add decorative elements that reflect your personality and consider the flooring to tie everything together. With these tips, you'll achieve a harmonious and charming display that feels both curated and cozy.

Advertisement

Enjoy making your space uniquely yours!

Continue Reading

Home Decor

Yes, You Can Have a Stylish Home Office With Country Charm

Join us to explore how to create a stylish home office with country charm that will inspire your productivity and elevate your workspace…

Published

on

By

stylish country charm office

Yes, you can absolutely create a stylish home office infused with country charm! Start with a muted color palette of soft greens and warm browns to set a cozy atmosphere. Incorporate natural materials like wood and stone for authenticity. Key pieces, such as an antique wooden desk and a vintage leather armchair, not only boost style but also encourage productivity. Don't forget to include charming lighting options, like wrought iron chandeliers or cozy string lights. Layering textures and curating personal decor, like framed botanical prints, completes the look. Discover how to elevate your home office further.

Key Elements

essential components overview

To create the perfect country charm in your home office, focus on the key elements of color scheme, materials, and textures.

Choosing a muted, earthy palette and incorporating natural materials will set a warm tone.

Layering different textures will add depth and comfort, making your workspace both stylish and inviting.

Color Scheme

Embracing a color palette of muted, earthy tones like soft greens and warm browns can transform your home office into a peaceful country retreat. These muted tones not only evoke the tranquility of nature but also create a soothing atmosphere conducive to productivity.

Incorporate rich colors such as deep reds and ochres to add warmth and character to the space, fostering creativity and focus. To enhance your country charm, consider floral patterns in your upholstery, curtains, or wallpaper. These patterns infuse a lively touch while maintaining a warm and inviting vibe.

Advertisement

Layering textures is essential—mix wood, stone, and natural fibers to create a cozy ambiance that reflects the English Country style. Accent pieces featuring classic plaid or gingham patterns can further enhance the rustic feel, ensuring a stylish yet cohesive look.

Materials

Natural materials like wood and stone are key to creating a home office that exudes country charm and warmth. By incorporating elements such as reclaimed wood for your desk or stone accents for your wall, you'll establish an authentic atmosphere that invites creativity and focus.

Antique furniture plays a significant role in achieving this aesthetic. A distressed wooden desk or a vintage chair not only adds character but also provides functional workspace solutions that blend seamlessly into your design. These unique pieces often tell a story, making your office feel personal and lived-in.

To complement these natural materials, consider using an earthy color palette. Deep greens and soft blues can help create a calm and focused environment, reflecting the tranquility often found in country living. This muted palette enhances the overall warmth of the space without overwhelming it.

Lastly, don't forget decorative elements like mismatched china or vintage accessories. These touches add personality to your office, ensuring it reflects your style while maintaining that charming, country feel. Embrace these materials, and you'll create a stylish home office that feels both inviting and inspiring.

Advertisement

Textures

Textures play an essential role in creating a cozy and inviting atmosphere in your country-themed home office. By incorporating natural materials like wood, stone, and brick, you can infuse your workspace with warmth and authenticity, enhancing its rustic charm.

Layered textures are vital, too. Think about adding woven rugs, linen curtains, and distressed upholstery to create visual interest and a comfortable vibe that encourages productivity.

Mixing patterns is another effective strategy. Floral and plaid designs can evoke a traditional country feel while adding depth and personality to your decor. Consider using antique furniture pieces; their unique textures and finishes can serve as focal points, providing both functionality and character to your office.

Don't shy away from variety! Combining metal accents with soft fabrics helps achieve a balanced look that reflects the inviting, lived-in essence of country decor.

Essential Fixtures and Furniture

necessary furnishings and equipment

To create a stylish home office with country charm, you'll want to focus on essential fixtures and furniture that blend comfort and functionality.

An antique wooden writing desk, a vintage leather armchair, and a charming vintage bookshelf can transform your workspace into a cozy yet productive environment.

Advertisement

Let's explore how these pieces can enhance both your productivity and aesthetic.

Antique Wooden Writing Desk

An antique wooden writing desk adds a timeless charm to your country-chic home office, blending functionality with rich historical appeal. This piece serves as a stunning centerpiece, showcasing the beauty of reclaimed wood while enhancing the rustic feel of your space. Its unique textures and intricate carvings can spark conversations, drawing attention to the craftsmanship of bygone eras.

When selecting your desk, consider its size and design, as these elements can dictate your office layout. Look for one with ample storage solutions, like drawers and compartments, to keep your office supplies organized and easily accessible. This functionality guarantees that your workspace remains tidy and efficient.

To complete the look, incorporate vintage decor around your antique wooden writing desk. A traditional lamp or framed botanical prints can elevate the country charm, creating a cohesive and inviting workspace.

Vintage Leather Armchair

A vintage leather armchair brings a touch of timeless elegance to your home office while providing the ergonomic support you need for those long working hours. Its rich texture not only enhances the cozy feel of your workspace but also complements rustic decor beautifully. This classic piece can serve as a striking focal point, drawing attention and creating a warm, inviting environment.

Advertisement

When you choose a vintage leather armchair, look for sturdy construction. Well-maintained vintage furniture often offers greater durability than modern alternatives, ensuring your investment lasts for years. Plus, the character of a vintage piece can add depth to your home office's overall design.

To elevate your stylish aesthetic, consider pairing your vintage leather armchair with sleek, contemporary elements. A modern desk or chic lighting can create a balanced look that merges old-world charm with fresh, modern touches. This harmony not only enhances the visual appeal of your workspace but also fosters creativity and productivity, making your home office a truly inspiring place to work.

Embrace the charm of a vintage leather armchair, and transform your office into a stylish retreat.

Charming Vintage Bookshelf

Embracing the allure of a charming vintage bookshelf can transform your home office into a stylish sanctuary while providing essential storage for books and decor. This piece not only serves a functional purpose but also acts as a decorative focal point, enhancing the overall aesthetic of your country-themed space.

To evoke rustic charm, consider incorporating natural materials like wood and metal in the design of your bookshelf. These elements add durability and character, making your office feel inviting.

Advertisement

Styling your charming vintage bookshelf with a mix of books, vintage decor items, and plants creates visual interest and reflects your personal style, contributing to a cozy atmosphere.

Opt for mismatched shelves or antique finds to embrace the eclectic spirit of country decor. This approach not only provides authenticity but also adds warmth to your workspace.

Just remember to keep your bookshelf well-organized to maintain a clutter-free environment, which promotes efficiency and enhances the inviting nature of your home office.

With these thoughtful touches, your charming vintage bookshelf will become a beloved centerpiece in your stylish, country-inspired workspace.

Lighting Ideas

creative illumination concepts

When it comes to lighting your stylish home office, you can really enhance that country charm with the right fixtures.

Think about incorporating an antique chandelier with candles, or wall sconces that feature vintage bulbs for a warm glow.

Advertisement

Don't forget to contemplate rustic lanterns and soft Edison bulb string lights to create a cozy, inviting atmosphere.

Antique Chandelier With Candles

Antique chandeliers with candles can transform your home office into a stylish retreat, blending vintage elegance with warm, inviting light. These stunning fixtures serve as focal points that enhance your space's country charm while providing functional lighting to keep your workspace bright and welcoming.

When choosing an antique chandelier, look for options made from materials like wrought iron or brass. These materials not only add character but also complement rustic decor styles, contributing to a cozy atmosphere that fosters creativity and productivity. The gentle flicker of candlelight creates an inviting ambiance, making your home office a place where you can feel relaxed and inspired.

It's essential to select a chandelier that fits your office's size. A larger chandelier can make a bold statement in a spacious room, while a smaller piece can elegantly accent a more compact setup.

Wall Sconces With Vintage Bulbs

Wall sconces with vintage bulbs add a touch of rustic charm to your home office, creating a warm and inviting atmosphere that enhances your workspace. These fixtures come in various designs, like wrought iron or antique brass, allowing you to harmonize them with your vintage furniture. The combination of rustic decor and vintage bulbs contributes to a cozy atmosphere, making your office feel like a retreat.

Advertisement

Using vintage-style LED bulbs helps reduce energy consumption while still providing that nostalgic glow reminiscent of traditional incandescent bulbs. Position your wall sconces at eye level or above work surfaces to guarantee you have adequate lighting for reading and writing. This strategic placement not only illuminates your tasks but also enhances the overall ambiance.

Consider incorporating dimmable options in your wall sconces to adjust the lighting to suit different moods. Whether you're in a focused work mode or winding down for the day, having control over your lighting makes a significant difference.

With the right wall sconces, you can effortlessly blend functionality and style, guaranteeing your home office remains both productive and charming.

Rustic Lanterns With Warm Glow

Adding rustic lanterns to your home office not only enhances the vintage charm established by wall sconces but also introduces a warm glow that creates an inviting workspace. You'll find various styles of rustic lanterns, including wall-mounted, hanging, and table-top options, making them versatile lighting solutions for your country decor.

Many of these lanterns feature LED bulbs designed to mimic a warm glow, which adds a cozy ambiance while remaining energy-efficient. Choosing materials like wrought iron, wood, and glass enhances their aesthetic appeal and contributes to that charming, vintage look you want in your office.

Advertisement

Consider incorporating dimmable rustic lanterns, allowing you to adjust the lighting intensity based on your needs—whether you're reading, working, or simply relaxing. This flexibility is essential for creating a space that feels comfortable and tailored to you.

Soft Edison Bulb String Lights

Transform your home office into a cozy retreat with soft Edison bulb string lights that not only illuminate the space but also enhance its rustic charm. These lights provide a warm, inviting glow perfect for creating a cozy atmosphere in your country-style home office. Available in various lengths and designs, you can easily get creative—drape them along shelves, wrap them around furniture, or hang them above your workspace to add that extra touch of charm.

The vintage aesthetic of Edison bulbs, with their exposed filaments, beautifully complements rustic decor elements like wooden furniture and floral patterns, making them an ideal choice for your office. Plus, they're energy-efficient, typically utilizing LED technology, which means you'll enjoy longevity and lower electricity costs compared to traditional incandescent bulbs.

For added versatility, consider incorporating dimmable Edison bulb string lights. This allows you to adjust brightness levels based on your tasks or moods throughout the day, ensuring your workspace is always just right. With soft Edison bulb string lights, you're one step closer to achieving that stylish, cozy haven you've always wanted.

Decorative Elements

ornamental design features

To truly capture the essence of country charm in your home office, consider incorporating decorative elements like an antique globe on a stand, a vintage porcelain vase, and framed botanical prints.

These pieces not only add character but also create a welcoming atmosphere that inspires creativity.

Advertisement

Antique Globe on a Stand

An antique globe on a stand instantly captures attention, bringing a touch of exploration and nostalgia to your home office decor. This striking decorative element complements country-style decor beautifully, adding charm and character to your workspace. When you choose a vintage globe, you're not just selecting a piece of decor; you're embracing a historical appreciation that enhances the old-world charm typical of country aesthetics.

Opting for an antique globe with a wooden stand can further elevate the warmth of your office, emphasizing natural materials that create a cozy atmosphere. Its rich textures and tones harmonize with other rustic elements, making it a perfect fit for your design scheme.

Moreover, incorporating an antique globe as a focal point inspires creativity and wanderlust. It's not just a decorative piece; it serves as a conversation starter, inviting guests to share stories of their travels or dreams of future adventures.

With various sizes and styles available, you can easily customize your choice to fit your aesthetic preferences while maintaining the overall country charm. Make this timeless piece a key element in your stylish home office, and watch how it transforms your space.

Vintage Porcelain Vase

Vintage porcelain vases add elegance and charm to your home office, enhancing its overall aesthetic with their intricate designs and warm, inviting colors. These decorative elements often feature floral patterns and muted tones that seamlessly align with the cozy atmosphere of country charm.

Advertisement

Incorporating a vintage porcelain vase filled with either fresh or dried flowers creates a stunning focal point on your desk, promoting a serene and inspiring workspace. It's not just about beauty; these vases can also reflect your personal style and history, adding character and a sense of nostalgia to your office environment.

When selecting vintage porcelain vases, consider varying heights and shapes to create a visually interesting arrangement. Mixing different styles can enhance the overall appeal and complement other decorative elements in your space.

Don't shy away from showcasing your unique finds—each vase tells a story and brings life to your home office.

Framed Botanical Print

Incorporating framed botanical prints into your home office not only brings a touch of nature indoors but also enhances the overall aesthetic, complementing the charm of vintage porcelain vases. These prints, especially those featuring muted, earthy tones, align beautifully with the country decor style, creating a serene and inviting workspace that promotes productivity.

Consider using vintage-style frames for your botanical prints. They add character and depth, enriching your interior design with an old-world charm that ties everything together. Mixing prints of varying sizes and orientations can transform a simple wall into an engaging gallery, serving as a focal point that draws the eye and adds interest to your home office.

Advertisement

Look for botanical prints sourced from local artists or vintage collections. Not only do they support craftsmanship, but they also infuse your space with a unique, personal touch. This thoughtful approach to decor will make your home office feel curated and special, reflecting your individual style while maintaining a cozy country aesthetic.

With framed botanical prints, you can effortlessly create a stylish and charming workspace that inspires creativity and focus.

Flooring

home improvement flooring options

When choosing flooring for your country-chic home office, think about options like distressed hardwood with a rich patina or reclaimed barn wood planks that bring character to the space.

Weathered stone tile flooring can also add an earthy touch while being easy to maintain.

Each choice can enhance the cozy atmosphere you're aiming for, so consider what aligns best with your overall design.

Distressed Hardwood With Rich Patina

Choosing distressed hardwood flooring with a rich patina instantly brings warmth and character to your home office, perfectly embodying the charm of country style. This type of flooring showcases natural variations in color and texture, helping to conceal everyday wear and tear, making it a practical choice for your high-traffic workspace.

Advertisement

Not only does distressed hardwood flooring enhance the rustic aesthetic of your office, but it often comes from sustainable sources, promoting eco-friendly practices. With options available in various finishes, you can select a hue that complements your existing decor—light finishes create an airy feel, while darker tones add a dramatic touch.

To further enhance your space, consider pairing the flooring with cozy area rugs, which can delineate workspaces and provide comfort underfoot. The combination of distressed hardwood and thoughtfully chosen decor will make your home office a welcoming and stylish retreat, perfect for productivity and creativity.

Embrace the charm of country style by incorporating distressed hardwood flooring, and transform your workspace into a beautiful and functional environment.

Reclaimed Barn Wood Planks

Reclaimed barn wood planks bring a unique, rustic charm to your home office, making it a standout space filled with character. Sourced from old barns and structures, these planks offer an eco-friendly flooring option that repurposes materials that would otherwise go to waste. By choosing reclaimed wood, you not only help reduce environmental impact but also add a story to your workspace.

The beauty of reclaimed barn wood lies in its varied colors, textures, and grain patterns. This allows you to create a personalized look that truly reflects your individual style. Whether you prefer a weathered appearance or a more refined finish, the options are endless.

Advertisement

Additionally, installing reclaimed barn wood flooring can enhance insulation and improve acoustics, making your workspace more comfortable and quiet.

To keep your floors looking their best, regular maintenance is essential. A simple cleaning routine with a damp cloth and occasional application of wood conditioner can help preserve its natural beauty and longevity.

Incorporating reclaimed barn wood planks into your home office not only elevates the aesthetic but also aligns with sustainable living ideals, making it a thoughtful choice.

Weathered Stone Tile Flooring

Embracing weathered stone tile flooring adds a rustic aesthetic that perfectly complements the country charm of your home office. The natural variations in color and texture of these tiles create a unique, lived-in look that enhances your workspace's character. You'll appreciate how this flooring combines beauty with practical durability, making it an ideal choice for high-traffic areas.

Weathered stone tiles are resistant to scratches, stains, and moisture, so you won't have to worry about wear and tear from daily use. Plus, if you're looking for warmth during colder months, these tiles can easily accommodate underfloor heating systems, ensuring your comfort without sacrificing style.

Advertisement

Available in various sizes and shapes, weathered stone tile flooring allows you to play around with creative layout options. You can customize your office space to reflect your personal style while maintaining that cozy, rustic vibe.

Conclusion

Incorporating country charm into your home office is easier than you think.

By focusing on key elements like essential fixtures, thoughtful lighting, and charming decorative accents, you can create a stylish and inviting workspace.

Don't forget about flooring options that enhance the overall aesthetic.

With a little creativity and attention to detail, you'll transform your office into a cozy retreat that inspires productivity and comfort.

Advertisement

So go ahead, embrace that country charm and enjoy your new stylish space!

Continue Reading

Alfresco

What Is Alfresco Living? The Ultimate Outdoor Lifestyle!

Nurture your soul with the ultimate outdoor lifestyle of alfresco living, where nature and luxury converge in perfect harmony.

Published

on

By

alfresco living lifestyle guide

Step into a world where nature seamlessly blends with comfort and style, redefining outdoor living through alfresco living. Enjoy enhanced well-being, mental health benefits, and social connections. Design elements like outdoor kitchens, dining areas, and greenery create a harmonious space. Choose durable materials, comfortable seating, and vibrant accessories for a stylish outdoor oasis. Embrace luxury with eco-friendly options like Western Red Cedar and FireRock concrete pavers. Create entertainment spaces for barbecues, stargazing, and outdoor games. Landscaping enhances ambiance, while al fresco dining experiences boost mood and social interactions. Elevate your outdoor lifestyle by blending comfort, functionality, and design.

Key Takeaways

  • Alfresco living is the ultimate outdoor lifestyle embracing nature, social connections, and well-being.
  • It includes outdoor kitchens, dining areas, lounge spaces, and greenery for a holistic outdoor experience.
  • Alfresco living promotes mental health, physical well-being, and relaxation through outdoor activities and natural surroundings.
  • Design elements like durable materials, comfortable seating, and lighting enhance alfresco living spaces.
  • Maintenance tips like regular cleaning, seasonal upkeep, and protecting outdoor features maintain the alfresco lifestyle.

Benefits of Alfresco Living

Experience the benefits of alfresco living through enhanced well-being and mental health. Outdoor living spaces offer a myriad of advantages that contribute to a healthier and more balanced lifestyle. By spending time outdoors, you engage in physical activities, bask in natural sunlight, and increase your Vitamin D intake. These elements play a vital role in reducing stress levels, enhancing mood, and promoting relaxation.

The fresh air and improved circulation in outdoor environments also lead to better air quality, creating a healthier atmosphere for both physical and mental well-being.

Moreover, alfresco living spaces provide a conducive environment for social interactions, creativity, and mental clarity. Being surrounded by nature allows you to disconnect from the hustle and bustle of indoor life, offering a tranquil retreat to rejuvenate your mind and body.

This trend towards embracing outdoor lifestyles reflects a growing appreciation for sustainable design practices and the numerous benefits that alfresco living brings to individuals seeking a holistic approach to well-being.

Design Elements and Features

design elements and features

Design elements and features in alfresco living spaces seamlessly blend luxury and functionality to create an inviting outdoor environment for relaxation and entertainment.

When it comes to outdoor kitchens, these spaces aren't just about cooking; they're a focal point for social gatherings and culinary experiences. Equipped with top-of-the-line appliances, spacious islands, and stylish dining areas, outdoor kitchens elevate the alfresco living experience.

Advertisement

These kitchens are designed with a keen eye for detail, ensuring that they not only meet practical needs but also add aesthetic value to the outdoor space.

The integration of outdoor kitchens into alfresco living areas provides a smooth shift from indoor to outdoor entertaining, allowing you to enjoy the beautiful weather while preparing and sharing meals with your guests.

With a focus on luxury and functionality, outdoor kitchens exemplify the essence of alfresco living, where every element is carefully curated to enhance your outdoor lifestyle.

Creating an Outdoor Oasis

designing a backyard paradise

To transform your outdoor space into a tranquil retreat, focus on incorporating weather-resistant furniture, plush cushions, and throws for maximum comfort.

Enhance the ambiance with string lights, solar lanterns, and candles to create a magical setting.

Adding greenery with potted plants, hanging baskets, and fresh floral arrangements will contribute to a lush atmosphere in your outdoor living area.

Advertisement

Make sure to set a well-prepared table with durable dinnerware and glassware for memorable dining experiences under the open sky.

Providing shade and comfort with umbrellas, pergolas, or fabric canopies will guarantee that your guests remain relaxed during gatherings.

Eco-Friendly Materials

eco friendly approach with materials

Consider incorporating eco-friendly materials into your alfresco living space to promote sustainability and enhance the natural appeal of your outdoor oasis.

Opting for Western Red Cedar can provide both durability and sustainability, making it a popular choice for decking and furniture.

FireRock concrete pavers, like the shade Oyster, offer eco-friendly outdoor flooring solutions due to their composition.

Dekton Quartz, known for its resistance to UV rays and extreme weather conditions, is a versatile material often used in alfresco designs.

Advertisement

Adding iron ore columns to your outdoor space not only brings elegance but also contributes to sustainability efforts.

For a sustainable option in entertainment areas, domestically sourced concrete tiles can offer style and eco-friendliness combined.

Entertainment and Relaxation Spaces

perfect for unwinding and fun

When designing your outdoor space, it's crucial to create designated entertainment areas like outdoor kitchens for hosting social gatherings with ease.

Additionally, incorporating serene lounging spots with features such as fire pits and cozy seating can offer a tranquil space for unwinding after a long day.

Outdoor Gathering Areas

Enhancing your alfresco living experience, outdoor gathering areas create inviting spaces for socializing and relaxation. These outdoor spaces are designed to facilitate social interactions and provide a relaxing environment for you and your guests.

Featuring entertainment options such as outdoor kitchens, lounge areas, and fire features, outdoor gathering areas serve as ideal settings for hosting gatherings and events. In alfresco living designs, luxury and leisure are prioritized, with the use of eco-friendly materials like Western Red Cedar and FireRock concrete pavers.

Advertisement

Entertainment hubs, including living pavilions equipped with top-of-the-line appliances and comfortable seating, cater to your socializing and unwinding needs. The attention to detail in outdoor design elements, like iron ore columns and Dekton Quartz, not only adds sophistication but also guarantees durability in these outdoor spaces.

Serene Lounging Spots

Create a tranquil oasis in your outdoor living space with serene lounging spots designed for entertainment and relaxation.

In the domain of alfresco living, these lounging areas serve as havens for residents and guests to unwind and socialize. Featuring elements like outdoor sofas, fireplaces, and even outdoor TVs, these spots are carefully curated for both leisure and entertainment purposes.

To enhance the luxury and eco-friendly appeal of these spaces, materials like Western Red Cedar and FireRock concrete pavers are often utilized. Additionally, design elements such as iron ore columns and Dekton Quartz contribute to the visual appeal and durability of the outdoor environment.

Central to this alfresco lifestyle is the living pavilion, acting as the heart of relaxation and entertainment by seamlessly blending indoor and outdoor living spaces.

Advertisement

With a focus on creating a serene atmosphere for lounging, alfresco living spaces offer a perfect balance of comfort and entertainment for all to enjoy.

Integrating Indoor and Outdoor Spaces

blending indoor and outdoor

When considering the integration of indoor and outdoor spaces in alfresco living, one must prioritize current design trends.

By blending indoor elements with outdoor environments, you can achieve seamless living spaces that promote a functional and cohesive lifestyle.

These outdoor extensions not only enhance the overall flow of your property but also cater to the modern preference for open, airy, and multifunctional living environments.

Indoor-Outdoor Design Trends

To seamlessly blend indoor and outdoor spaces, focus on utilizing sliding glass doors and open floor plans in your design. Incorporating these elements helps blur the boundaries between your indoor and outdoor areas, creating a cohesive living experience. By maximizing natural light, ventilation, and views, modern architectural designs merge indoor and outdoor spaces to enhance connectivity to nature and promote a contemporary lifestyle. Similar flooring materials, color palettes, and design elements can be used to establish a harmonious flow between the two spaces. Check out the table below for some key elements of indoor-outdoor design trends:

Indoor-Outdoor Design Trends
Sliding glass doors
Open floor plans
Similar flooring materials
Harmonious color palettes

These trends not only create a sense of spaciousness but also provide an opportunity to enjoy the outdoors while being indoors.

Advertisement

Seamless Living Spaces

Integrating your indoor and outdoor spaces seamlessly in alfresco living fosters a unified living experience that blurs the distinction between the two areas. This design concept aims to create a cohesive environment where your living spaces flow effortlessly from inside to outside, enhancing the overall functionality and appeal of your home.

By incorporating features like large sliding glass doors, outdoor kitchens, and comfortable lounge areas, the connectivity between your indoor and outdoor living spaces is heightened, providing a versatile setting for relaxation and entertainment.

The goal of seamless living spaces in alfresco living is to facilitate a smooth shift between indoor comforts and outdoor elements, catering to modern lifestyles that value fluidity and integration in their living spaces. This design approach not only enhances the aesthetic appeal of your home but also promotes a lifestyle where the boundaries between indoor and outdoor living are blurred, creating a harmonious and enjoyable living experience.

Functional Outdoor Extensions

Functional outdoor extensions seamlessly blend indoor and outdoor spaces to enhance your living experience with a harmonious connection between the interior and exterior areas. By incorporating elements like sliding doors, open layouts, and matching flooring, these extensions create a smooth shift, making the space feel cohesive.

An outdoor kitchen, a popular feature in such extensions, not only adds functionality but also offers a versatile and convenient cooking space. These extensions not only enhance the overall usability of a property but also provide opportunities for expanded living and entertaining spaces, perfectly suited for enjoying the alfresco lifestyle.

Advertisement

With the integration of an outdoor kitchen, you can effortlessly entertain guests while enjoying the fresh air and natural surroundings, creating a seamless experience that blurs the lines between indoor comfort and outdoor freedom. Explore the possibilities of functional outdoor extensions to elevate your outdoor living experience.

The Role of Landscaping

enhancing outdoor spaces creatively

Landscaping's pivotal role in creating an inviting outdoor space can't be overstated. When it comes to alfresco dining, the design and maintenance of the natural elements in your outdoor area are essential. A well-thought-out landscaping plan can greatly enhance the aesthetics, functionality, and value of your outdoor space.

By incorporating elements such as plants, trees, hardscaping, and water features, you can create a harmonious environment that complements your alfresco dining experience.

Proper landscaping not only improves the curb appeal of your property but also sets the stage for enjoyable outdoor dining. Imagine dining under a canopy of lush trees, surrounded by beautifully manicured gardens, and the soothing sound of a water feature nearby.

These elements not only create a visually appealing setting but also contribute to the overall ambiance and comfort of your alfresco dining area. So, when planning your outdoor space, remember that landscaping is key to achieving the ultimate alfresco dining experience.

Al Fresco Dining Experiences

outdoor dining adventures await

When it comes to alfresco dining experiences, consider the benefits of enjoying meals outdoors. Setting up the right ambiance can enhance your dining experience greatly.

To make the most of your outdoor dining, meal planning tips can help you prepare and savor delicious food in the fresh air.

Advertisement

Outdoor Dining Benefits

Enhance your dining experience by embracing alfresco dining, which brings a multitude of benefits to both your physical and mental well-being. Outdoor dining not only promotes social interactions but also enhances meal experiences with stunning outdoor views. It increases well-being by providing Vitamin D intake and encouraging physical activity. Enjoying meals outdoors can reduce stress levels, boost mood, and improve mental clarity. Incorporating alfresco dining into lifestyle routines enhances relaxation, creativity, and focus. Outdoor dining offers the opportunity for physical exercise and improved air quality while fostering social connections.

Benefits of Outdoor Dining
Promotes social interactions Enhances meal experiences with outdoor views Increases well-being through Vitamin D intake
Encourages physical activity Reduces stress levels and boosts mood Improves mental clarity
Enhances relaxation and focus Offers opportunities for physical exercise Fosters social connections

Setting up Ambiance

Transform your outdoor dining space with cozy lighting and stylish decor to create an inviting ambiance for al fresco dining experiences. By paying attention to detail, you can elevate your outdoor dining area into a charming retreat.

Incorporate string lights, solar lanterns, and candles strategically to set the mood as the sun sets, enhancing the importance and ambiance of your surroundings. These lighting choices play a crucial role in creating a magical atmosphere for your al fresco dining experience.

Additionally, stylish dinnerware and glassware can add sophistication to your table setting, elevating the overall dining experience. Don't forget the practical elements, such as portable coolers to keep your drinks chilled and essential during your outdoor meals.

With the right ambiance, you can turn a simple outdoor meal into a memorable dining experience under the open sky.

Advertisement

Meal Planning Tips

To enhance your alfresco dining experience, consider planning a diverse menu featuring grilled meats, fresh salads, and seasonal fruits. Al Fresco Living entails creating a culinary journey that complements the outdoor ambiance.

Incorporate portable coolers and insulated containers to guarantee your beverages and food remain chilled throughout the meal. Opt for durable and chic outdoor dinnerware and glassware to elevate your dining experience with style and functionality.

When meal planning, think about creating a welcoming atmosphere by setting up stylish table settings, including tablecloths, napkins, and centerpieces that resonate with the natural surroundings.

Additionally, enhance the dining area with comfortable seating options such as outdoor chairs or benches to provide a cozy and inviting space for your guests to enjoy their meal.

Tips for Stylish Outdoor Decor

enhancing outdoor spaces creatively

Create a charming outdoor ambiance by incorporating string lights, solar lanterns, and candles into your decor. For comfortable and stylish outdoor furniture, opt for pieces that are weather-resistant with plush cushions and throws. This not only adds a cozy touch but also guarantees durability against the elements.

To further enhance the outdoor space, consider a mix of potted plants, hanging baskets, and fresh floral arrangements to bring a natural element to your decor.

Advertisement

When setting up for outdoor dining, aim to create an inviting atmosphere by arranging a well-prepared table with durable dinnerware and glassware. Additionally, provide shade and comfort for your guests by incorporating umbrellas, pergolas, or fabric canopies into your outdoor setup. These elements won't only add a touch of elegance but also ensure the comfort of your guests during outdoor gatherings.

Embracing the Outdoor Lifestyle

living in harmony with nature

Enhancing your outdoor lifestyle involves seamlessly blending comfort, functionality, and design to create inviting spaces for relaxation and socialization. When embracing the outdoor lifestyle, consider these key elements:

  1. Outdoor Hot Tub: A luxurious addition to your alfresco living space, a hot tub provides a perfect spot for unwinding after a long day and enjoying the outdoors in all seasons.
  2. Alfresco Dining Area: Set up a cozy dining space outdoors where you can enjoy meals with family and friends while soaking in the fresh air and beautiful surroundings.
  3. Lounge Space: Create a comfortable lounge area with stylish outdoor furniture, cushions, and perhaps a fire pit to gather around, fostering a welcoming atmosphere for socializing and relaxation.

Incorporating these elements into your outdoor living space won't only enhance your lifestyle but also promote well-being, social connections, and a deeper appreciation for the great outdoors.

Frequently Asked Questions

What Does Alfresco Living Mean?

Alfresco living means enjoying meals, relaxation, and socializing outdoors. It connects you with nature and fresh air, promoting well-being. Outdoor kitchens, cozy seating, and ambient lighting are essential for creating inviting alfresco living spaces that enhance your lifestyle.

What Does an Alfresco Mean?

So, you're wondering what an alfresco means? Well, get ready to dine, relax, and enjoy the great outdoors! Alfresco living is all about savoring nature, socializing, and feeling refreshed in the open air.

Conclusion

You have now discovered the ultimate outdoor lifestyle known as alfresco living. Embrace the beauty of nature, entertain guests in style, and create your own outdoor oasis.

Remember, the key to truly enjoying alfresco living is to make the most of your outdoor space. So go ahead, step outside and bask in the joys of alfresco living – the ultimate way to connect with nature and elevate your outdoor experience.

Advertisement

Continue Reading
Advertisement
Advertisement

Affiliate disclaimer

As an affiliate, we may earn a commission from qualifying purchases. We get commissions for purchases made through links on this website from Amazon and other third parties.

Vetted

fake fireplace for coziness fake fireplace for coziness
Vetted3 weeks ago

15 Best Fake Fireplace Options to Create Cozy Ambiance in Your Home

Flickering flames and cozy warmth await in these 15 top fake fireplace options - find your perfect match for a...

battle born batteries review battle born batteries review
Vetted1 month ago

Battle Born Batteries Review: Reliable Power Solution

Power up your adventures with Battle Born Batteries' robust 12V 270Ah 8D Lithium-Ion battery - the key to lasting power...

layer 3 managed switch layer 3 managed switch
Vetted1 month ago

D-Link Switch Review: Lite Layer 3 Managed Networking

Hunting for a reliable networking solution with advanced features? Delve into the D-Link Lite Layer 3 Managed switch review for...

vintage tissot chronograph review vintage tissot chronograph review
Vetted1 month ago

Tissot Heritage 1973 Review: Vintage Chronograph Insight

Fusing vintage charm with modern functionality, the Tissot Heritage 1973 chronograph offers timeless style and sporty appeal - a must-read...

jet bandsaw power review jet bandsaw power review
Vetted1 month ago

Jet Bandsaw Review: Powerful Cutting Performance

Harness the exceptional power of Jet Bandsaw for precise cuts and versatile blade options, elevating your cutting experience to new...

high performance gaming pc review high performance gaming pc review
Vetted1 month ago

Corsair Vengeance A7300 Review: Ultimate Gaming PC Choice

Yearning for the ultimate gaming experience? Discover why the Corsair Vengeance A7300 is the top choice for gamers seeking power...

water filter system details water filter system details
Vetted1 month ago

Aquasana Whole House Water Filter System Review

Keen to transform your water quality? Dive into the Aquasana Whole House Water Filter System review for a game-changing solution.

bathtub review for woodbridge bathtub review for woodbridge
Vetted1 month ago

WOODBRIDGE BJ300 Bathtub Review

Discover the luxurious WOODBRIDGE BJ300 Bathtub with customizable jets, chromotherapy lights, and therapeutic benefits—perfect for a spa-like experience that will...

electric bike review details electric bike review details
Vetted1 month ago

Hover-1 Altai Pro Review: Speedy Electric Bike Experience

Blast through city streets with the Hover-1 Altai Pro electric bike, hitting speeds of 28 mph and offering a thrilling...

electric scooter performance review electric scooter performance review
Vetted1 month ago

Hover-1 Altai Pro Review: Speed and Comfort

Hover-1 Altai Pro electric scooter offers a blend of speed and comfort, perfect for thrill-seekers seeking an exhilarating ride -...

truck bed cover analysis truck bed cover analysis
Vetted1 month ago

RealTruck RetraxPRO XR Review: Pros, Cons, Installation

Curious about the RealTruck RetraxPRO XR? Discover the strength, security, and ease of installation in this comprehensive review.

premium retractable tonneau cover premium retractable tonneau cover
Vetted1 month ago

Retrax RetraxPRO XR Review: Top Tonneau Cover Choice

Why is the Retrax RetraxPRO XR the ultimate tonneau cover choice?

Advertisement

Trending