Connect with us

Home Decor

Step-by-Step Christmas Bottle Decoration DIY

Delve into the world of festive crafting and discover the simple yet stunning steps to transform an ordinary bottle into a dazzling Christmas decoration.

Published

on

christmas bottle decoration tutorial

Get ready to create a stunning Christmas bottle decoration that showcases your personal style! Start by gathering essential materials and tools, including a clean glass bottle, acrylic paint, and festive embellishments like glitter, sequins, or ribbons. Prepare and clean the bottle, then paint it with festive colors, experimenting with techniques like stippling, blending, or layering. Add sparkle with glitter accents, and embellish with ribbons and bows that match your holiday theme. As you continue, you'll discover more creative ways to personalize your decoration and make it truly special.

Key Takeaways

• Gather materials like clean glass bottles, acrylic paint, and embellishments to create a festive Christmas decoration.

• Clean and prepare the bottle by scrubbing, rinsing, and drying it to remove soap residue and sticky labels.

• Use acrylic paint to add festive colors and designs, applying smooth, even strokes and letting each coat dry before adding more layers.

• Add sparkle with glitter accents by applying craft glue, sprinkling glitter, and sealing with clear sealant spray for a festive touch.

Advertisement

• Embellish the bottle with ribbons, bows, beads, and small decorative elements to personalize and reflect your unique style.

Gather Essential Materials and Tools

Gather all the necessary materials and tools, including a clean glass bottle, acrylic paint, paint brushes, a pencil, and a design template, to create a festive Christmas-themed decoration. Having these essentials nearby will guarantee a smooth and enjoyable creative process.

Don't forget to choose festive colors like red, green, gold, and silver to get into the holiday spirit. Additionally, consider having a protective surface to work on, such as a tablecloth or newspaper, to avoid paint spills and stains.

If you want to add extra flair to your bottle decoration, gather any additional embellishments like glitter, sequins, or ribbons. Having a clear idea of the design you want to paint on the bottle will also help guide your creative process and make the project more enjoyable.

With all your materials and tools in place, you'll be prepared to bring your Christmas-themed decoration to life.

Advertisement

Prepare and Clean the Bottles

prepare bottles for use

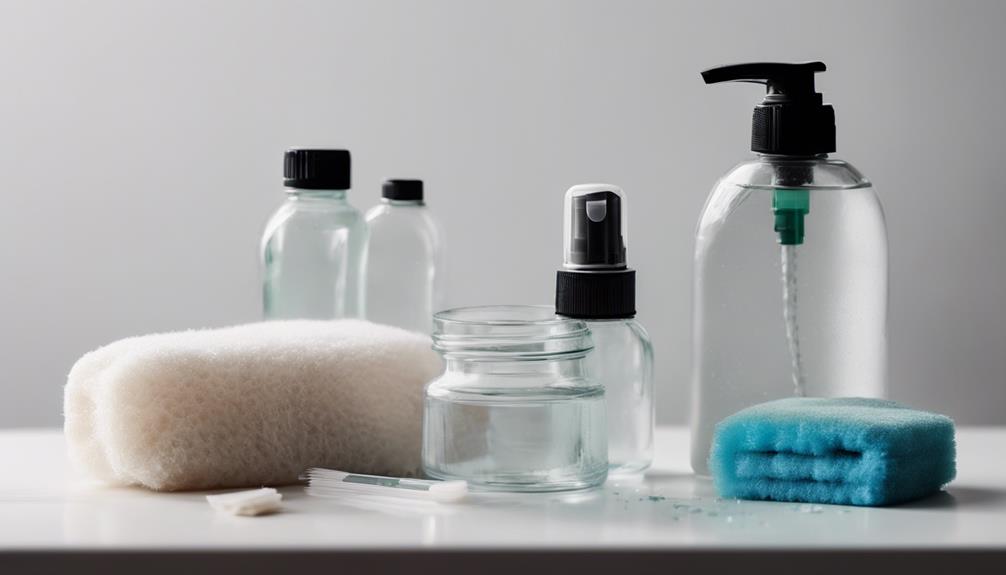
Now that you've gathered all the necessary materials and tools, it's time to prepare and clean the bottles.

You'll want to thoroughly clean the bottles to remove any dirt, residue, or labels that might impact the decoration process. By doing so, you'll guarantee a smooth surface for painting and decorating, and a beautiful finish for your Christmas bottle decoration.

Clean the Bottles Thoroughly

You'll want to start by scrubbing your bottles with warm soapy water and a bottle brush to remove any dirt, residue, or labels. This important cleaning is essential to guarantee a smooth surface for decoration.

Next, rinse the bottles well with clean water to remove all soap residue, which could impact the adhesion of your decorative materials. After rinsing, allow the bottles to completely dry, either air-drying them or gently patting them dry with a soft cloth. This step is vital, as any remaining moisture could cause water spots or streaks on the surface.

Take a close look at your bottles, checking for any remaining labels or sticky residue. If you find any, use a solvent like rubbing alcohol or vinegar to remove them completely.

Remove Labels and Residue

Remove labels from your bottles by soaking them in warm, soapy water or using a label remover solution to loosen the adhesive. This step is important in preparing your bottles for decoration.

Advertisement

After soaking, gently peel off the labels, and you'll likely be left with some sticky residue. Don't worry, this is easily removable. Mix equal parts baking soda and cooking oil to create a paste, and use it to scrub off the residue. Be gentle, as you don't want to scratch your bottles.

Once you've removed the residue, rinse your bottles thoroughly with water to make sure all traces of labels and residue are completely removed. This step is essential, as any remaining residue can affect the adhesion of your decorations.

Let the bottles dry completely before moving on to the next step in the Christmas bottle decoration DIY process. By following these steps, you'll be left with clean, smooth bottles, ready for decorating.

Soak and Rinse Well

Fill a large container with warm, soapy water, and submerge your empty bottles, letting them soak for a while to loosen any labels or sticky residue. This step is important in preparing your bottles for decoration. As you soak the bottles, the warm water and soap will help break down any stubborn labels or residue, making it easier to remove them later.

After soaking, use a bottle brush to clean the inside of the bottles thoroughly. This will guarantee that any remaining residue or debris is removed, leaving a smooth surface for painting or decorating.

Advertisement

Once you've cleaned the inside, rinse the bottles well with clean water to make sure no soap residue remains. You want to ensure that the bottles are completely clean and free of any soap residue, as this can affect the adhesion of your decorative materials.

Paint the Bottles With Festive Colors

decorate bottles with paint

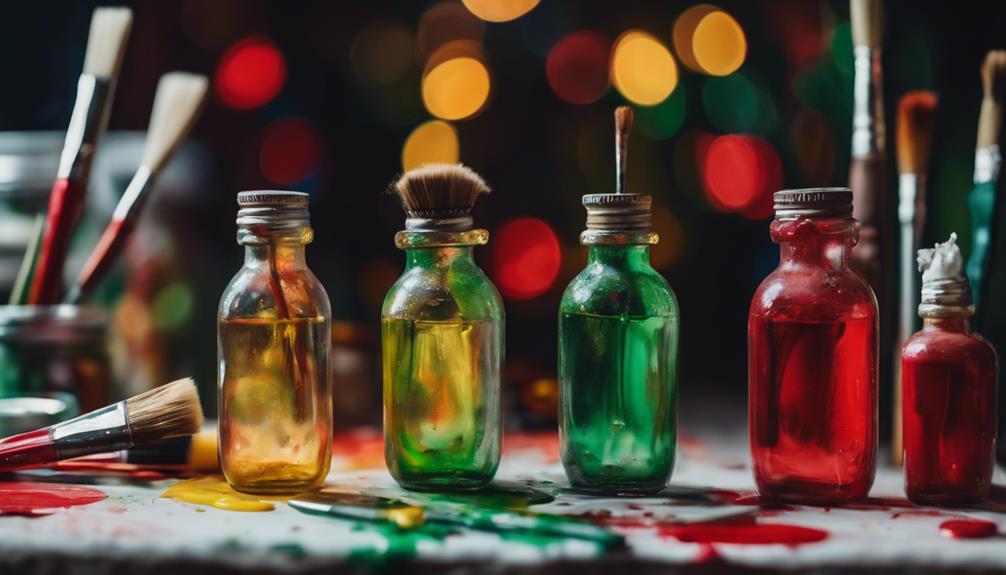
As you begin to paint the bottles, you'll need to ponder on a color scheme that captures the festive spirit of Christmas. Will you opt for traditional red and green, or add some glamour with gold or silver?

When it comes to painting techniques, you'll want to contemplate the finish and texture you're aiming for, as well as the best ways to add some extra sparkle to your design.

Color Scheme Inspiration

With a dash of creativity, you can transform plain bottles into festive decorations by painting them with traditional Christmas colors that evoke the spirit of the season. Red, green, and gold are classic choices, but don't be afraid to experiment with different shades and combinations to create a unique look. Consider adding a touch of sparkle with metallic or glitter paints, or use painter's tape or stencils to create geometric patterns or stripes for a modern twist.

Here are some color scheme ideas to get you started:

| Color Scheme | Description | Inspiration

Advertisement

| — | — | —

| Classic Christmas | Red, Green, Gold | Traditional holiday colors

| Winter Wonderland | Blues, Whites, Silvers | Frosty winter nights

| Vintage Glam | Reds, Golds, Creams | Elegant holiday decor

| Modern Merry | Greens, Reds, Neutrals | Contemporary holiday style

Advertisement

| Sparkling Snowflake | Blues, Silvers, Whites | Delicate winter wonderland

Painting Techniques

Now that you've chosen your color scheme, it's time to bring your bottles to life by applying acrylic paint in festive hues. Use a sponge or brush to apply the paint in smooth, even strokes, covering the entire surface of the bottles. Remember to let each coat dry completely before adding additional layers to achieve the desired opacity and vibrancy.

Don't be afraid to experiment with different painting techniques, such as stippling, blending, or layering, to create unique designs and patterns on the bottles. You can add details like snowflakes, holly leaves, or glitter accents with a fine brush or paint pen to enhance the festive decorations. Consider layering different colors to achieve a sense of depth and dimension.

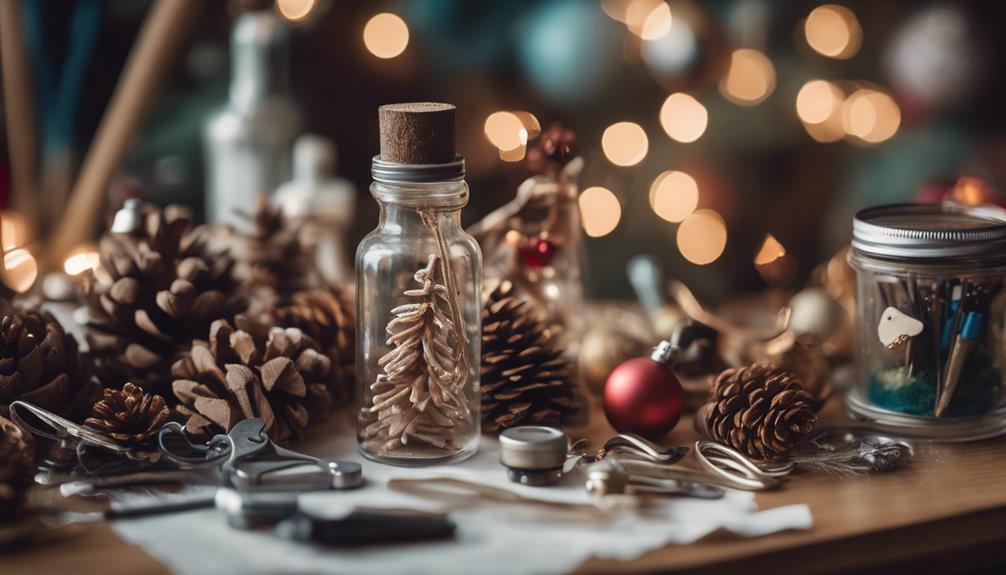
Add Sparkle With Glitter Accents

enhance d cor with glitter

You can add a dash of festive flair to your Christmas bottle decoration by incorporating glitter accents that catch the eye. To achieve this, grab a small paintbrush and apply craft glue in a design on the bottle where you want the glitter accents. Make sure to sprinkle glitter over the glue design, covering all the glue evenly. Gently tap the excess glitter off the bottle and let it dry completely before moving on to the next step.

Here's a breakdown of the glitter accent process:

Step Action Result
1 Apply craft glue Glue design on the bottle
2 Sprinkle glitter Glitter covers the glue design
3 Tap off excess glitter Excess glitter removed, design visible

To set the glitter in place, apply a thin layer of clear sealant spray over the glitter design on the bottle. This will make certain that your sparkling accents stay in place. With these glitter accents, your Christmas bottle decoration will shine brighter than ever, adding a festive and sparkling touch to your holiday decor.

Advertisement

Embellish With Ribbons and Bows

decorate with colorful details

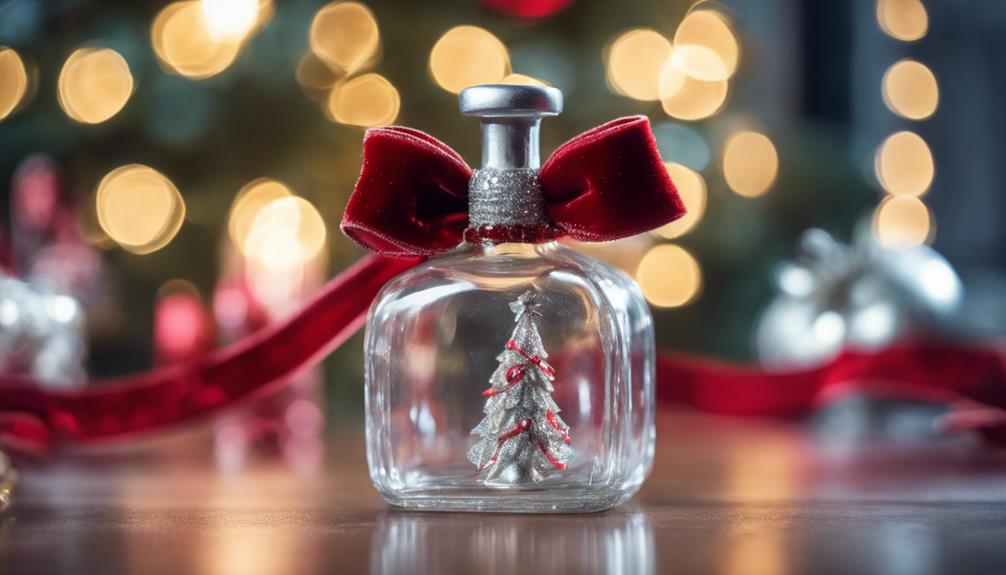
Add a touch of elegance to your Christmas bottle decoration by selecting festive ribbons and bows that match your holiday theme. This won't only add a pop of color but also create a cohesive look.

When choosing your ribbons and bows, consider the colors and textures that will complement your bottle's design. Secure the ribbons and bows to the bottle using glue or double-sided tape for a polished look.

To add some visual interest, mix and match different ribbon widths and textures. You can also experiment with layering ribbons and bows to create a unique and eye-catching design. For an elegant finishing touch, create a bow at the neck of the bottle.

Don't be afraid to get creative and try out different combinations – after all, it's all about having fun and making your decoration truly special.

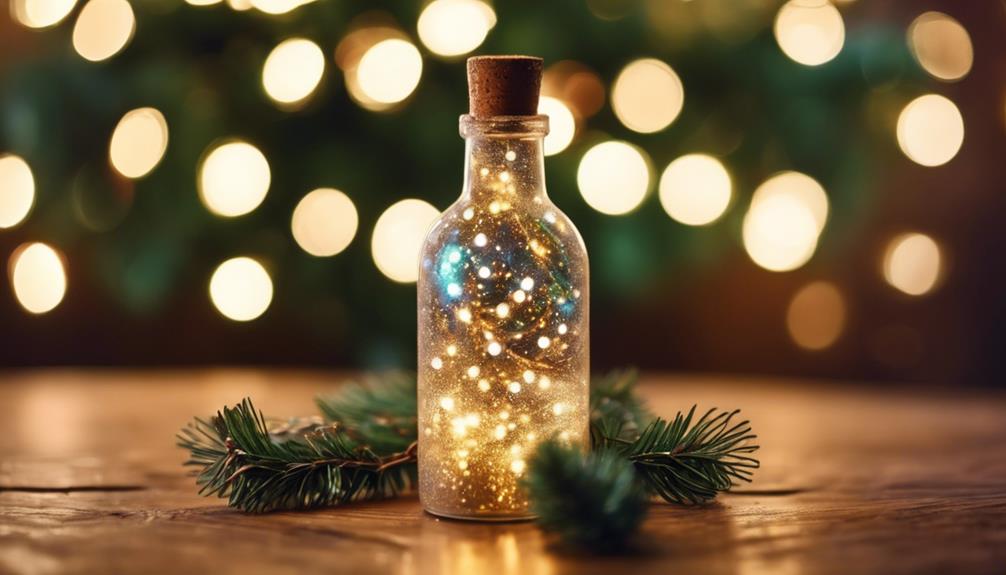
Final Touches and Display

perfecting the exhibition setup

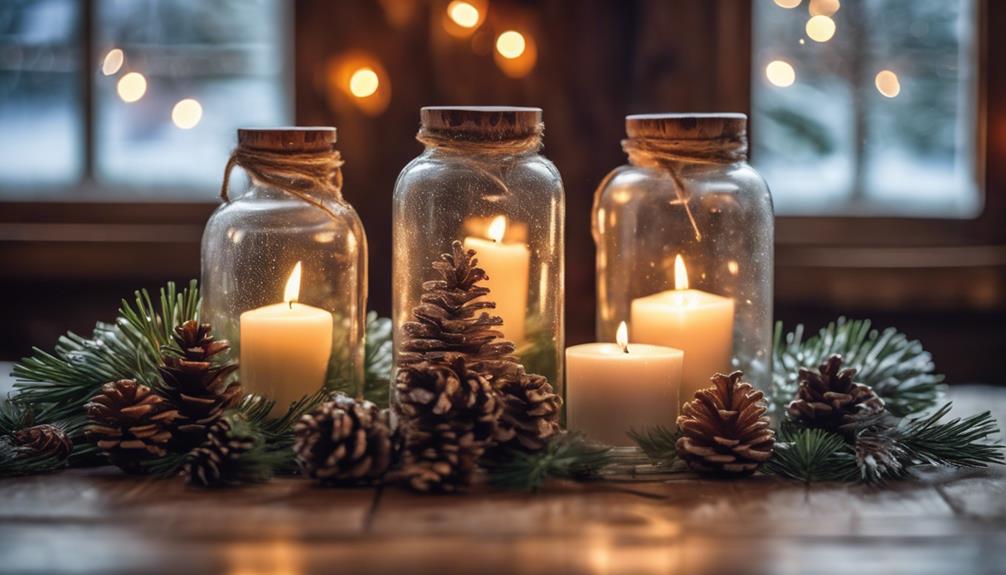
Finish your Christmas bottle decoration with a flourish by placing a festive ribbon or bow at the top, and then decide how you'll display your masterpiece. You've worked hard to create a beautiful, unique piece, and now it's time to show it off.

Consider placing your decorated bottle on a mantle, table, or shelf where it can be admired by all. To add an extra touch of magic, try placing battery-operated LED lights inside the bottle to create a warm, inviting glow.

You can also personalize your display by adding small ornaments, pine cones, or faux snow around the bottle. Feel free to experiment with different colored lights or embellishments to match your Christmas decor theme.

Advertisement

Frequently Asked Questions

How to Decorate a Glass Bottle for Christmas?

To decorate a glass bottle for Christmas, you'll start by giving it a thorough cleaning to remove any dust or residue.

Then, get creative with acrylic paint, glitter, and ribbons to create a festive design.

Consider adding a coat of varnish to protect your masterpiece.

You can also add a magical touch by inserting fairy lights or LED candles inside the bottle.

How to Decorate Plastic Bottles for Christmas?

You're looking to decorate plastic bottles for Christmas, a fun and eco-friendly way to get into the holiday spirit.

Advertisement

To start, gather clean plastic bottles of various sizes and cut them into festive shapes like snowflakes or trees using scissors or a craft knife.

Then, paint them with vibrant colors and add embellishments like glitter, sequins, or ribbons to give them a merry touch.

How to Decorate Clear Glass Bottles?

You're looking to decorate clear glass bottles for Christmas, and you're wondering where to start.

First, give those bottles a good cleaning with soap and water to remove any dirt or residue.

Then, apply a base coat of white or light-colored paint to create a smooth surface for decorating. This will guarantee your decorations stick and look their best.

Advertisement

What Materials Do You Need to Decorate a Bottle?

As you start on your creative journey, you'll need a few essentials to transform a plain bottle into a festive masterpiece.

Gather a clean glass bottle, acrylic paint, paintbrushes, glitter, glue, and decorative ribbons. Consider adding stickers, sequins, or beads to give your design an extra sparkle.

Don't forget a primer for better paint adhesion and a sealer to protect your handiwork.

With these materials, you'll be well on your way to crafting a stunning Christmas decoration.

Conclusion

You've successfully transformed plain bottles into stunning Christmas decorations! According to the National Retail Federation, 62% of Americans decorate their homes for the holiday season. Your handiwork is now part of this festive tradition.

Advertisement

Display your creations proudly, knowing you've added a personal touch to your holiday decor. With these DIY decorations, you've not only saved money but also infused your space with a unique, homemade charm.

Continue Reading
Advertisement

Home Decor

Diy Burlap Lamp Shade

Transform your space with a unique, rustic lamp shade made from burlap fabric, and discover the easy DIY steps to create it.

Published

on

By

crafting with burlap fabric

We're about to create a unique and rustic DIY burlap lamp shade that not only adds warmth and character to any room but also offers a cost-effective alternative to expensive store-bought options. By gathering essential supplies like burlap fabric, spray adhesive, and a glue gun, we can customize our lamp shade with binding colors and designs that reflect our personal style. With accurate measurements and cutting, we can guarantee a snug and tailored fit. As we assemble the lamp shade, we'll explore various techniques for attaching the burlap fabric, adding decorative trims, and securing the shade to the base. Now, let's get started and uncover the steps to craft a beautiful, one-of-a-kind lamp shade that adds a touch of rustic charm to our home.

Key Takeaways

• Gather essential supplies, including a lamp shade, burlap fabric, spray adhesive, Heat n Bond, and a glue gun, to create a unique DIY burlap lamp shade.

• Measure the lamp shade accurately, adding a few inches for a tailored fit, and cut the burlap fabric precisely for a polished appearance.

• Attach the burlap fabric to the lamp shade frame using a strong adhesive or stitching method, and secure the edges with Heat n Bond and a glue gun.

• Add decorative embellishments, such as trim, fabric rosettes, or jeweled pins, to enhance the lamp shade's style and reflect personal taste.

Advertisement

• Secure the lamp shade to the base using a lamp harp and finial, ensuring a snug and centered fit, and test the lamp for proper functionality.

Gathering Materials and Supplies

We'll need a solid color lamp shade as the base for our DIY burlap lamp shade project, so grab one that fits your desired size and shape. This will provide a sturdy foundation for our burlap creation.

Next, we'll need to gather the essential supplies, including burlap fabric, spray adhesive, Heat n Bond, and a trusty glue gun. The amount of burlap needed will depend on the size of our lamp shade, but a general rule of thumb is to have 1-2 yards on hand, with more needed for larger shades. Having these materials ready will guarantee a smooth and successful project.

With our supplies in order, we can start thinking about customizing our lamp shade with binding colors and designs that reflect our personal style. By taking on this DIY project, we can enjoy significant cost savings compared to buying a similar lamp shade at a retail store.

Measuring and Cutting Burlap Fabric

crafting with burlap fabric

Measuring and cutting burlap fabric accurately is essential, so we carefully measure our lamp shade, taking note of its dimensions and adding a few inches to our calculations to guarantee a snug, tailored fit.

We understand that precision is key in this step, as it directly impacts the overall appearance of our DIY lamp shade. To guarantee a seamless and professional-looking cover, we take our time to measure twice and cut once.

Advertisement

When cutting the burlap fabric, we use a clever trick: we pull out a thread along the desired cutting line, creating a straight edge for a clean finish. This technique allows us to achieve a precise cut, which is crucial for a polished finish.

Assembling the Lamp Shade

putting together a lamp

Now that we've successfully measured and cut our burlap fabric, it's time to bring our lamp shade to life by assembling the various components.

We'll start by shaping the frame to provide a sturdy base for our shade, then carefully attach the burlap fabric using a strong adhesive or stitching method.

Shaping the Frame

As we assemble the lamp shade, shaping the frame is the essential first step that sets the tone for the entire project. We're not just creating a lamp shade, we're building a foundation that will support the entire structure.

Proper frame shaping is important for guaranteeing the lamp shade fits securely on the lamp base. We need to adjust the frame to accommodate different types of lamp bases and lamp shade styles. This process involves bending, molding, and securing the frame to achieve a balanced and visually appealing design.

Attaching the Burlap

We're prepared to bring our lamp shade to life by attaching the burlap fabric. This won't only add texture and visual interest but also tie the entire design together. To guarantee a secure and even application, we'll use a spray adhesive to attach the burlap fabric to the lampshade.

Advertisement

For a polished look, we can use Heat n Bond to create a finished edge on the burlap fabric.

Here are a few tips to keep in mind when attaching the burlap:

  • Secure the binding to the top and bottom edges of the lampshade using a glue gun for a neat and professional finish.
  • Consider using bias tape for a different binding look, adding a unique touch to the burlap lampshade design.
  • Customize the binding color to match your decor scheme, such as brown or cream, for a cohesive and stylish look.

Adding the Trim

With our burlap fabric securely in place, we'll elevate our lamp shade's style by adding a decorative trim that complements its rustic charm. We love how trim can transform the overall look of our DIY project, and we're excited to share our process with you.

When choosing a trim, we recommend selecting a style that complements the burlap fabric, such as ribbon, lace, or decorative braiding. To attach the trim, we'll use fabric glue or a glue gun to securely fasten it to the top and bottom edges of the lamp shade.

This won't only add a decorative touch but also help cover any imperfections in the fabric edges, creating a seamless look. We can experiment with different trim styles and widths to achieve the desired aesthetic for our burlap lamp shade.

Adding Decorative Embellishments

enhancing with ornamental details

We can take our burlap lamp shade to the next level by adding decorative embellishments that reflect our personal style. This is where we can get creative and make our lamp shade truly unique. By incorporating decorative elements, we can add a touch of elegance or whimsy to our DIY project.

Here are some ideas to get us started:

Advertisement
  • Fabric rosettes or jeweled pins can add a touch of glamour to our lamp shade
  • A monogram or personalized message can create a special and meaningful piece
  • Utilizing the burlap's hemmed edge on the bottom of the shade can provide a clean and finished appearance

When customizing our lamp shade with embellishments, we can experiment with different trims and decorative elements to enhance the overall design. Through affiliate links, we can find a wide range of materials and inspiration to help us customize our lamp shade.

Attaching the Shade to Base

assembly instructions for lamp

As we progress with attaching the shade to the base, we'll need to focus on securing the shade properly to guarantee a sturdy and stable lamp.

We'll use a combination of glue gun or fabric glue to attach the burlap-covered shade to the lamp base, making sure it's centered and straight before securing it in place.

Securing the Shade

We'll secure the lampshade to the base using a lamp harp and finial, guaranteeing a sturdy and stylish attachment. Before we start, we'll double-check that the lampshade fits snugly on the base. A little rotation will help us find the perfect position, making sure it sits straight and securely.

Here are some key steps to keep in mind:

  • Rotate the lampshade to guarantee it's properly aligned on the base
  • Adjust the harp's height to position the lampshade correctly
  • Tighten the finial to hold the lampshade firmly in place

Final Assembly Steps

Now that our lampshade is securely covered in burlap, it's time to attach it to the base, guaranteeing a sturdy and stylish final assembly. To do this, we'll use a glue gun to firmly attach the lampshade to the base.

Before applying the glue, we'll make sure the lampshade is centered and straight to avoid any unevenness. Once the glue is applied, we'll double-check that the lampshade is securely attached to prevent any accidents.

Next, we'll test the lamp to confirm it functions properly before placing it in its final location.

Advertisement

This DIY burlap lamp shade is almost complete, and we can't wait to enjoy the rustic and stylish lighting addition to our home.

As a reminder, 'a DIY burlap lamp shade is a great way to add a touch of rustic charm to any room' (DIY Home Decor).

With our glue gun and some patience, we'll have a beautifully crafted lamp shade that's both functional and aesthetically pleasing.

Finishing Touches and Display

perfecting the final details

We're putting the final flourishes on our burlap lamp shade, and that means it's time to add those special touches that make it truly one-of-a-kind.

Now that our shade is assembled, we can focus on the finishing touches that will give it a custom look.

Here are a few ideas to get you started:

Advertisement
  • Add a fabric rosette or jeweled pin to give your shade a touch of elegance
  • Experiment with different trims to create a unique design that reflects your personal style
  • Consider adding a monogram for a personal touch that makes your lamp shade truly one-of-a-kind.

Frequently Asked Questions

What Is the Best Fabric to Cover a Lampshade?

We're deciding on the best fabric to cover a lampshade – it depends on the vibe we want. For rustic, we'd choose burlap or linen, while cotton offers a softer look, and velvet or silk add luxury and sophistication.

Can You Make a Lampshade Out of Any Fabric?

We're wondering if we can make a lampshade out of any fabric, and the answer is yes, as long as it's heat-resistant and allows light to pass through.

What Can I Use as a Temporary Lamp Shade?

"Like a ray of sunshine, temporary solutions brighten up our lives! We can repurpose paper, fabric, or even a basket as a makeshift lamp shade – a quick fix for our lighting needs."

What Can I Use to Make a Lamp Shade?

We're considering various materials to make a lamp shade, and we think paper, fabric, or even recycled materials like old maps or book pages could work well, depending on the desired look and ambiance.

Conclusion

As we step back to admire our handiwork, the burlap lamp shade radiates a warm, earthy glow, reminiscent of a rustic country cottage. Like a master weaver, we've intertwined threads of creativity and practicality, crafting a unique piece that illuminates not only a room, but also our imagination.

As designer Rachel Ashwell once said, 'The beauty of DIY is that it's all about self-expression.' And in this case, our self-expression shines brightly, casting a warm, inviting light on our creative endeavors.

Advertisement

Continue Reading

Home Decor

Incredible Ways to Use Natural Elements in Your Home – The Transformation Will Amaze You!

Discover how simple natural elements can revolutionize your home's ambiance, leaving you wondering what stunning transformations await within your space!

Published

on

By

transform your home naturally

You can transform your home into a serene oasis by incorporating natural elements in creative ways. Start with water features like tabletop fountains for soothing sounds and visuals. Embrace weekly flower deliveries to add vibrant life to any room. Introduce indoor plants for improved air quality and a calming atmosphere; think low-maintenance succulents or unique fiddle leaf figs. Choose natural textiles like jute and linen for comfort, and consider rustic furniture to create warmth. Use natural lighting to enhance your space. Explore these ideas, and you'll discover even more stunning transformations waiting for you.

Key Takeaways

  • Incorporate water features like tabletop fountains or slate walls to create soothing atmospheres and enhance relaxation in your home.
  • Embrace weekly flower deliveries for vibrant decor that brings seasonal beauty and warmth to any room.
  • Add indoor plants to improve air quality and foster a calming environment, with options for every lifestyle.
  • Utilize natural textiles such as jute and linen to create comfort and visual harmony in your furnishings.

Water Features for Serenity

Water features, like slate water walls and tabletop fountains, can instantly transform your home into a serene oasis. These elements mimic the calming sound of natural waterfalls, bringing relaxation and tranquility to any space. By incorporating water features into your decor, you create an inviting atmosphere that not only impresses guests but also enhances your well-being.

Slate water walls are perfect for larger areas, providing a stunning visual and auditory focal point. You'll find that the sound of flowing water greatly boosts your mood, making it a great addition to your home office or meditation room.

If you're looking for something more affordable, tabletop fountains offer a simple yet effective way to incorporate serenity into your surroundings. They serve as soothing centerpieces, allowing you to enjoy the gentle sound of water without overwhelming your space.

With various types of water features available, you can easily choose one that suits your budget and style. Whether you opt for an elaborate installation or a low-maintenance design, the calming effect of water will create a peaceful environment that promotes relaxation and harmony in your home.

Embrace Weekly Flower Deliveries

enjoy fresh floral arrivals

Embracing weekly flower deliveries can elevate your home's ambiance and boost your mood with vibrant, fresh blooms. Regularly receiving seasonal flowers not only enhances your home decor but also creates a lively atmosphere filled with natural light and color. Companies like FTD allow you to customize arrangements, ensuring you enjoy a variety of blooms throughout the year.

Incorporating flowers into your decor acts as an instant upgrade, transforming any room into a more inviting space. Whether you place them in your living room, kitchen, or even your home office, the presence of fresh flowers fosters a warm, welcoming environment. This connection to nature promotes tranquility and well-being, making your home feel more serene.

Advertisement

Moreover, having fresh flowers regularly encourages mindfulness and appreciation for beauty in everyday life. You'll find that taking a moment to admire your blooms can greatly enhance your overall mental health.

Incorporate Indoor Plant Life

enhance home with plants

Incorporating indoor plants can transform your space while offering numerous benefits, like improved air quality and a vibrant atmosphere.

You'll find a variety of ideal selections, from low-maintenance succulents to eye-catching fiddle leaf figs, perfect for any skill level.

Plus, creative display ideas can help you showcase your greenery, making your home feel more alive and inviting.

Benefits of Indoor Plants

Indoor plants not only elevate your home's aesthetic but also greatly enhance air quality and well-being. By incorporating natural materials like indoor plants, you're not just beautifying your space; you're also creating a healthier environment. Studies show that plants can filter toxins and increase oxygen levels, making your home a healthier sanctuary.

Benefits Details
Improved Air Quality Filters toxins and increases oxygen levels.
Reduced Stress Can decrease anxiety by 37%.
Enhanced Productivity Boosts productivity by up to 58%.
Low Maintenance Ideal for busy lifestyles with easy-to-care-for options.
Adaptable to Lighting Thrives in various light conditions, perfect for any space.

Incorporating indoor plant life into your home allows you to experience these benefits firsthand. Whether you place a snake plant in your office or herbs in your kitchen, you'll enjoy the fresh ingredients and vibrant ambiance. Don't underestimate the impact of greenery; it can transform your daily living experience while promoting healthier habits.

Advertisement

Ideal Plant Selections

Choosing the right plants can dramatically enhance your home's atmosphere while providing numerous benefits. By incorporating indoor plants, you not only improve air quality but also add natural beauty to your space.

For a low-maintenance option, consider snake plants and pothos. They filter toxins and thrive even in busy lifestyles, making them perfect for you.

If you're looking to add height and visual interest, fiddle leaf figs and rubber plants are excellent choices. They thrive in bright, indirect light and greatly enhance your decor.

For those who prefer less frequent watering, succulents like jade and aloe vera are ideal. These hardy plants can be creatively displayed in various pots, fitting seamlessly into your design.

If you love cooking, a wall-mounted herb garden featuring fresh basil and mint can optimize your kitchen space while bringing in delightful fragrances.

Advertisement

Mixing indoor plants with varying leaf shapes and colors creates a vibrant, dynamic indoor garden that elevates your home's ambiance. By selecting the right combination of indoor plants, you can transform your living space into a natural oasis, promoting both relaxation and well-being.

Creative Display Ideas

Transform your space by creatively displaying plants in ways that enhance both their beauty and your home's atmosphere. Incorporating indoor plants not only connects you with the natural world but also elevates your design aesthetic.

Here are three inspiring display ideas to contemplate:

  1. Succulent Gallery: Create a visually striking arrangement using a mix of sizes and pots. This unique setup can fit any design style and adds visual interest to your space.
  2. Wall-Mounted Herb Garden: Maximize your kitchen's potential by installing a wall-mounted herb garden. It provides easy access to fresh herbs while enhancing culinary experiences and overall aesthetics.
  3. Decorative Plant Stands: Use decorative plant stands or hanging planters to elevate your greenery. This technique adds dimension to your decor, drawing the eye upward and creating an illusion of taller ceilings.

Natural Textiles for Comfort

comfortable natural textile fabrics

Natural textiles like jute, wool, and linen provide you with comfort and durability, making them ideal choices for rugs and soft furnishings in your home. These materials not only enhance your living space but also promote a cozy atmosphere that invites relaxation.

For instance, using undyed linen curtains allows natural light to filter through while ensuring your privacy, creating a bright and airy environment.

You'll find that cushions made from unwoven wool add a soft, inviting texture, transforming any seating area into a snug retreat. Incorporating these natural textiles in your decor not only brings warmth but also contributes to eco-friendly living by minimizing the use of synthetic materials. This choice reflects a commitment to sustainability while enriching your home's aesthetic.

Advertisement

The diverse textures and colors available in natural textiles add visual appeal, making your interiors feel more dynamic. By choosing these materials, you create a harmonious balance between comfort and style, ensuring your home is both inviting and environmentally conscious.

Embrace the beauty and practicality of natural textiles, and watch how they elevate your living spaces.

Accent With Rustic Furniture

rustic furniture home accent

Incorporating rustic furniture into your home not only complements the comfort of natural textiles but also adds a unique character that enhances your overall decor. By integrating these pieces, you create a warm atmosphere that invites connection to nature, bridging the gap between rustic charm and modern design.

Consider adding these three rustic furniture items to your space:

  1. Farmhouse Table: Perfect for family gatherings, it evokes a sense of togetherness while showcasing the beauty of natural wood.
  2. Reclaimed Wood Shelves: These not only display your favorite decor but also tell a story, adding depth and personality to your walls.
  3. Unfinished Wood Bench: A versatile seating option that encourages creativity; you can customize it to fit your specific style.

Rustic furniture often features natural materials like reclaimed wood, making each piece a conversation starter. Its organic imperfections enhance the tactile experience, while its ability to complement various design styles—from modern to traditional—ensures seamless integration into your home.

Embrace the charm of rustic furniture and watch how it transforms your living space!

Enhance With Natural Lighting

illuminate with natural light

Brightening your home with ample natural light can instantly lift your mood and create a welcoming atmosphere. To maximize natural light, consider installing skylights, especially in small or poorly lit rooms. They allow sunlight to flood in, making your space feel larger and more inviting.

Sheer curtains are another great option. They maintain your privacy while letting in plenty of sunlight, promoting a light, airy feel throughout your home. If you want to enhance the natural light even further, strategically placing mirrors can reflect that sunlight, making your rooms appear brighter and more expansive.

Advertisement

Additionally, choose neutral lighting fixtures that complement natural elements in your décor. This creates a harmonious and serene environment, allowing the beauty of natural light to shine through.

Use Elements of Nature

harnessing nature s powerful forces

Bringing elements of nature into your home not only creates a calming atmosphere but also enhances your space's overall aesthetic by reflecting the beauty of the outdoors. By incorporating natural elements, you'll transform your living space into a serene retreat. Here are three impactful ways to do it:

  1. Wood and Stone: Use wooden furniture and stone accents to introduce warmth and texture. These materials evoke a sense of durability and connection to nature.
  2. Indoor Plants: Adding greenery with indoor plants not only beautifies your space but also improves air quality. Choose low-maintenance varieties like succulents or herbs for an effortless touch of nature.
  3. Water Features: Consider a small fountain or aquarium. The soothing sounds of water create a peaceful ambiance, making your space feel more tranquil.

Maximizing natural light with large windows or skylights can also enhance the feel of your living space.

These natural elements come together to create a harmonious environment that rejuvenates your spirit and makes your home a true sanctuary.

Embrace nature, and watch your home flourish!

Frequently Asked Questions

What Are Three Examples of Natural Elements?

You might consider wood, stone, and plants as three natural elements. Wood adds warmth, stone introduces durability, and plants improve air quality, creating a serene atmosphere in your space while connecting you to nature.

Why Use Natural Materials in Interior Design?

Using natural materials in interior design enhances aesthetics, boosts indoor air quality, and promotes sustainability. You'll enjoy unique textures, durability, and increased property value, making your space healthier and more inviting for everyone who visits.

Advertisement

Conclusion

By incorporating these incredible natural elements into your home, you can create a space that feels both inviting and rejuvenating.

Imagine walking into a room filled with the soothing sound of water, vibrant plants, and warm sunlight.

Isn't it time you transformed your living environment into a sanctuary that reflects the beauty of nature?

Embrace these ideas and watch as your home evolves into a stunning oasis that captivates and inspires all who enter.

Advertisement

Continue Reading

Home Decor

Ways to Incorporate Functional Art Into Your Scandinavian Home Decor

Unlock the secrets of blending functional art with Scandinavian decor to create a warm, inviting space that reflects your unique style and personality.

Published

on

By

functional art in decor

To incorporate functional art into your Scandinavian home decor, start by choosing pieces that showcase natural materials like wood and wool. Opt for handmade furniture that balances simplicity with utility—think minimalist dining tables or cozy lounge chairs. Layer textures using organic fabrics for warmth, and introduce accent colors through artwork or decorative accessories. Soft, warm lighting from wooden pendant lights or natural fiber floor lamps creates an inviting atmosphere. Don't forget to include plants or unique vases for a touch of nature. Keep going to uncover even more ideas for enhancing your Scandinavian style with functional art.

Key Elements

essential components overview

When you think about key elements in Scandinavian functional art, consider the color scheme, materials, and textures at play.

You'll notice that soft, muted colors create a calm atmosphere, while natural materials like wood and wool connect you to nature.

Textures add depth and interest, making each piece not just functional but also a work of art.

Color Scheme

A neutral color palette forms the backbone of Scandinavian home decor, promoting light and tranquility throughout the space. You'll find that whites, grays, beiges, and soft pastels create a calming atmosphere, making your home feel more open and inviting. By utilizing light wall colors and blonde wood, you not only enhance brightness but also foster a sense of spaciousness.

To add depth without compromising the minimalist aesthetic, consider incorporating larger accent colors like grayish blues and warm tans. These hues can enrich your decor, providing a subtle contrast to the dominant neutral color scheme. Meanwhile, introducing bold colors as smaller accents—perhaps through art pieces or decorative objects—can inject vibrancy and personality into your home.

Advertisement

Mixing light and dark neutrals is another effective strategy, creating visual interest while maintaining a cohesive and harmonious environment. This balance allows you to experiment with different shades while staying true to the Scandinavian ethos of simplicity and functionality.

Materials

Natural materials are at the heart of Scandinavian decor, enhancing both the beauty and functionality of your home. When you choose natural wood for your furniture and decor, you not only add warmth to your space but also align with the minimalist aesthetic that defines Scandinavian design. Light wood finishes are especially popular, as they create a bright, airy atmosphere while maintaining practicality.

Incorporating other eco-friendly materials like wool and leather can also elevate your functional art pieces. These materials provide both comfort and durability, ensuring that your decor serves its purpose effectively. By selecting organic textiles and recycled elements, you align your choices with sustainable practices that reflect the environmental consciousness inherent in Scandinavian decor.

Functional art in this style often features clean lines and minimalist designs, making them versatile additions to your home. Whether it's a beautifully crafted wooden shelf or a woolen throw that doubles as art, these elements contribute to a cohesive look that marries form and function.

Textures

Textures are essential in Scandinavian decor, adding warmth and coziness through materials like wool, linen, and chunky knits that enhance your furnishings and accessories. By incorporating these soft elements, you create inviting spaces that feel lived-in and welcoming.

Advertisement

To truly embrace the Scandinavian aesthetic, focus on natural textures. Use untreated wood, stone, and organic fabrics to connect your home to the outdoors. This simplicity aligns perfectly with the functional nature of Scandinavian design.

Layering different textures, like soft blankets over woven rugs, can add depth while maintaining a minimalist look.

Remember, matte finishes are preferred over glossy ones in Scandinavian decor. This choice helps create a more natural and approachable atmosphere.

You might also consider incorporating handmade items, such as macrame wall hangings or artisanal ceramic vases, to introduce unique textures that infuse character and warmth into your home.

Essential Fixtures and Furniture

necessary furnishings and equipment

When you think about essential fixtures and furniture in Scandinavian decor, consider how each piece enhances both functionality and style.

A Scandinavian-style dining table, bookshelf with clean lines, and lounge chair not only serve their purposes but also create a cohesive, inviting atmosphere.

Advertisement

These elements reflect the beauty of simplicity while adding character to your home.

Scandinavian-Style Dining Table

A Scandinavian-style dining table combines minimalist design with functionality, making it a central element in your home that invites warmth and togetherness. Typically crafted from light woods like beech or oak, these tables feature clean lines that enhance the organic feel of your dining area. Their sleek appearance is complemented by multi-functional designs, allowing you to extend the table for larger gatherings while keeping it compact when not in use.

To further embrace Scandinavian design, consider incorporating textured table runners or placemats made from natural fibers like linen or cotton. These not only add depth but also make cleaning a breeze. You'll also want to include Scandinavian-inspired tableware, such as ceramic dishes or wooden serving boards, which serve as functional art pieces that reflect simplicity and craftsmanship.

Don't forget about the lighting! Pendant lights with simple designs in natural materials can hang above your dining table, serving as both functional art and a way to create an inviting ambiance. Together, these elements guarantee that your Scandinavian-style dining table isn't just a piece of furniture but a gathering spot that embodies the spirit of your home.

Scandinavian Bookshelf With Clean Lines

Embracing clean lines and minimalist designs, a Scandinavian bookshelf serves as both a stylish and functional addition to your home. These bookshelves, typically crafted from natural wood like birch or oak, bring warmth and texture to your space, enhancing the overall aesthetic of Scandinavian decor.

Advertisement

Functionality is key; you'll find open shelving that allows for easy access to your books and decorative items, while integrated storage solutions help keep clutter at bay. Many Scandinavian bookshelves are modular, offering you the flexibility to customize layouts that suit your open-plan living spaces.

Opt for neutral color palettes, such as white or light wood finishes, to amplify brightness and openness. When you incorporate books and a few personal decorative items, you add character without overwhelming the minimalist aesthetic.

Don't forget to include elements of nature, like plants or handcrafted decor, as they foster a connection to the outdoors and introduce a sense of hygge into your home. By choosing a Scandinavian bookshelf with clean lines, you not only enhance your decor but also create a functional piece that elevates your living environment.

Scandinavian Lounge Chair

Incorporating a Scandinavian lounge chair into your decor not only complements the clean lines of a minimalist bookshelf but also adds a cozy element that invites relaxation and comfort. These chairs embody Scandinavian design principles, featuring clean lines and multifunctionality, making them essential fixtures for achieving a stylish, clutter-free living space.

Iconic models like the Hans Wegner Wishbone Chair and the Eames Lounge Chair perfectly blend aesthetic appeal with comfort. They often utilize natural materials such as wood and wool, contributing to a warm atmosphere while aligning with the eco-friendly ethos of the style.

Advertisement

By placing a lounge chair in your open-plan layout, you enhance the visual flow of the space and create a cozy nook that embodies the concept of hygge. Furthermore, Scandinavian lounge chairs incorporate soft, inviting textiles and ergonomic shapes, ensuring long-lasting comfort without sacrificing sophistication.

Whether you're curling up with a book or enjoying a cup of tea, the right lounge chair becomes a functional art piece, enhancing both your decor and your daily experiences. Don't underestimate the impact of this essential furniture in your Scandinavian home.

Lighting Ideas

creative illumination concepts

When it comes to lighting in your Scandinavian home, think about incorporating pendant lights with wood accents for a warm touch.

Soft-glow table lamps and natural fiber floor lamps can enhance the cozy atmosphere, while wall sconces with natural finishes add elegant detail.

Together, these choices create a layered lighting effect that embodies the essence of Scandinavian design.

Pendant Lights With Wood Accents

Pendant lights with wood accents effortlessly combine functionality and style, making them a perfect choice for enhancing your Scandinavian home decor. These lights align with the principles of Scandinavian design, which prioritize natural materials and simplicity. The addition of wood not only brings warmth and texture but also complements the neutral color palette typical of these interiors.

Advertisement

When you incorporate pendant lights with wood accents, you create a cozy atmosphere essential to hygge, providing soft, ambient lighting that makes your spaces inviting. Look for minimalist fixtures featuring light wood tones, as they can easily be paired with glass or metal elements, maintaining that clean, modern look that defines Scandinavian design.

You'll find a variety of styles from popular Scandinavian brands, making it easy to choose pendant lights that fit both your budget and aesthetic preferences. Whether you want to illuminate your dining area or create a focal point in your living space, these wood-accented pendant lights serve as functional art that enhances your overall decor.

Soft-Glow Table Lamps

Soft-glow table lamps consistently bring warmth and elegance to Scandinavian interiors, enhancing the cozy atmosphere essential to the hygge lifestyle. These lamps are a hallmark of Scandinavian decor, creating an inviting space with their soft, diffused lighting that encourages relaxation and comfort. Often designed with clean lines and made from natural materials like wood or metal, soft-glow table lamps embody the minimalist aesthetic that defines Scandinavian style.

Incorporating dimmable options allows you to adjust the lighting to suit your mood, further enhancing the ambiance of your living areas. Whether you're reading a book or hosting friends, these lamps provide just the right touch of light. Plus, many of these lamps come equipped with eco-friendly LED bulbs, ensuring you're not only stylish but also sustainable in your choices.

Moreover, soft-glow table lamps can function as unique decorative art pieces, featuring interesting shapes and textures that add visual appeal without overwhelming your space. By thoughtfully placing these lamps throughout your home, you can create a harmonious blend of functionality and artistry, perfectly aligning with the principles of Scandinavian decor.

Advertisement

Wall Sconces With Natural Finishes

Wall sconces with natural finishes, like wood or metal, instantly elevate your Scandinavian decor by providing a warm, inviting glow that complements the minimalist aesthetic. These fixtures align perfectly with Scandinavian design principles, enhancing your space while promoting sustainability through eco-friendly materials.

When choosing wall sconces, consider options that offer adjustable features. This flexibility lets you tailor the lighting to suit various activities and moods, contributing to that coveted hygge atmosphere. Soft, diffused light is another essential aspect; it helps reduce harsh shadows, creating a cozy environment that feels welcoming.

To make your lighting scheme even more dynamic, layer your wall sconces with other light sources, such as candles and floor lamps. This approach emphasizes texture and depth in your decor while ensuring you have adequate illumination for any setting.

Whether you place them in the living room, hallway, or bedroom, wall sconces with natural finishes won't only enhance the beauty of your home but also add functional art that resonates with the Scandinavian ethos. Embrace these lighting ideas to cultivate a warm and inviting atmosphere in your space.

Natural Fiber Floor Lamps

Natural fiber floor lamps, crafted from rattan, jute, or seagrass, bring a touch of warmth and organic texture to your Scandinavian home decor. These lamps enhance the cozy atmosphere that's central to Scandinavian design by introducing natural elements that make your space feel inviting.

Advertisement

With their soft, diffused lighting, they create a gentle ambiance perfect for relaxation and comfort, aligning with the Scandinavian emphasis on serene environments.

You'll love how many of these lamps feature minimalist designs and neutral color palettes, allowing them to blend seamlessly into various room aesthetics. Whether you place one in your living room or a cozy reading nook, natural fiber floor lamps serve as functional art pieces. They illuminate your space while adding a sculptural element that enhances your decor.

Moreover, choosing lamps made from sustainable and eco-friendly materials reflects a commitment to environmental consciousness, which is key to authentic Scandinavian decor. By incorporating these stylish lamps, you not only elevate your home's aesthetic but also embrace a lifestyle that values nature and sustainability.

Decorative Elements

artistic design features

When you think about decorative elements in Scandinavian decor, consider how a handwoven wool throw blanket can add warmth and texture to your space.

Pair it with a ceramic vase in earthy tones to create a harmonious feel, while a geometric wall art piece can serve as a striking focal point.

Together, these elements enhance both the beauty and functionality of your home.

Advertisement

Handwoven Wool Throw Blanket

A handwoven wool throw blanket instantly elevates your Scandinavian decor, bringing warmth and texture that create a cozy atmosphere. Emphasizing the hygge principle, this blanket embodies comfort, perfect for those chilly evenings. Wool isn't only a natural and sustainable material but also aligns beautifully with the Scandinavian design ethos of incorporating nature and organic elements into your home.

The versatility of a handwoven wool throw means you can use it as a decorative accent on your sofa or bed, while also enjoying its functional warmth during colder months. Opt for neutral colors or subtle patterns to maintain the calming aesthetic typical of Scandinavian interiors, ensuring your blanket adds visual interest without overwhelming the space.

Each handwoven textile often showcases unique craftsmanship, making your blanket a one-of-a-kind piece that enhances the personal touch in your home decor. By choosing a handwoven wool throw blanket, you're not just adding a decorative element; you're embracing a functional art piece that enhances comfort and style in your Scandinavian home.

Ceramic Vase With Earthy Tones

Handwoven wool throw blankets set the stage for warmth, making the addition of ceramic vases in earthy tones a perfect complement to your Scandinavian decor.

These vases, often crafted from terracotta or muted greens, enhance your home's natural aesthetic by introducing organic textures and inviting warmth into the space. Their minimalist designs align beautifully with Scandinavian principles of simplicity and functionality, ensuring they fit seamlessly into any room.

Advertisement

Consider incorporating a ceramic vase as a statement piece; it serves both decorative and practical purposes. Not only can it hold fresh or dried flowers, but it also adds visual interest to your surfaces.

Layering different sizes and shapes of these earthy-toned vases can create a dynamic focal point on shelves or tables, reflecting your love for natural elements in home decor.

Geometric Wall Art Piece

Geometric wall art pieces elevate your Scandinavian decor with their clean lines and minimalist appeal, perfectly embodying the 'less is more' philosophy.

These art pieces not only enhance the visual interest of your space but also maintain the simplicity that defines Scandinavian design. By featuring geometric shapes, you can break up neutral palettes without overwhelming the room's aesthetic.

Opting for materials like wood or metal in your geometric wall art can create an organic feel while keeping a contemporary look. This choice aligns with the natural elements often found in Scandinavian decor.

Advertisement

Plus, many geometric wall art pieces serve dual purposes, functioning as both decorative elements and practical items like shelves or organizers, maximizing your space efficiently.

Using geometric wall art also allows you to create a focal point in any room. This modern touch draws attention, harmonizing beautifully with the overall emphasis on functionality and comfort in Scandinavian homes.

Flooring

flooring installation and options

When it comes to flooring in Scandinavian decor, light-colored hardwoods like oak and birch set the tone for a bright and airy vibe.

You can also explore textured cork or reclaimed wood planks to add warmth and sustainability to your space.

Each choice not only enhances the aesthetic but also aligns with the functional art philosophy that defines this design style.

Light-Colored Hardwood Flooring

Light-colored hardwood flooring, like birch or ash, not only enhances the airy feel of Scandinavian interiors but also makes spaces feel more expansive and inviting. By choosing light wood, you'll create a bright and welcoming atmosphere, which is essential in Scandinavian decor that values luminosity. This flooring effectively reflects natural light, helping to combat the darkness of long winter months and ensuring your home remains cheerful and vibrant.

Advertisement

Moreover, light hardwood floors serve as a neutral backdrop, allowing your minimalist furniture and decor elements to shine without overwhelming the space. This balance is key in achieving the simplicity that Scandinavian design embodies. The durability of hardwood also makes it a practical choice for high-traffic areas, aligning perfectly with the Scandinavian principles of functionality and longevity.

You'll find that light-colored hardwood pairs effortlessly with various textures and colors in textiles, maintaining a cohesive hygge atmosphere throughout your home. Whether you opt for soft rugs or bold cushions, the light wood flooring will enhance your decor while providing a warm, inviting foundation for your functional art pieces.

Textured Cork Flooring

Textured cork flooring not only adds a unique tactile element to your home, but it also embodies the eco-friendly and functional principles of Scandinavian design. This flooring option offers natural warmth and comfort underfoot, making it an inviting choice for any room.

Its unique texture provides a non-slip surface, enhancing safety, especially in moisture-prone areas like kitchens and bathrooms. Cork's excellent insulating properties help maintain a comfortable indoor temperature, which reduces energy consumption—a key aspect of functional Scandinavian decor.

You'll appreciate how textured cork seamlessly integrates with the neutral color palettes typical of Scandinavian aesthetics, providing warmth without overwhelming your space. Available in a variety of colors and patterns, cork flooring allows you to personalize your home while staying true to minimalist design principles.

Advertisement

Its durability and resilience make it a practical choice, as it requires minimal maintenance and adds a distinctive tactile element to your overall decor. By choosing textured cork flooring, you're not just enhancing your home's aesthetic; you're also embracing a sustainable, cozy, and stylish lifestyle that reflects the essence of Scandinavian living.

Reclaimed Wood Plank Flooring

Reclaimed wood plank flooring brings warmth and character to your Scandinavian home while promoting eco-friendly living by repurposing materials and reducing waste. This flooring option features unique textures and colors that enhance the natural aesthetic central to Scandinavian decor, creating a cozy atmosphere that feels inviting.

When you choose reclaimed wood, you're not just adding beauty; you're opting for durability. These planks are built to last, aligning perfectly with the Scandinavian focus on functionality and quality craftsmanship. You'll find a range of lighter wood tones, from pale ash to rich oak, allowing you to select a flooring that harmonizes with your neutral color palette.

Moreover, installing reclaimed wood plank flooring can greatly improve your indoor air quality. Unlike new manufactured options, reclaimed wood is often free from harmful chemicals, promoting a healthier living environment. By incorporating this sustainable choice into your home, you're not just enhancing its aesthetic appeal, but also contributing to a more eco-conscious lifestyle.

Embrace the charm and functionality of reclaimed wood plank flooring, and let it transform your Scandinavian home into a space that reflects both style and sustainability.

Advertisement

Conclusion

Incorporating functional art into your Scandinavian home decor can elevate your space while keeping it practical.

By blending key elements, essential fixtures, and stylish lighting, you create a harmonious environment that reflects your personality.

Don't forget to add decorative elements and thoughtful flooring choices to enhance the overall aesthetic.

Embrace the beauty of functional art, and watch your home transform into a stunning yet efficient sanctuary that perfectly captures the essence of Scandinavian design.

Advertisement

Continue Reading

Trending