Connect with us

Home Decor

DIY Outdoor Plastic Chair Makeover

You'll be amazed at how a few simple steps can transform your worn-out plastic chair into a luxurious outdoor oasis waiting to happen.

Published

on

revamp plastic chairs creatively

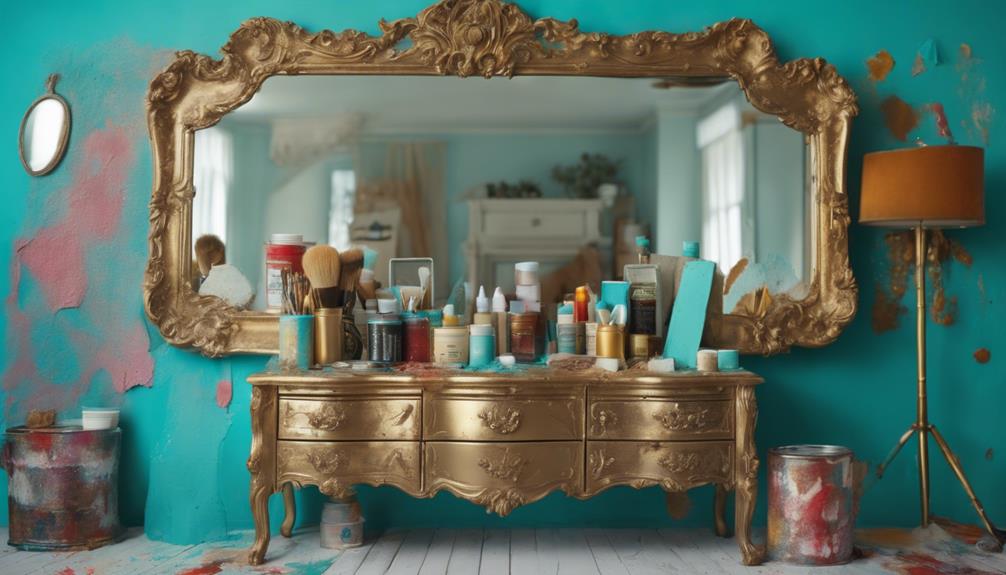
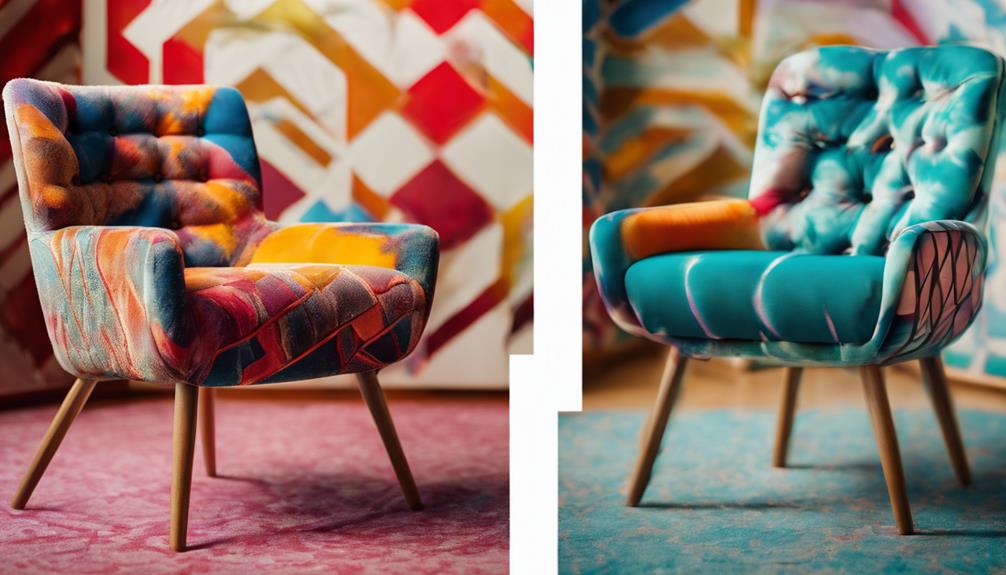
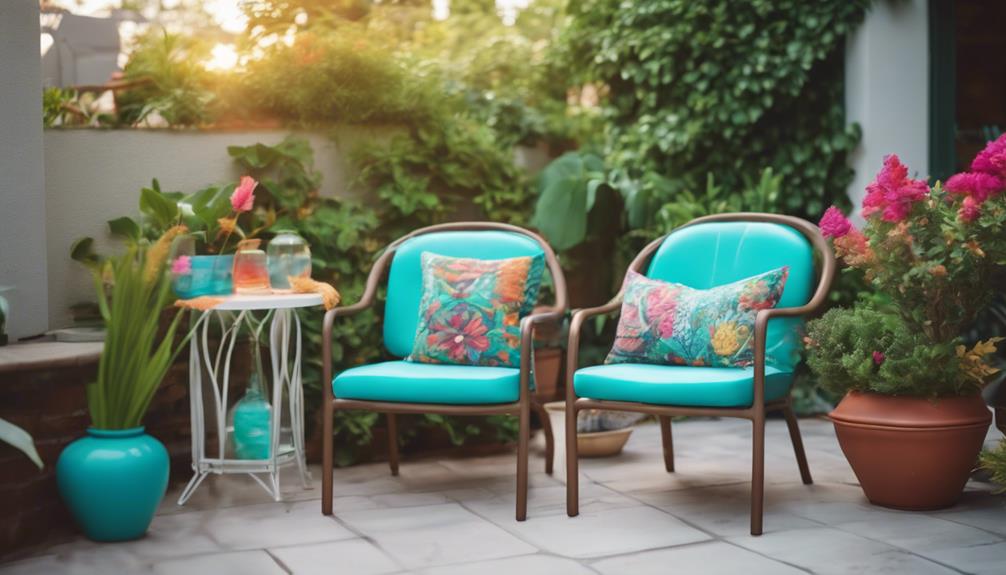
To guarantee your worn-out plastic chair a fresh new look, begin by thoroughly cleaning and sanding it for better paint adhesion. Apply a primer specifically designed for plastic surfaces, followed by high-quality outdoor paint in a color of your choice. Create a cardboard template to secure a precise fit, and add foam cushioning for comfort. Choose durable outdoor fabric, cut to fit the chair's dimensions, and attach it securely using contact glue, staples, or hot glue. Add decorative touches, such as tufting, rhinestones, and sunflower mesh strips, to give your chair a luxurious touch. Keep refining your DIY skills to discover more creative ways to transform your outdoor space.

Key Takeaways

• Thoroughly clean and lightly sand the chair to ensure paint adhesion and a durable finish.

• Use high-quality outdoor paint and primer specifically designed for plastic surfaces.

• Add foam cushioning and durable outdoor fabric to enhance comfort and style.

• Use tufting techniques and decorative elements like rhinestones to add a touch of luxury.

Advertisement

• Secure fabric and foam with contact glue, hot glue, or staples for a long-lasting and polished finish.
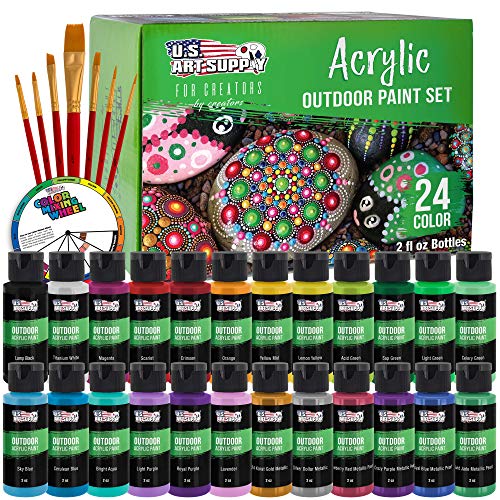
Prepare the Chair for Makeover

Before diving into the makeover process, give your plastic chair a thorough cleaning with soap and water to remove dirt and grime that may impact the new paint job. This essential step guarantees a smooth, even surface for painting.

Next, lightly sand the chair to create a rough surface for better paint adhesion and to smooth out any imperfections. Make sure to use a primer specifically designed for plastic surfaces to ensure proper paint adhesion and durability.

When selecting a paint, choose a high-quality outdoor paint suitable for plastic surfaces to guarantee long-lasting results in various weather conditions.

If you want to give your chair a completely different color, make sure to apply two coats of paint, allowing the first coat to dry completely before applying the second.
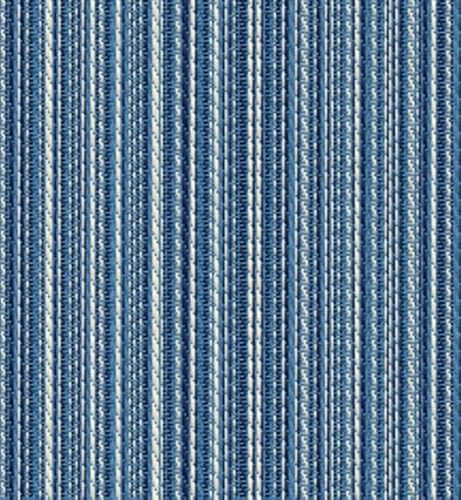
Advertisement

Measure and Cut Cardboard Template

cutting cardboard accurately matters

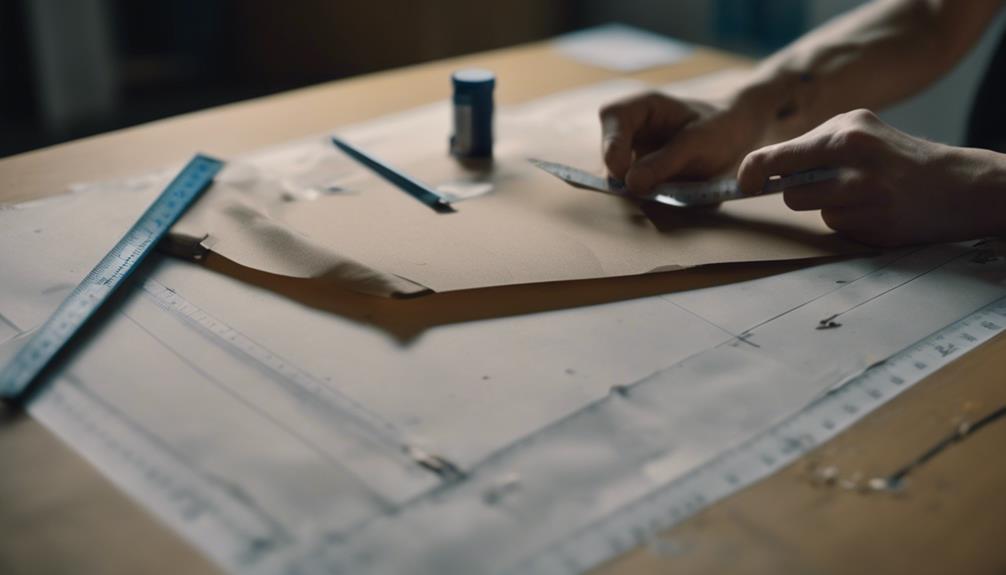
Take precise measurements of your plastic chair's dimensions to guarantee a perfectly fitting cardboard template. This important step ensures that your makeover turns out professional and polished. Using a tape measure, record the width, length, and any unique features of the chair's bottom and back. Don't forget to note any curves or angles that might impact the template's fit.

Next, use these measurements to cut cardboard pieces that match the chair's shape. You'll need two identical pieces: one for the bottom and one for the back. Ensure the cardboard is sturdy enough to provide a stable base for the makeover process. Cutting the cardboard accurately helps achieve a seamless transformation.

As you cut, double-check your measurements to avoid errors. A well-fitting template is crucial for a successful makeover. By taking the time to measure and cut the cardboard precisely, you'll set yourself up for success and a beautifully transformed outdoor plastic chair.
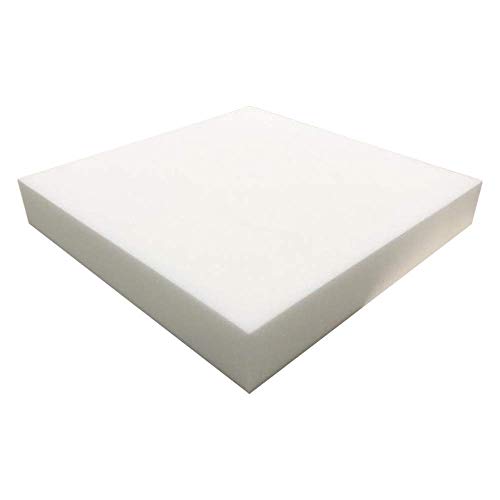
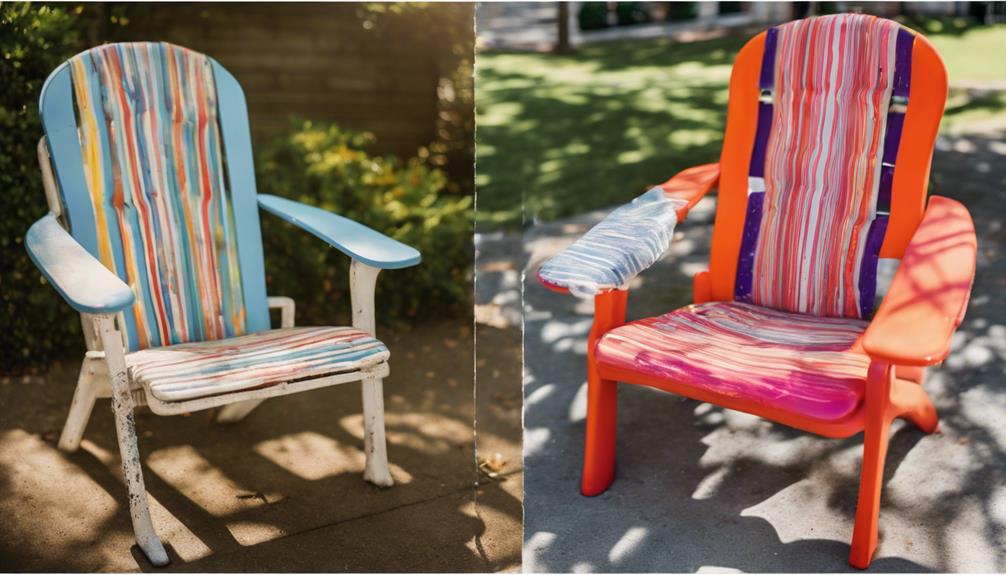
Spray Paint the Chair Legs

revive worn chair legs

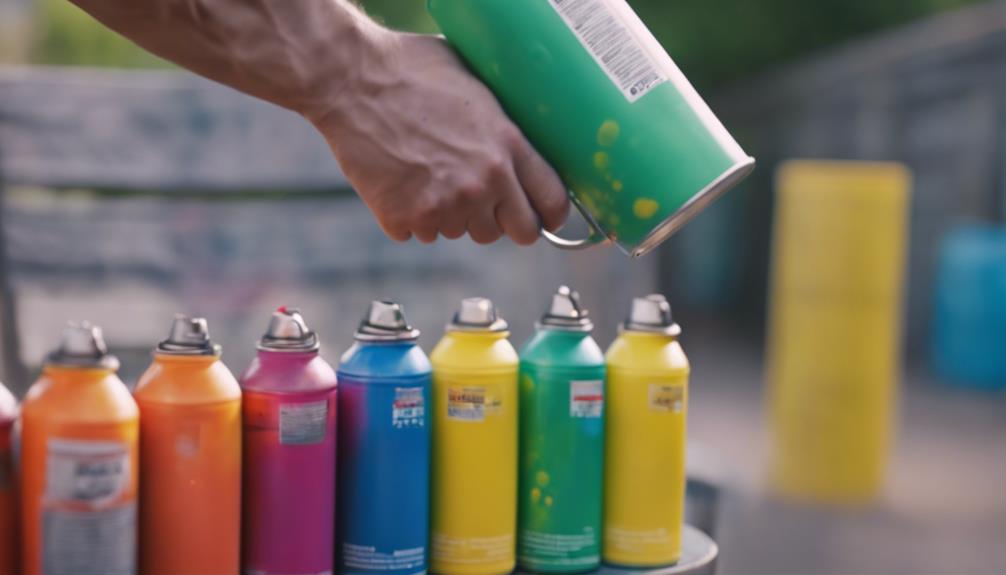
Now that you've prepared your cardboard template, it's time to focus on transforming the chair legs.

To achieve a stunning, high-end look, you'll need to prep the legs properly and master some essential painting techniques. By doing so, you'll guarantee a sleek, smudge-free finish that complements the fabric you've chosen for your chair makeover.

Prep the Legs Properly

By the time you're ready to tackle the legs, they should be free of dirt and debris, so clean them thoroughly with soap and water to guarantee a smooth painting process. This step is vital, as any remaining dirt or grime can impact the adhesion of the paint.

Once clean, lightly sand the legs to create a rough surface for the paint to adhere to. This will establish a strong bond between the paint and the plastic.

Advertisement

When you're ready to paint, use a high-quality spray paint specifically designed for outdoor use. Apply at least two coats, allowing sufficient drying time between coats. This will ensure a durable and long-lasting finish.

Painting Techniques Matter

With your chair legs properly prepped, you're ready to express your creativity with a bold, bright gold spray paint that will add a stylish, modern twist to your outdoor plastic chair makeover. The key to achieving a professional-looking result lies in the painting technique. By applying two coats of spray paint, you'll guarantee a smooth, even finish that will make your chair stand out.

Remember, the choice of spray paint color is important, as it will greatly impact the overall look and feel of your chair transformation. In this case, the bright gold color will create a striking contrast against the outdoor setting, making the chair a decorative element.

Some essential tips to keep in mind:

  • Spray painting provides an efficient way to coat the chair legs, allowing for a smooth, even finish.
  • Properly preparing the chair legs before spray painting ensures a durable finish.
  • The gold spray paint will add a modern touch to your outdoor plastic chair makeover.

Add Foam Cushioning for Comfort

add foam cushioning for comfort

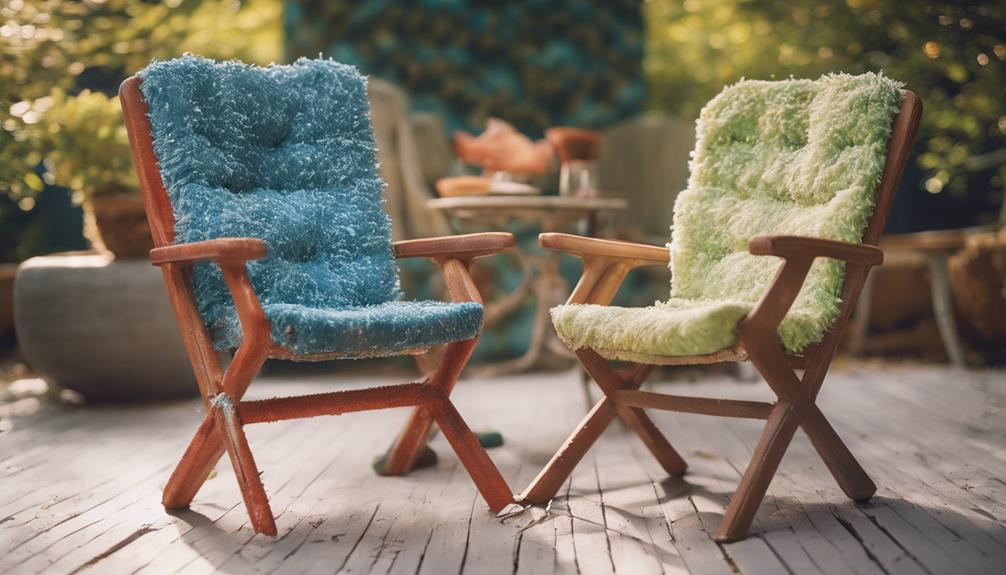
As you move forward with adding foam cushioning to your outdoor plastic chair, it's crucial to contemplate the type of cushion material that will offer the best comfort.

You'll want to explore various cushion material options, weighing the pros and cons of each, to guarantee you make the best choice for your chair.

Advertisement

Additionally, you'll need to think about the foam thickness that will provide the right balance of comfort and support for users.

Cushion Material Options

You can greatly enhance the comfort of your outdoor plastic chair by adding foam cushioning, a popular choice for outdoor seating. Foam cushioning provides the perfect solution to transform your hard plastic chair into a cozy retreat.

When selecting the right foam cushioning for your outdoor chair, consider the following options:

  • High-density foam: Provides support and durability for outdoor use, guaranteeing your cushion maintains its shape and comfort over time.
  • Waterproof foam: A great option to prevent moisture damage and secure your cushion stays dry and comfortable, even in wet weather conditions.
  • UV-resistant foam: A must-have for outdoor seating, this type of foam prevents fading and deterioration from sun exposure, safeguarding your cushion looks like new for years to come.

Foam Thickness Matters

Add a generous layer of foam cushioning to your outdoor plastic chair, as a thickness of at least 2 inches is crucial for maximum comfort. This thickness provides better cushioning and support, especially when you'll be sitting for extended periods. You'll want to choose a weather-resistant foam to guarantee it can withstand the outdoor elements. Once you've selected your foam, secure it onto the chair using contact glue to prevent shifting or sliding.

Remember to test the comfort level by sitting on the chair before finalizing the makeover. This will give you an opportunity to adjust the foam or make any necessary changes to achieve the perfect level of comfort. With the right thickness and type of foam, you'll be able to enjoy your outdoor space without sacrificing comfort.

Choose and Cut Fabric for Upholstery

fabric selection for upholstery

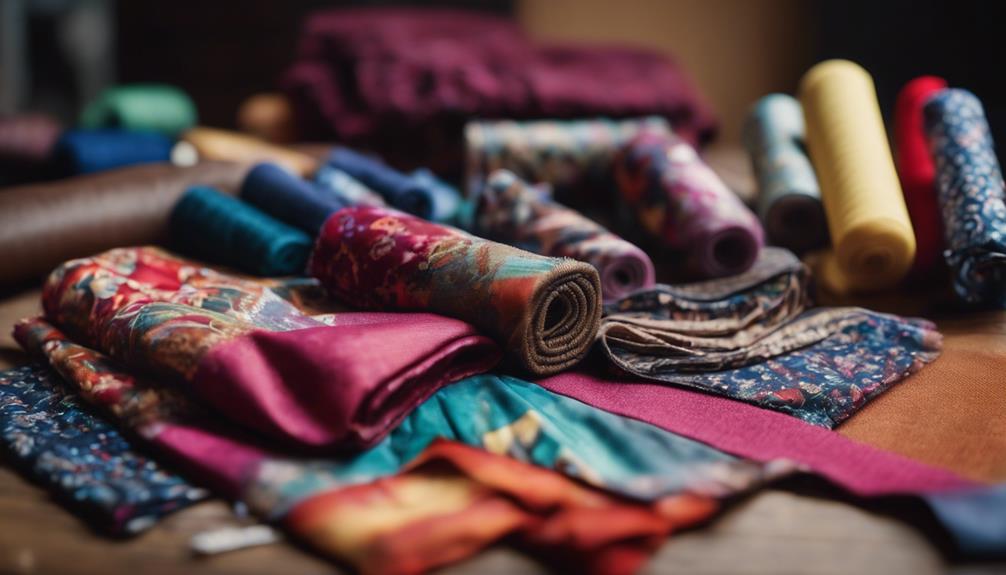
Measure the dimensions of your plastic chair to determine how much fabric you'll need for the upholstery makeover. This will guarantee you have enough fabric to cover the entire chair, without wasting any excess material.

When selecting a fabric, choose a durable outdoor fabric that can withstand weather elements and complement the outdoor space.

Advertisement

Consider the following key factors when choosing your fabric:

  • Durability: Will it withstand outdoor weather conditions?
  • Style: Does the color and pattern match your outdoor decor?
  • Ease of maintenance: Can it be easily cleaned and maintained?

Once you've selected your fabric, cut it to match the measurements of the chair, leaving some excess for a neat finish. Remember to attach the fabric securely to the chair using contact glue, staples, or hot glue for a long-lasting makeover.

With the right fabric and a little creativity, you'll be able to transform your old plastic chair into a stylish and functional piece of outdoor furniture.

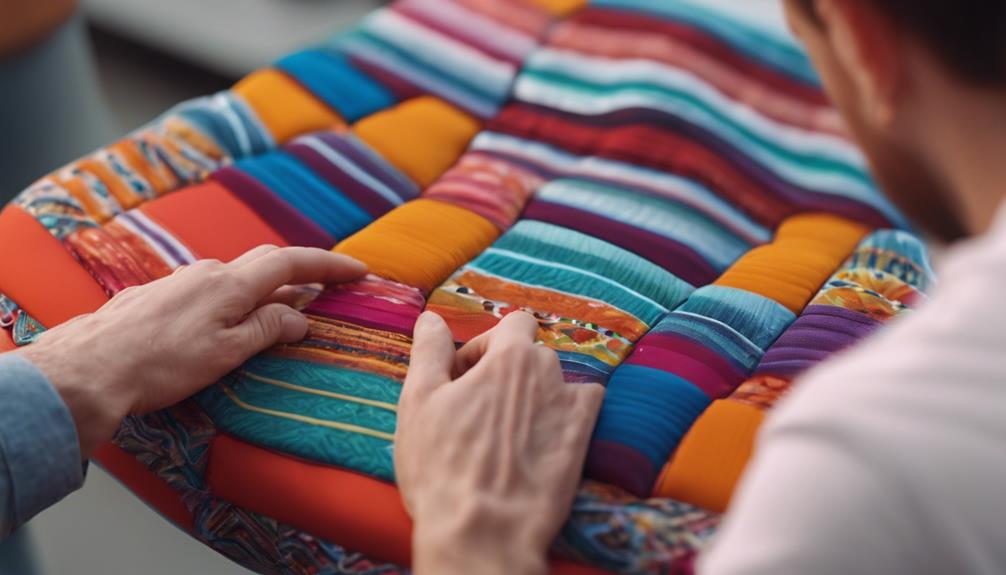
Tufting Design and Pattern Creation

innovative tufting techniques explained

When you move on to the tufting design and pattern creation stage, you'll need to contemplate the design elements that will elevate the aesthetic appeal of your outdoor plastic chair.

You'll want to ponder the techniques you'll use to create a cohesive look, such as carefully crafting a tufting pattern on the chair's backrest and extending the fabric pattern to the front part of the chair.

Design Elements

You'll elevate the style of your outdoor plastic chair by incorporating a unique tufting design, which creates a visually appealing pattern on the chair's surface. The design elements you choose will make a significant difference in the final look of your makeover.

To achieve a stylish look, you'll create a tufting design using chrome pipe, button, and fabric. You'll then glue excess fabric down with hot glue for a neat and secure finish.

Advertisement

Here are some key design elements to keep in mind:

  • A pattern created on the front part of the chair guarantees a clean and cohesive appearance.
  • Using sunflower mesh to cover glue residue adds a polished and professional final touch.
  • Tufting process is preferred over staple gun for achieving a better shape and design consistency.

Tufting Techniques

With a clear vision of your design elements in place, create a unique tufting design by strategically placing chrome pipes and buttons on the chair's surface to achieve a visually appealing pattern.

You'll want to carefully arrange the chrome pipes and buttons to create a cohesive look that complements your fabric choice.

Once you're happy with the design, start attaching the fabric to the chair using hot glue. Make sure to secure the excess fabric by gluing it down neatly, ensuring a clean finish.

To add an extra touch of glamour, attach rhinestones to the silver buttons using hot glue.

When you're done, use sunflower mesh to cover any glue residue, leaving your chair looking sleek and polished.

Advertisement

By following these tufting techniques, you'll be able to create a one-of-a-kind design that showcases your creativity and attention to detail.

With a little patience and practice, you'll be able to achieve a professional-looking finish that will elevate your outdoor plastic chair makeover.

Assemble the Chair Cushion Layers

layering chair cushion components

Begin by placing the foam padding on top of the cardboard base, making sure it's centered and evenly distributed. This layer provides comfort and support for the cushion, so take your time to get it just right.

Next, secure the foam in place with contact glue to prevent shifting or sliding. This step is essential to guarantee the cushion stays in place and maintains its shape.

Here are some key considerations to keep in mind as you assemble the cushion layers:

  • Use a generous amount of contact glue to secure the foam in place
  • Ensure the foam is evenly distributed and centered on the cardboard base
  • Consider adding additional layers or decorative elements to enhance the cushion's appearance and comfort

As you continue to assemble the cushion layers, keep in mind that the goal is to create a comfortable and visually appealing seat.

Add Decorative Touches to Joints

enhancing joints with decorative finishes

As you move on to the finishing touches, cut sunflower mesh into strips to conceal the joints and create a seamless look in your outdoor plastic chair makeover. This clever trick not only covers any glue residue but also adds a unique, stylish element to your chair transformation.

To secure the sunflower mesh strips, use hot glue to guarantee a durable and decorative finish. As you work on the joints, pay attention to the details and use decorative elements like sunflower mesh to enhance the overall aesthetic of your plastic chair makeover.

Advertisement

By adding these subtle yet impactful touches, you'll elevate your chair's design and create a cohesive look. Remember, it's all about the little details that make a big difference.

Embellish Buttons With Rhinestones

add sparkle to clothing

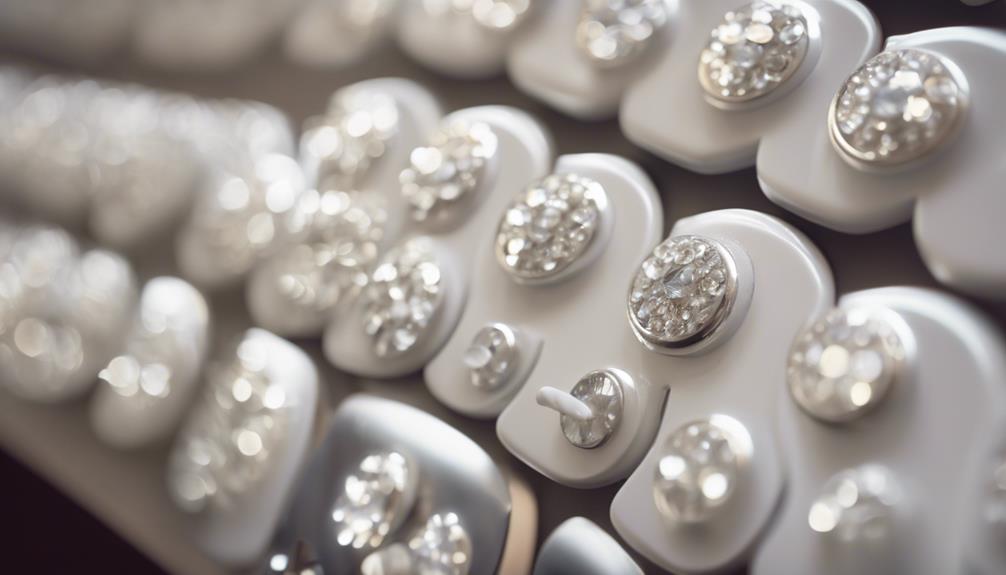
Take your outdoor plastic chair makeover to the next level by adding a touch of luxury with rhinestone-embellished buttons that will catch the eye and elevate the overall design. To add this glamorous touch, you'll need to attach rhinestones to silver buttons using hot glue. Make sure the rhinestones are firmly attached to guarantee durability. Consider the size and design of the rhinestones to match the overall aesthetic of the chair.

Here are some key things to keep in mind when embellishing your buttons with rhinestones:

  • Use hot glue to attach the rhinestones to the buttons for a strong hold
  • Choose rhinestones that complement the chair's design and color scheme
  • Strategically place the rhinestone-embellished buttons on the tufted areas for a decorative touch.

Final Assembly and Styling

final assembly and presentation

To complete the assembly and styling of your outdoor plastic chair makeover, it's crucial to secure any excess fabric on the bottom part of the chair using hot glue for a clean finish.

Next, apply contact glue to attach the foam in the middle of the chair, ensuring added comfort. Then, use hot glue to secure the fabric to the foam, preventing any movement.

To create a neat finish on the front part, glue the excess fabric in a pattern. Finally, cover any glue residue with sunflower mesh strips for a polished look.

Frequently Asked Questions

How Do You Make Plastic Patio Chairs Look New Again?

You're wondering how to revive your worn-out plastic patio chairs, right? Well, the key is to give them a fresh coat of paint – literally!

Advertisement

A new color can work wonders. Clean the chairs thoroughly, then spray paint them with a hue that complements your outdoor space.

You can also add cushions or fabric covers for extra comfort and style. Finally, seal the deal with a clear coat to protect your handiwork from the elements.

How Can I Make My Plastic Garden Chair Look Better?

You're wondering how to give your plastic garden chair a facelift. Start by covering it with cardboard to add texture and interest.

Next, spray-paint the legs a bright, bold color to create a pop of personality.

Then, add foam and fabric for comfort and style.

Advertisement

With a little creativity, you can transform your chair from bland to grand, making it the perfect spot to relax in your outdoor oasis.

How to Beautify a Plastic Chair?

You're looking to beautify a plastic chair, and there are several ways to do so.

First, consider giving it a fresh coat of paint or stain to revamp its appearance.

Adding decorative elements like ribbons, lace, or even fabric can also give it a unique touch.

If you're feeling crafty, try decoupaging or stenciling designs onto the chair for a personalized look.

Advertisement

Whatever method you choose, make sure it's durable enough to withstand outdoor or indoor use.

Can I Paint My Plastic Outdoor Chairs?

You're wondering if you can give your plastic outdoor chairs a fresh coat of paint. Did you know that 80% of outdoor furniture is replaced every 5-7 years? Paint can extend their lifespan!

Yes, you can paint your plastic outdoor chairs, but it's essential to use a high-quality spray paint specifically formulated for plastic surfaces. Proper preparation, including cleaning and sanding, is also necessary for a durable finish.

Conclusion

With your newly revamped outdoor plastic chair, you've successfully breathed new life into a once-forgotten piece of furniture. Don't be surprised if friends and family ask to borrow your DIY skills, as this makeover is sure to turn heads.

One potential concern – 'Will the fabric fade quickly?' – can be alleviated by using outdoor-friendly fabric and applying a fabric protector to guarantee your hard work remains vibrant for seasons to come.

Advertisement

Continue Reading
Advertisement

Home Decor

August Color Palettes That Will Transform Your Home – Try Them Today!

Discover vibrant August color palettes that can transform your home, but wait until you see the unexpected accents that will elevate your space!

Published

on

By

transform your home colors

Looking to transform your home this August? Embrace vibrant color palettes to ignite your space. Start with Pink Dawn as your bold centerpiece, complemented by Symphony Blue and Jamaican Aqua for a lively mix. Adding white brings balance, while gold accents and natural elements enhance the bohemian vibes. Don't shy away from incorporating hot pink accents in unexpected places—like kitchens and bathrooms. This combination energizes your decor without overwhelming it. With these ideas, you're well on your way to creating a fresh atmosphere. Stick around, and you'll discover even more tips to elevate your home's style!

Key Takeaways

  • Embrace vibrant hues like Pink Dawn, Symphony Blue, and Jamaican Aqua to energize your living spaces this August.
  • Incorporate white accents for visual balance, enhancing the overall aesthetic of your decor.
  • Use gold accents and natural elements to add a bohemian flair to your interior design.
  • Experiment with layering colorful rugs and throw pillows for a cozy, inviting atmosphere.

Embracing Color Trends

Embracing color trends means welcoming vibrant hues like pink into your home, transforming spaces with a fresh and expressive flair. As you explore the emerging dominance of pink, consider how it can redefine your design aesthetic. This isn't just any pink—Millennial Pink is leading the charge, reflecting a cultural shift towards embracing bold colors in home decor.

To create a harmonious environment, start by developing a mood board that features August's color palette. Incorporate Pink Dawn as your main shade, pairing it with Symphony Blue and Jamaican Aqua. This combination will breathe life into your rooms, moving away from traditional neutrals and adding a lively touch.

Don't forget to enhance your design with gold accents and natural elements. These additions can elevate the overall aesthetic, making your space feel more inviting and textured.

August's Signature Color Palette

august color palette selection

August's signature color palette showcases Pink Dawn as the vibrant centerpiece, offering versatility for walls or ceilings. This striking shade isn't just a trend; it's a reflection of how colors have evolved over the years. You can easily transform a space by incorporating this bold pink into your decor.

Complementing Pink Dawn, Symphony Blue and Jamaican Aqua provide invigorating tones that breathe life into your rooms. These colors create a soothing contrast while remaining in harmony with the energetic pink. Adding white enhances visual balance, allowing the vibrant Pink Dawn to shine even more.

To elevate the overall look, consider incorporating gold accents and natural elements like orchids and hibiscus. These touches bring a bohemian flair, making your home feel both stylish and inviting.

Advertisement

This color palette not only embraces current trends but also encourages you to think outside the box when it comes to color choices.

Personal Reflections on Pink

introspective thoughts on pink

You might find your feelings about pink have changed over time, especially as life events influence your color preferences.

Once seen as just a childish hue, pink can now represent a bold choice in your home decor.

As you embrace brighter shades, consider how these shifts reflect your personal journey and evolving taste.

Journey to Embrace Pink

The journey to appreciate pink unfolded unexpectedly after welcoming a daughter, transforming my initial resistance into a vibrant acceptance of the color. You might find that your own experiences color your perspective, just as mine did.

While I once shied away from pink, especially pastel shades, I embraced hot pink with enthusiasm. It became a bold statement in my wardrobe and home decor.

Advertisement

Incorporating pink hasn't only brightened my space but also reflected a broader cultural shift towards more dynamic colors. You may notice this trend too, where blush tones are predicted to dominate upcoming fall palettes. This evolution in taste showcases how personal experiences can reshape our preferences.

Consider these aspects of your journey with pink:

  • The emotional connections tied to specific colors
  • The influence of personal milestones, like having children
  • The shift in societal color trends
  • The contrast between pastel and vibrant shades

Embracing pink, particularly in its bolder forms, can reinvigorate your surroundings and enrich your experiences. So why not take a chance on this lively hue?

Personal Color Preferences Shift

As life experiences unfolded, personal color preferences shifted dramatically, illustrating how our journeys can reshape our views on hues like pink. You might remember a time when pastel pink felt like a color to avoid, steeped in negative memories. However, welcoming a daughter into your life can change everything. Suddenly, the softness of pink transforms from something you resist to a color that carries warmth and joy.

Though pastel shades still don't resonate with you, vibrant hues like hot pink have found a place in your heart. This shift isn't just about embracing a new color; it represents a deeper evolution in your taste. You've slowly woven pink into your wardrobe and home, reflecting your changing perspective.

In this broader context, it's fascinating to see how cultural trends, like the rise of Millennial Pink, resonate with your own transformation. Your journey with pink showcases the power of personal experiences in shaping color preferences and design choices. By allowing yourself to explore the spectrum of pink, you reveal a vibrant part of your identity, demonstrating that even our color preferences can grow and evolve over time.

Advertisement

Pink in Home Decor

Embracing pink in home decor has transformed my living space into a vibrant reflection of my evolving taste, blending warmth and joy in unexpected ways. Initially, I resisted pastel shades due to their associations, but after welcoming a daughter, my perspective shifted. Now, I lean towards bold, vibrant shades like hot pink that energize my space while steering clear of softer pastels.

Integrating pink into my decor has revealed its versatility, allowing me to create a dynamic atmosphere. As pink gains popularity, especially Millennial Pink, it signifies a cultural shift towards bolder choices in home design. Engaging in conversations with others, I've discovered diverse opinions on how striking pink can be, particularly when paired with other colors like gray.

Here are some ways to incorporate pink into your home decor:

  • Use hot pink throw pillows to add a pop of color to neutral sofas.
  • Paint an accent wall in a bold pink to create a focal point.
  • Accessorize with pink artwork that complements your existing decor.
  • Choose vibrant pink rugs to enliven your floors.

Explore the transformative power of pink and see where it takes you!

Bohemian Decor Essentials

bohemian style home essentials

How can you transform your space into a vibrant bohemian haven filled with personality and warmth? Start by embracing a lively mix of colors, patterns, and textures that reflect your unique style.

Layer colorful rugs and throw pillows to create a cozy atmosphere. These textiles not only add depth but also enhance the eclectic feel that defines bohemian decor.

Incorporate plants like orchids and hibiscus to breathe life into your home. These natural elements connect your space to the outdoors, making it feel fresh and inviting.

Advertisement

Don't forget to include diverse materials such as wood, metal, and woven elements; they contribute to the layered look that's essential in bohemian design.

Curate your space with unique art pieces and decor items collected from travels or local markets. These treasures tell your story and showcase your individuality.

The key to a successful bohemian vibe is personalization, so let your creativity shine through every aspect of your decor. Mix and match until you find the perfect balance that reflects your personality, and you'll create a warm, vibrant sanctuary that feels truly like home.

Community Color Conversations

engaging local dialogue sessions

Let's talk about your color journey!

Share your favorite combinations and how you've used pink in your home decor.

Your experiences can spark inspiration for others in our vibrant community!

Advertisement

Share Your Color Journey

Sharing your color journey not only sparks inspiration but also builds a vibrant community where everyone can explore their unique tastes and preferences in home decor. Engaging with others about color choices fosters a rich dialogue and allows you to learn from diverse opinions. You might discover why pink resonates with some while gray appeals to others.

The comments section is a fantastic platform for exchanging insights and suggestions. You can share how you incorporated trending colors into your space or ask for advice on your current project. Plus, participating in monthly color challenges on social media lets you showcase your creativity and inspire others.

Here are some ways to enhance your color journey:

  • Share photos of your color transformations.
  • Discuss your favorite color palettes and why they speak to you.
  • Offer tips on blending colors effectively in your home.
  • Invite friends to join in on color challenges.

Favorite Color Combinations

Immerse yourself in the vibrant world of favorite color combinations, where each pairing tells a story and reflects personal style. In this community, you'll discover a treasure trove of color palettes that resonate with diverse preferences and experiences. Many members find joy in combining pink with complementary hues like Symphony Blue and Jamaican Aqua, creating lively atmospheres that are both modern and inviting.

As you explore these combinations, you'll notice the emotional connections people have with their chosen colors. Each story shared can inspire you to think differently about your own color choices. The ongoing dialogue encourages you to experiment with new palettes, fostering creativity in your home decor.

Don't shy away from expressing your own favorites! The community thrives on feedback and shared experiences, making it a welcoming space for everyone. Whether you're drawn to soft pastels or bold contrasts, there's a combination waiting for you to investigate.

Advertisement

Plunge into these conversations, and you might just find the perfect palette that transforms your living space into a reflection of your unique style. Embrace the journey and let your home shine with colors that speak to you!

Pink in Home Decor

As you explore favorite color combinations, you'll find that pink is making a bold statement in home decor, capturing attention with its versatility and warmth. This year, Blush is set to dominate fall color palettes, reflecting a cultural shift towards vibrant choices. You'll notice Pink Dawn as a key player in August's palette, beautifully complemented by Symphony Blue and Jamaican Aqua.

Homeowners are increasingly embracing pink, moving from a dislike of pastels to celebrating bolder shades like hot pink. This transformation is especially evident in bohemian aesthetics, where pink is integrated with textiles, plants, and natural materials to create an inviting atmosphere.

Consider these ideas to incorporate pink into your decor:

  • Pair pink with neutral tones like gray for a sophisticated look.
  • Use hot pink accents to energize a room without overwhelming it.
  • Incorporate pink textiles, like throw pillows or rugs, to add warmth.
  • Combine pink with vibrant greens to enhance a natural feel.

Embrace the versatility of pink, and watch your space transform into a vibrant haven!

Seasonal Decorating Tips

creative seasonal decor ideas

Transform your space with seasonal colors that reflect the vibrant energy of August, using shades like Pink Dawn, Symphony Blue, and Jamaican Aqua. These hues not only create a rejuvenating ambiance but also energize your home decor during the summer months.

To enhance this look, consider adding white accents alongside pink, as they provide visual balance and highlight the vibrant tones in your decor. Incorporate gold accents and natural elements like greenery to add texture and interest, contributing to a bohemian aesthetic that flourishes in warm weather.

Advertisement

Rotating seasonal colors in textiles, such as throw pillows and blankets, can effortlessly revitalize your home while creating a cozy atmosphere that resonates with August's spirit. Don't overlook the impact of small changes; introducing plants like orchids and hibiscus can greatly enhance the vibrancy of your living spaces.

These elements bring life and a touch of nature indoors, making your home feel more inviting. By embracing these seasonal decorating tips, you'll capture the essence of August and transform your home into a stylish, lively retreat. Get ready to enjoy the beauty of summer right inside your own space!

Resources for Color Inspiration

color inspiration resource guide

To find the perfect color inspiration for your home, explore a variety of resources that cater to your unique style and preferences. With the right tools and communities at your fingertips, you'll discover palettes that resonate with you and elevate your space.

  • Color analysis tools: Use free quizzes to determine your personal color types, helping you enhance your style.
  • Pinterest: Browse for downloadable resources like color palettes and wheels to aid in planning your color combinations.
  • Social media challenges: Participate in weekly color challenges on platforms like Instagram and Facebook to engage with fellow color enthusiasts and share your journey.
  • Blogs: Access insightful blog posts that offer tips on choosing paint colors, considering color psychology, and exploring trending hues for home decor inspiration.

Frequently Asked Questions

What Are the Colors for the Month of August?

For August, you've got Pink Dawn as the main color, paired with Symphony Blue and Jamaican Aqua for cool accents. Adding white creates balance, while gold accents and greenery enhance the overall vibe beautifully.

What Color Goes Best With August?

Did you know that 60% of people feel more relaxed in pink environments? For August, consider pairing Pink Dawn with Symphony Blue and Jamaican Aqua. They create a vibrant yet calming atmosphere in your space.

How Do I Choose a Color Palette for My New Home?

To choose a color palette for your new home, start with a main color you love. Then, select complementary shades and neutrals, adding accents to enhance the overall look while ensuring harmony throughout your space.

What Colors Are Associated With Months?

Colors associated with months reflect seasonal changes. For example, January features white, February has cherry red and pink, March boasts emerald green and purple, while August embraces burnt red and orange, signaling summer's shift into autumn.

Advertisement

Conclusion

As you stand in your living room, imagine the vibrant hues of August washing over your walls.

Picture how a bold pink can breathe life into your space, while soft neutrals create a serene backdrop.

The warmth of bohemian accents draws you in, inviting you to explore every corner.

So, are you ready to transform your home and embrace these enchanting color palettes?

The perfect shade awaits you—just step into your vision and let the magic unfold.

Advertisement

Continue Reading

Alfresco

What Is Alfresco Painting? Artistic Techniques Explained!

An exploration of alfresco painting, a historical technique rooted in the Renaissance, revealing artistic secrets that elevate outdoor artistry.

Published

on

By

outdoor painting technique overview

Explore the historical artistry of alfresco painting, stemming from the Renaissance in Italy. Artists like Giotto and Michelangelo led the way, painting on wet plaster to craft vivid frescoes. For this technique, you'll need outdoor-grade paints such as oil paints, acrylics, or watercolors, along with suitable brushes and water containers. Prepping the plaster surface meticulously is essential for a flawless finish. As you paint, remember to use soft brushes on wet plaster, allowing pigments to chemically bond with the surface for depth. Delve into this technique further to uncover the intricate details and techniques that make alfresco painting truly unique.

Key Takeaways

  • Originates from Renaissance Italy, involving painting on wet plaster.
  • Requires outdoor-grade paints, suitable brushes, water containers, and portable easels.
  • Involves drawing directly on wet plaster and using soft brushes for blending.
  • Fresh plaster crucial for strong paint bonding, vibrant colors, and longevity.
  • Preservation entails curing, sealing, weather considerations, and regular maintenance.

Origins of Alfresco Painting

The origins of alfresco painting trace back to Italy during the Renaissance period, where artists pioneered the technique of painting on wet plaster to create enduring murals. This artistic practice, known as fresco, emerged as a popular method for decorating the walls and ceilings of churches, palaces, and public buildings in Italy.

During the Italian Renaissance, artists like Giotto and Michelangelo utilized fresco painting to produce magnificent works of art that showcased both their technical skill and creative vision.

Fresco painting involves applying water-based pigments on freshly laid wet plaster, allowing the colors to become an integral part of the surface as they dry. Artists would transfer their designs onto the wet plaster from a cartoon or outline drawing, enabling them to create intricate and long-lasting murals.

This technique not only provided a durable finish but also allowed for the creation of monumental and detailed artworks that adorned various architectural settings, contributing to the rich artistic legacy of the Italian Renaissance.

Materials Needed for Alfresco Painting

outdoor painting supplies required

For alfresco painting, you'll need specific materials to create your artwork outdoors. Common materials for fresco painting include outdoor-grade paints such as oil paints, acrylics, or watercolors. These paints are chosen based on the artist's preferences and the desired effect.

In addition to paints, you'll require brushes suitable for outdoor use, water containers for mixing paints, and portable easels to support your canvas or surface.

Advertisement

When painting alfresco, the natural light and surroundings play a significant role in influencing the colors and atmosphere of your artwork. This medium allows artists to capture changing light, shadows, and textures in real-time, providing a unique artistic experience.

Remember that preparing the plaster surface adequately is essential before beginning your alfresco painting to maintain the longevity and quality of your artwork.

Preparing the Plaster Surface

surface ready for plaster

To start preparing the plaster surface for alfresco painting, ensure it's smooth and free of imperfections. This step is vital as the success of the painting relies heavily on the quality of the plaster surface.

Artists often employ traditional fresco techniques to achieve the desired smoothness and flawlessness required for alfresco painting. Ensuring the plaster surface is completely dry is essential before commencing the painting process, as any moisture can compromise the adhesion of the pigments to the surface.

Properly preparing the plaster surface not only enhances the aesthetic appeal of the final artwork but also contributes to its longevity. By meticulously attending to the details of the plaster surface, artists set a strong foundation for the application of water-based pigments, which is the hallmark of alfresco painting.

Drawing the Design on Plaster

designing patterns on plaster

When drawing the design on plaster for alfresco painting, artists meticulously outline their vision directly onto the wet plaster surface. This technique for tracing serves as an essential guide for applying pigments and creating the mural.

Ensuring accuracy and cohesion in the final artwork, this step allows for the seamless integration of the design into the larger mural composition.

Advertisement

Plaster Design Preparation

Efficiently transferring the desired artwork onto the fresh plaster surface is a crucial step in the process of preparing the design for an alfresco painting. Artists utilize tools like brushes, pencils, or styluses to outline the design directly onto the prepared plaster surface.

These design outlines act as a roadmap for the artist, guiding them through the painting process in the alfresco technique. Precision and accuracy in this step are essential as they greatly impact the overall composition of the artwork.

Drawing the design on plaster marks the critical initial phase in creating vibrant and enduring alfresco paintings. By carefully tracing the design onto the plaster, artists lay the foundation for a visually captivating mural that withstands the test of time.

This meticulous process ensures that the artwork isn't only visually appealing but also structurally sound, enhancing its longevity and artistic impact.

Technique for Tracing

Using a sinopia sketch or cartoon, artists meticulously trace the design onto the fresh plaster surface to prepare for the alfresco painting process. Tracing is an essential step in fresco painting, as it allows artists to transfer the intricate details of their design onto the plaster with precision and accuracy.

Advertisement

By following the lines of the sketch or cartoon, artists can guarantee that the final composition reflects their original vision faithfully. This technique not only guides the artist during the painting process but also aids in the placement of elements within the composition. Through tracing, artists can achieve a level of detail and accuracy that would be challenging to attain freehand.

Ultimately, tracing plays a significant role in ensuring that the final fresco painting is a true representation of the intended design, capturing every nuance and detail with meticulous care.

Painting Techniques in Alfresco Painting

alfresco painting methods explained

To achieve intricate details and vibrant colors in alfresco painting, artists employ specific brushwork techniques on the freshly applied plaster. Working on wet plaster allows the pigments to bond chemically with the surface, ensuring the artwork becomes a permanent part of the wall in mural painting.

The technique involves using soft brushes to apply pigments to the wet surface, with the colors becoming brighter as the plaster dries. Artists must work swiftly and confidently to capture the desired hues and textures before the plaster sets. By blending and layering pigments on the wet surface, they can achieve depth and dimension in the mural.

This method of painting on wet plaster gives the artwork a matte finish and durability that's ideal for large-scale murals. The process of painting on wet plaster requires skill and precision to create lasting and visually stunning pieces of art.

Importance of Fresh Plaster in Painting

fresh plaster for painting

Fresh plaster plays a vital role in alfresco painting by ensuring that the paint adheres securely to the wall surface, enhancing its durability over time.

The porous nature of fresh plaster allows the pigments to be absorbed, creating a strong bond between the paint and the wall.

Advertisement

Artists find that painting on fresh plaster provides a smooth and receptive canvas for their artistic expression, resulting in vibrant and long-lasting colors on the wall.

Fresh Plaster Enhances

Enhancing the vibrancy and longevity of painted colors, fresh plaster plays an essential role in alfresco painting techniques. When working with fresco painting, fresh plaster acts as a pivotal foundation that allows the colors to bond effectively, creating lasting artwork. The porous nature of fresh plaster enhances the vibrancy of the colors, ensuring they remain vivid over time. Additionally, painting on fresh plaster provides artists with a smooth and even surface to work on, allowing for intricate details and precise brushwork.

To further illustrate the importance of fresh plaster in alfresco painting, consider the following table:

Benefits of Fresh Plaster in Alfresco Painting
Allows colors to bond effectively
Enhances color vibrancy and longevity
Provides a smooth surface for detailed work

Painting Adhesion and Durability

For ideal adhesion and durability in alfresco painting, fresh plaster plays a critical role in bonding water-based pigments to the wall surface. In fresco painting, the application of fresh plaster serves as the foundation for the paint to guarantee effective bonding, ensuring a long-lasting finish.

The interaction between the fresh plaster and water-based pigments is essential for creating a strong bond that withstands the test of time. Without the use of fresh plaster, the paint may not properly set on the wall surface, leading to potential issues such as flaking or peeling over time.

Advertisement

Fresh plaster in alfresco painting isn't just a surface preparation step but a fundamental component in enhancing the vibrancy and longevity of the colors applied. It allows for a seamless integration of the paint into the wall, becoming a permanent part of the structure.

The meticulous attention to using fresh plaster guarantees a durable and visually striking outcome in fresco painting.

Curing and Sealing the Fresco

preservation of ancient artwork

Curing and sealing the fresco is an essential final step in guaranteeing its longevity and preservation. The curing process involves allowing the fresco to dry naturally over several weeks. This period is vital for achieving full strength and durability as the pigments chemically bond with the plaster. Properly curing the fresco guarantees a lasting and vibrant artwork.

Sealing the fresco with a protective coating, such as a transparent glaze or wax, further enhances its longevity. This protective layer helps shield the fresco from environmental factors like dust, dirt, and moisture, preserving its colors and details for years to come. By properly curing and sealing the fresco, you aren't only maintaining its integrity but also ensuring its beauty withstands the test of time.

This meticulous process is fundamental for the long-term preservation of fresco paintings, making them a valuable and enduring art form.

Tips for Successful Alfresco Painting

outdoor painting success guide

When starting alfresco painting, keep in mind that the choice of location can greatly impact your artwork's outcome.

Considering the weather conditions is essential for a successful painting session outdoors.

Advertisement

Location Choice Matters

Selecting the right location is key to ensuring successful alfresco painting, as it greatly impacts the outcome of your artwork. When choosing a spot for your outdoor painting session, consider factors such as lighting, scenery, and ambiance. Here are some tips to help you make an informed decision:

Consideration Description Example
Lighting Opt for locations with natural light sources to enhance colors and shadows. Painting near a lake during sunset.
Scenery Choose settings that inspire your creativity and complement your artistic vision. A lush garden with vibrant flowers.
Ambiance Look for places that provide a peaceful and inspiring atmosphere to focus on your art. A quiet meadow with the sound of birds chirping.

Weather Considerations Crucial

Considering weather conditions is crucial for successful alfresco painting. It directly impacts the quality and process of your artwork.

Temperature plays a significant role in determining the drying times of your paints. Extreme heat can cause them to dry too quickly, affecting the blending and overall finish of your piece. On the other hand, cold temperatures can prolong drying times, leading to potential smudging or smearing if not carefully monitored.

Additionally, humidity levels in the air can influence how your paints adhere to the canvas, impacting the richness and depth of colors achieved. It's advisable to work during times when the temperature is moderate, avoiding peak sunlight hours that can accelerate drying excessively.

Inspirational Examples of Alfresco Art

outdoor art installations thrive

Explore a variety of awe-inspiring alfresco artworks that showcase the beauty and creativity of painting outdoors. Alfresco painting, with its roots in capturing the essence of nature, has produced some remarkable pieces throughout history.

One of the most iconic examples of alfresco art is Michelangelo's masterpiece in the Sistine Chapel. The intricate frescoes adorning the chapel's ceiling are a testament to the skill and dedication required for this painting technique.

Advertisement

Artists like Monet and Sargent also found inspiration in painting outdoors, using plein air techniques to convey the changing light and atmosphere in their works.

These influential artists paved the way for contemporary alfresco painters, who continue to create stunning pieces that blur the lines between art and nature. From vibrant landscapes to intimate portraits, alfresco art offers a unique perspective that can only be achieved by working directly from the natural world.

Preservation and Maintenance of Alfresco Paintings

conserving outdoor artwork masterpieces

To guarantee the longevity and beauty of alfresco paintings, preservation and maintenance are crucial steps in protecting these artworks from environmental damage. Preservation of fresco paintings involves safeguarding them from weather elements such as rain, sun exposure, and temperature fluctuations.

It's essential to maintain these pieces by regularly cleaning them to remove dirt, grime, and pollutants that could harm the artwork over time. Applying protective coatings or sealants can help extend the lifespan of alfresco paintings and prevent color fading.

In cases where restoration is necessary, conservators may repair cracks, reattach loose paint, and address any structural issues to ensure the durability of the artwork. Professional conservators utilize specialized methods and materials to safeguard fresco paintings, ensuring that their beauty and historical significance are preserved for future generations to appreciate.

Frequently Asked Questions

What Is the Fresco Painting Technique?

The fresco painting technique involves applying water-based pigments on freshly applied plaster, creating durable murals. Artists grind dry-powder pigments in water to create colors that dry and set with the plaster, allowing for detailed artworks.

Advertisement

What Does Al Fresco Mean in Painting?

Imagine painting under the open sky, capturing nature's essence with each brushstroke. 'Al fresco' in painting means embracing the outdoors. Artists use this term to signify creating art in the fresh air, connecting with nature's beauty.

How Does an Artist Create a True Fresco Painting?

To create a true fresco painting, you meticulously apply water-based pigments on fresh plaster while transferring your design. Each day, you paint sections on wet plaster, ensuring colors become permanent as they dry within the surface.

Why Is Fresco Painting Significant?

Fresco painting is significant due to its durability and ability to create monumental murals. Artists like Michelangelo favored it during the Italian Renaissance. Applying water-based pigments on wet plaster makes colors permanent, allowing detailed work.

Conclusion

To sum up, alfresco painting is a timeless art form that requires skill, patience, and attention to detail.

As you commence on your own alfresco painting journey, remember that like a fresco, life is a canvas waiting to be painted with vibrant colors and intricate designs.

Advertisement

So, take inspiration from the masters of the past, embrace the process of creating something beautiful, and let your creativity shine through in every brushstroke.

Happy painting!

Continue Reading

Home Decor

Set the Perfect Mood in Any Room With These Lighting Tips – You’Ll Be Amazed!

Unlock the secrets to transforming your space with simple lighting tips that will leave you amazed at the results!

Published

on

By

transform your space s ambiance

You can easily set the perfect mood in any room with just a few lighting tips. Start by using a mix of ambient and task lighting to create comfort and functionality. Dimming your lights softens the atmosphere for intimate gatherings, while warm-toned bulbs foster positivity. Layer your lighting with floor lamps, sconces, and colored LED bulbs to add depth and visual interest. Consider natural elements, like salt lamps, to enhance relaxation. These simple adjustments can transform your space. For even more ways to elevate your home's vibe, you'll want to explore additional creative lighting techniques!

Key Takeaways

  • Use dimmable fixtures or candles to easily adjust ambiance for gatherings or relaxation, creating a warm and inviting atmosphere.
  • Layer lighting with multiple sources, such as floor lamps and wall sconces, to enhance room aesthetics and depth.
  • Choose warm-toned bulbs to create a flattering environment that boosts confidence and enhances emotional connections.
  • Incorporate task lighting in functional areas to ensure safety and productivity while maintaining a cozy atmosphere.

Understanding Mood Lighting

Understanding mood lighting is essential because it can dramatically shape your emotions and experiences in any space. The right mood lighting creates an inviting atmosphere that enhances your feelings and interactions.

Ambient lighting, particularly when it has a warm glow, is vital for setting the tone. It not only softens harsh realities but also boosts confidence, especially in romantic settings.

Research shows that many people prefer dimmed lighting during intimate moments, often due to worries about body visibility and self-image. By using warm tones, you can create a more flattering environment that reduces self-consciousness and heightens enjoyment. This positive lighting can make a significant difference in how you and your partner connect, fostering deeper emotional ties.

Incorporating multiple light sources and adjusting colors can further enhance your space. You're not just illuminating a room; you're curating an experience that promotes well-being and satisfaction.

Types of Lighting to Consider

various lighting options available

To create the perfect atmosphere in your space, it's important to explore the different types of lighting available, each serving a unique purpose in enhancing your home's ambiance.

Start with ambient lighting, which sets the overall tone and mood of a room. Options like floor lamps and recessed lights provide a soft glow that enhances comfort and relaxation, making your space feel inviting.

Advertisement

Next, consider task lighting. This type is essential for functional areas where you need focused illumination. Under-cabinet lights in kitchens or desk lamps in home offices guarantee you can perform specific activities efficiently and safely. Task lighting not only aids productivity but also prevents eye strain.

Techniques for Effective Atmosphere

creating engaging atmosphere techniques

Creating the right atmosphere in your space involves a strategic blend of lighting techniques that cater to your specific needs and preferences.

Start by using dimmable light fixtures or candles to soften the ambiance, perfect for gatherings or relaxation. Multiple light sources, like floor lamps, wall sconces, and table lamps, allow you to adjust the mood effortlessly while enhancing the overall aesthetic of your room.

Consider incorporating smart home technology, which lets you customize brightness and color to suit different occasions. This adaptability guarantees your space feels just right, whether you're hosting friends or enjoying a quiet evening alone.

Opt for warm-toned lighting to boost self-confidence and create an inviting environment, fostering positive interactions. For a calming atmosphere, try adding natural elements like Himalayan salt lamps; they not only provide a gentle glow but also contribute to a soothing vibe.

Creating Intimacy With Light

illuminating connection through light

Soft lighting sets the mood for intimacy, helping you and your partner feel more relaxed and connected. When you dim the lights, the atmosphere transforms, inviting a sense of closeness. A warm, amber glow creates a cozy environment that encourages emotional bonding.

According to a Harris Poll, 62% of people prefer intimate moments with the lights off, emphasizing the power of reduced visibility in fostering comfort.

Advertisement

Incorporating ambient lighting solutions like Himalayan salt lamps or colored bulbs can greatly enhance the mood of a space. These options not only cast a soft light but also add a unique charm that can elevate your romantic experiences.

Warm tones in lighting improve appearance and boost self-confidence, allowing both you and your partner to feel at ease during those special moments.

Practical Lighting Tips for Rooms

effective room lighting strategies

Maximizing the effectiveness of your lighting can transform any room into a more inviting and functional space. Start by incorporating dimmer switches to easily adjust the lighting intensity, allowing you to create the right ambience for relaxation or social gatherings.

Layer your lighting with multiple sources, like floor lamps, table lamps, and recessed fixtures, to add depth and visual interest.

In spaces like living rooms and bedrooms, opt for warm-toned bulbs. They enhance appearance and boost confidence, making your environment feel more welcoming.

For functional areas like kitchens, utilize task lighting by combining overhead fixtures with under-cabinet lights. This guarantees ideal usability and safety while you cook.

Advertisement

Don't forget to experiment with strip lighting! It's perfect for accentuating architectural features or creating a cozy atmosphere in various spaces.

Consider using color-changing LED bulbs as well; they allow you to customize the atmosphere according to your mood or occasion. By mixing different shades and intensities throughout your rooms, you'll achieve a well-lit space that feels just right for any activity.

Frequently Asked Questions

How to Set the Mood With Lighting?

To set the mood with lighting, use warm-toned bulbs and multiple light sources. Incorporate soft lighting for comfort, and experiment with unique options like Himalayan salt lamps to create a playful, intimate atmosphere.

What LED Light Puts You in a Good Mood?

Imagine warm, soft oranges and yellows wrapping around you like a cozy blanket. Those LED lights lift your spirits, while playful purples spark joy, and calm blues keep you alert. Choose your mood, light it up!

How Does Room Lighting Affect Mood?

Room lighting affects your mood considerably. Warm tones can boost your confidence and create a relaxing atmosphere, while bright lights keep you alert. Adjusting lighting alters your feelings, enhancing intimacy and emotional satisfaction during interactions.

Advertisement

How Does Lighting Affect the Mood of a Scene?

You might think lighting doesn't matter much, but it profoundly shapes a scene's mood. Soft, warm tones create intimacy, while harsher lights can evoke tension. Carefully chosen lighting enhances emotions, fostering connections and making moments memorable.

Conclusion

Now that you've got the tools to set the perfect mood, imagine this: you're hosting a cozy dinner party.

Soft, warm lights flicker from strategically placed lamps, while candles on the table cast a gentle glow.

Friends laugh and share stories, feeling instantly relaxed in the inviting atmosphere you've created.

With these lighting tips, you can transform any space, making every gathering memorable and every moment special.

Advertisement

So go ahead, let your creativity shine!

Continue Reading

Trending