Connect with us

Home Decor

7 Stunning Topiary Design Ideas for Your Garden

Yearning for a show-stopping garden?

Published

on

topiary design ideas garden

Transform your outdoor space with these 7 stunning topiary design ideas for your garden! Revive classic shapes like spheres, cubes, and cones, or reveal whimsical animal designs like elephants and birds. Geometric patterns inspired by nature will create visually striking features, while framed masterpieces will elevate your garden's visual appeal. Modern twists on traditional designs and elegant entranceways with topiary will showcase your personal style. With a little creativity, you can create a captivating garden that boosts your home's curb appeal. As you explore these ideas, discover how to balance harmony and structure, and take your garden to the next level.

Key Takeaways

• Revive traditional topiary shapes like pyramids and spirals to enhance garden harmony and balance.

• Use wire frames to create whimsical animal designs, such as elephants, giraffes, and birds, adding charm to gardens.

• Incorporate geometric patterns and shapes, like spheres and cones, to create visually striking features in your garden.

• Conceal wire templates with foliage to create framed masterpieces, elevating garden visual appeal with creative shapes.

Advertisement

• Modernize topiary designs by incorporating fresh geometric shapes, unique plant choices, and contemporary twists on classic styles.

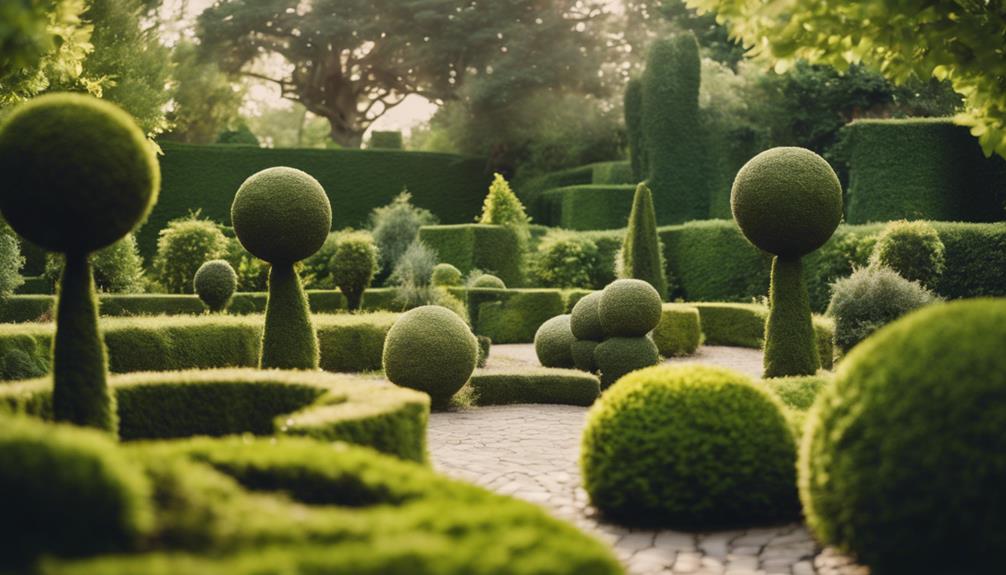
Classic Topiary Shapes Revived

As you stroll through modern gardens, you'll notice classic topiary shapes like spheres, cubes, and cones making a stylish comeback, adding structure and elegance to outdoor spaces. These timeless shapes aren't only aesthetically pleasing but also provide a sense of symmetry and balance in the garden. By incorporating classic topiary shapes into your design, you can create a focal point and add visual interest to your outdoor space. Reviving traditional topiary forms like pyramids and spirals can also enhance the harmony and refinement of your garden.

Classic topiary shapes are versatile and can complement various garden styles, from modern to traditional. They can be used as standalone pieces or combined with other design elements to create a unique look. When selecting a topiary shape, consider the overall aesthetic you want to achieve and the style of your garden.

With a little creativity, you can use classic topiary shapes to create a stunning outdoor space that reflects your personal style. By embracing these timeless design ideas, you can elevate your garden's beauty and create a welcoming atmosphere for years to come.

Whimsical Animal Designs Unleashed

animal themed art collection released

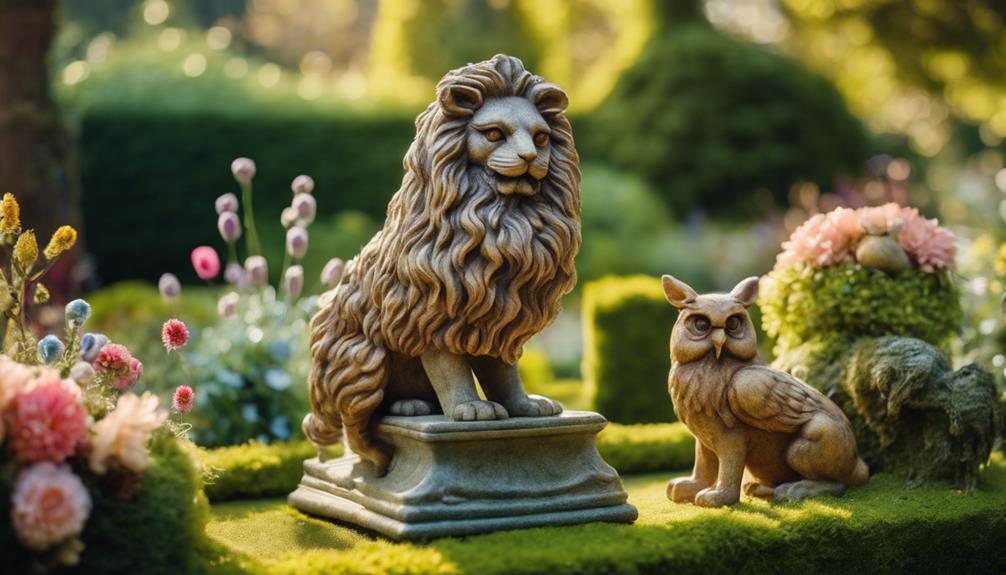
As you explore the domain of whimsical animal designs, you'll discover a world of creative possibilities. From wire-framed wonders to feathered friends and woodland creatures, these topiary designs will transport you to a fantastical world.

Let's explore the points of Whimsy in Wire Frames, Feathered Friends Forever, and Woodland Creatures Abound, and uncover the secrets to bringing these enchanting designs to life in your garden.

Advertisement

Whimsy in Wire Frames

With wire frames, you can ignite your creativity and bring a touch of whimsy to your garden by shaping plants into fantastical animal forms that seem to spring to life. These wire frames provide a structured foundation for shaping plants into recognizable animal forms, allowing you to spark your creativity and bring a sense of enchantment to your garden. Popular animal designs include:

Animal Design Description Plant Type
Elephant Majestic and gentle, adding a touch of sophistication Boxwood or Holly
Giraffe Tall and playful, perfect for a whimsical touch Ivy or Clematis
Peacock Vibrant and colorful, adding a pop of color Flowering plants like Petunias or Geraniums
Monkey Mischievous and fun, great for a playful garden Trailing plants like Creeping Jenny or Sweet Potato Vine
Dragon Fierce and mythical, perfect for a dramatic statement Succulents like Aloe or Echeveria

Feathered Friends Forever

Take your topiary design to new heights with feathered friends that add a touch of personality to your garden, from majestic birds of paradise to playful parakeets, all waiting to be shaped and pruned into whimsical wonders.

In a topiary garden, these feathered friends can bring a sense of charm and whimsy, adding a playful touch to your landscape. To achieve these lifelike forms, careful pruning and shaping are essential.

You can feature a single, show-stopping topiary animal or scatter them throughout your garden for a fun surprise. Popular feathered friends in topiary design include peacocks, which can add a regal touch to your garden.

By incorporating these whimsical designs into your topiary garden, you'll create a unique and enchanting outdoor space that's sure to delight. So why not give your garden a personality boost with these charming feathered friends?

Advertisement

With a little creativity and pruning know-how, you can bring these topiary animals to life and make your garden a true showstopper.

Woodland Creatures Abound

You can create a whimsical woodland world in your garden by incorporating topiary designs featuring playful rabbits, mischievous squirrels, and curious birds that seem to come to life amidst your lush greenery.

With the help of a skilled topiary specialist, you can craft large topiary woodland creatures that will transport your visitors to an enchanted land.

Imagine strolling through your garden, surrounded by a menagerie of woodland creatures, each one meticulously sculpted from boxwoods, yews, or hollies. These whimsical animal topiaries can serve as focal points or accents in your garden, enchanting visitors with their intricate forms.

By incorporating these charming designs, you'll transform your outdoor space into a magical woodland paradise that delights both young and old.

Advertisement

Whether you're looking to add a touch of fantasy or simply want to create a unique conversation starter, woodland creatures abound in your topiary garden, bringing a sense of wonder and enchantment to your outdoor oasis.

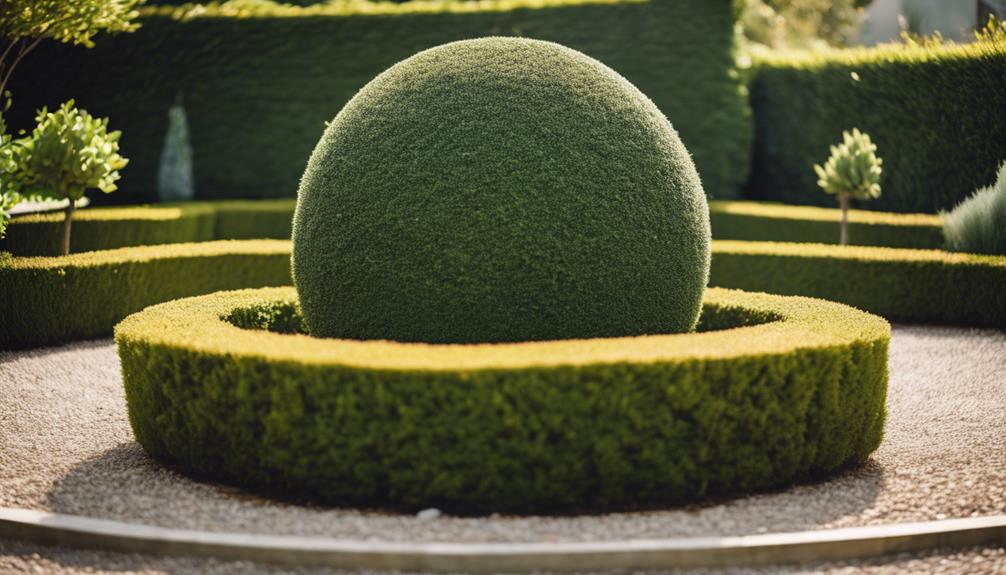
Geometric Patterns in Nature

symmetry in natural designs

Nature's intricate designs inspire topiary artists to replicate geometric patterns, echoing the harmony of cubes, spheres, and cones found in the natural world. By incorporating these shapes into your garden design, you can create a visually striking and unique feature. Topiary offers a way to create visual contrast in your garden with simple geometric shapes, adding depth and interest to your outdoor space.

Here are some ways to incorporate geometric patterns into your topiary design:

  • Use frames to guide plants into creative shapes, with wire templates hidden inside the topiary for intricate designs.
  • Plant clipped evergreens in geometric shapes, such as spheres or cones, to mimic the Oriental shaping found in traditional Japanese gardens.
  • Create a topiary forest by planting a mix of various geometric shapes, creating a unique and dramatic garden feature.
  • Experiment with different geometric shapes, such as cubes or pyramids, to add visual interest to your garden.
  • Combine geometric shapes with other design elements, such as water features or statues, to create a cohesive and stunning garden design.

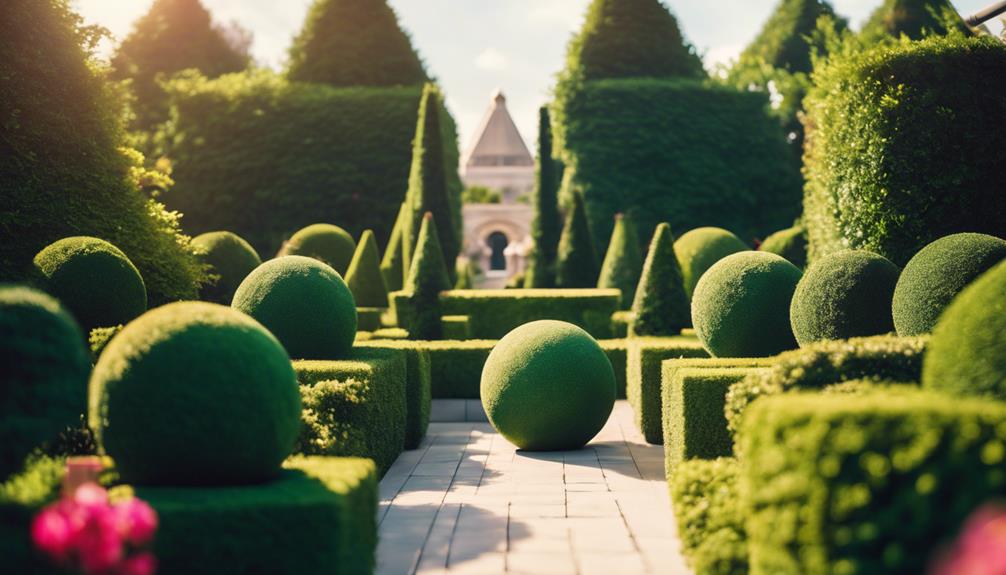
Topiary Forests for Dramatic Impact

topiary forest artistry display

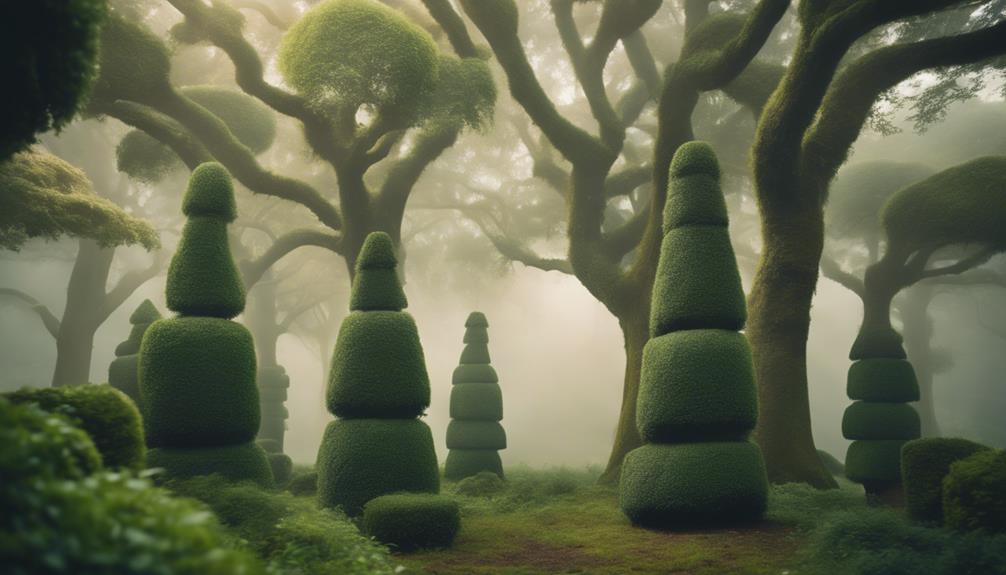
By grouping multiple geometric topiary shapes together, you can create a visually stunning topiary forest that adds depth, texture, and whimsy to your garden. These topiary forests can feature a mix of shapes and sizes, creating a mesmerizing impact that transforms your outdoor space.

Imagine a cluster of spiral-shaped trees alongside cylindrical and conical ones, forming a visually striking landscape that's sure to impress. By incorporating different geometric shapes, you can add texture and depth to your garden design, making it a unique and enchanting oasis.

You can arrange the topiary trees in patterns or clusters, further enhancing the aesthetic appeal of your garden. With a topiary forest, you can create a whimsical atmosphere that invites exploration and relaxation. By grouping these geometric shapes together, you can create a dramatic and alluring garden that's sure to become a focal point of your outdoor space.

Framed Masterpieces in the Garden

artistic display in nature

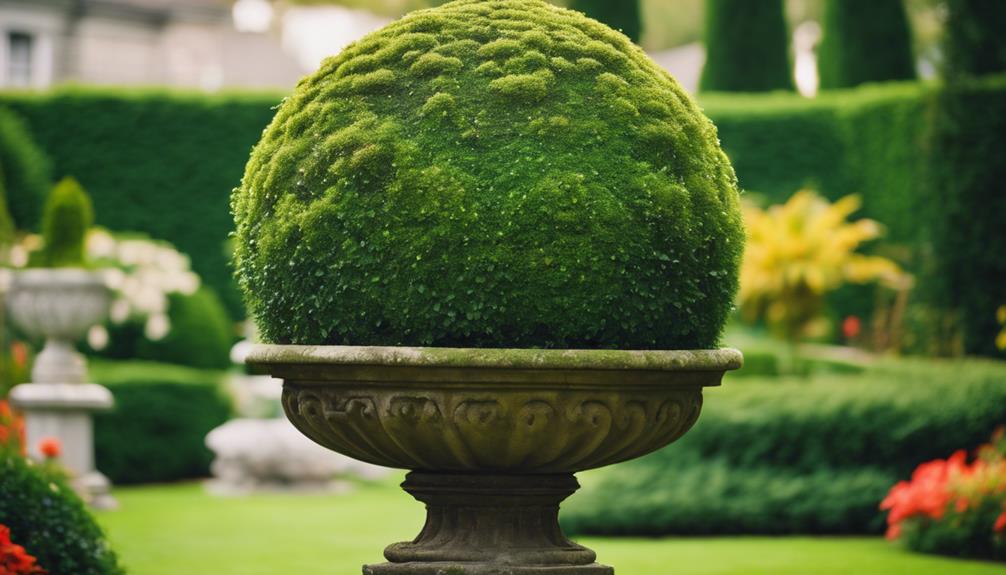
To elevate your garden's visual appeal, incorporate framed topiary masterpieces that cleverly conceal wire templates within the foliage, allowing you to craft creative shapes that become instant focal points. By using frames, you can create stunning topiary designs that add a touch of elegance to your formal gardens. Evergreen shrubs, like boxwood or yew, are ideal for framing, as they can be easily shaped and maintained.

Here are some ideas to get you started:

Advertisement
  • Design a topiary hedge atop a privacy hedge for a unique and decorative look in your garden.
  • Use lollipop bay trees, box topiary balls, and pompom conifers to add charm and elegance to your garden.
  • Replicate Oriental shaping by incorporating clipped evergreens in Japanese gardens for a touch of traditional and serene beauty in your outdoor space.
  • Create a topiary forest with various geometric shapes to add depth and dimension to your garden while showcasing your creativity and style.
  • Experiment with different frame shapes and sizes to create a one-of-a-kind topiary masterpiece that reflects your personal style.

Modern Twists on Traditional Designs

innovative fusion of styles

You can modernize traditional topiary designs by incorporating fresh, geometric shapes and unique plant choices that add a contemporary spin to classic styles. As a garden designer, you can experiment with modern twists like lollipop bay trees, box topiary balls, and pompom conifers to create a fresh take on traditional designs.

To add visual contrast in your garden, try using simple shapes such as cubes, spheres, or cones to add interest and dimension. You can also replicate oriental shaping with clipped evergreens in Japanese gardens to bring a touch of zen to your outdoor space.

For a whimsical and enchanting element, plant a topiary forest with various geometric shapes. Use frames for creative shapes, utilizing wire templates hidden inside topiary to achieve unique and intricate designs in your garden.

Cloud pruning, a technique that involves pruning plants to create soft, cloud-like shapes, can also add a modern touch to your topiary designs. By incorporating these modern twists, you can create a unique and captivating garden that showcases your creativity and style.

Elegant Entranceways With Topiary

beautiful topiary at entrance

Create a stunning first impression by placing topiary at your entranceway, where it can elegantly flank your doorway and guide visitors' eyes towards your home's main entrance. This thoughtful touch will elevate your garden ideas and add structure to your outdoor space.

By incorporating topiary in containers at your entry points, you'll create a welcoming and stylish touch that sets the tone for your entire garden. Here are some tips to keep in mind:

  • Use topiary to create symmetry by flanking your doorway, enhancing the architectural features of your home.
  • Choose shrubs that match the style of your home, whether traditional or modern.
  • Consider using topiary as a focal point to draw visitors' attention to your main entrance.
  • Don't be afraid to experiment with different shapes and sizes to add visual interest.
  • Topiary can be tailored to fit your personal style, from formal to whimsical.

Frequently Asked Questions

How to Design a Topiary Garden?

When designing a topiary garden, you'll want to start by choosing a style that suits your taste, whether it's classic, modern, or themed. Consider popular themes like animal sculptures or geometric shapes for a unique look.

Next, decide on an approach: will you use frames to guide plant growth or opt for a more natural look?

Advertisement

How Can I Make My Garden Look Amazing?

You want to make your garden look amazing, but where do you start? Begin by creating visual contrast with simple shapes like cubes, spheres, or cones to add interest and beauty to your outdoor space.

Don't be afraid to get creative with unique topiary designs that reflect your personal style. By incorporating stunning topiary elements, you'll be well on your way to crafting a garden that's truly show-stopping.

What Plant Makes the Best Topiary?

When selecting the best topiary plant, you'll want to contemplate the shape and structure you envision.

Yew is great for tall, spiraling creations, while boxwood is perfect for defined 3-D shapes.

Bay trees work well for stemmed pieces that bush out at a specific height.

Advertisement

Bayberry, with its dense foliage, is ideal for intricate designs.

Ultimately, the right plant for you'll depend on the unique look you're going for.

How Do I Make My Garden Aesthetically Pleasing?

As you commence on crafting an aesthetically pleasing garden, envision a masterpiece where every element harmonizes in perfect symphony.

You'll want to balance textures, colors, and shapes to create visual interest. Start by incorporating a mix of plants with varying heights, widths, and bloom times to add depth and visual appeal.

Then, use topiary designs to add a touch of whimsy and sophistication, drawing the eye to focal points in your garden.

Advertisement

Conclusion

As you incorporate these stunning topiary design ideas into your garden, remember that topiary art has been a staple of landscaping for centuries. In fact, did you know that topiary has been a part of European garden design since the 16th century?

By embracing both classic and modern designs, you'll create a unique outdoor space that's sure to impress. Whether you opt for whimsical animals or elegant entranceways, your topiary creations will unquestionably become the focal point of your garden, elevating its beauty and sophistication.

Continue Reading
Advertisement

Home Decor

10 Stylish 34-Inch Tree Collars for Your Christmas Decor

Find the perfect finishing touch for your Christmas tree with these 10 stylish 34-inch tree collars that elevate your holiday decor.

Published

on

stylish 34 inch christmas tree

Elevate your Christmas decor with a stylish 34-inch tree collar that complements your unique holiday style. From modern sophistication to rustic charm, you'll find a collar to fit your theme. Choose from red velvet with sequins, burlap for a natural look, or a winter wonderland snowflake design. For a classic touch, opt for emerald green or galvanized steel for a farmhouse chic vibe. Alternatively, go for vintage glamour with gold sequins, Scandinavian minimalism in white, or a cozy country cottage look with a plaid pattern. Whichever style you choose, you'll add a touch of elegance to your holiday display, and there's more to discover.

Key Takeaways

• The Red Velvet Tree Collar offers modern sophistication with its double-layer velvet and sequins, fitting larger trees with its 34-inch diameter.

• The Scandinavian Minimalist Tree Collar provides a sleek, modern design in white, easily assembling and storing with its 34-inch size.

• The Rustic Charm Burlap Tree Collar brings natural texture and neutral color, fitting trees up to 11 feet tall for a cozy ambiance.

• The Winter Wonderland Snowflake Design Tree Collar features a white and silver color scheme, durable materials, and easy assembly for a festive display.

Advertisement

• Multiple stylish options, including galvanized steel and emerald green, cater to different decor styles, from rustic to elegant and sophisticated.

Modern Sophistication in Red Velvet

Adding a 34-inch red velvet tree collar to your Christmas decor instantly injects modern sophistication into your holiday display. This luxurious touch isn't just aesthetically pleasing, but also elevates your entire Christmas decor.

The double-layer velvet, sequins, and glitter used to craft this tree collar exude elegance and glamour, making it a stunning focal point for your holiday tree. Measuring 34 inches in diameter, this tree collar is perfect for larger trees, providing ample coverage for the base.

The rich red color and detailed design of the collar create a beautiful contrast against the green of your tree, drawing the eye upward. By incorporating this stylish tree collar into your decor, you'll seamlessly combine beauty and functionality, taking your Christmas display to the next level.

With its luxurious feel and modern design, this red velvet Christmas tree collar is the perfect addition to your holiday decor.

Advertisement

Rustic Charm With Burlap Accents

chic barn wedding d cor

You can bring rustic charm to your Christmas decor with a 34-inch burlap tree collar that wraps around your tree, introducing a natural, earthy tone to your holiday display. This type of Christmas tree collar is perfect for those who want to add a cozy and inviting vibe to their festive decorations. With its neutral color, burlap complements a wide range of tree styles and ornaments, making it a versatile choice for any home.

Feature Description Benefit
Natural Texture Burlap tree collars have a natural, earthy tone Adds rustic charm to your decor
Ample Coverage 34-inch tree collars fit trees up to 11 feet tall Ensures a cohesive look for larger trees
Neutral Color Burlap complements a wide range of tree styles and ornaments Versatile choice for any home

Winter Wonderland Snowflake Design

festive snowflake pattern creation

Thirty-four inches of Winter Wonderland Snowflake Design tree collar wraps around your tree, bringing an elegant touch to your holiday display with its intricate snowflake patterns. This stunning tree collar is perfect for larger Christmas trees, adding a touch of sophistication to your holiday decor.

The snowflake pattern is carefully crafted to create a beautiful, intricate design that catches the eye. Made from durable materials, this tree collar is built to last for multiple holiday seasons, ensuring it remains a staple in your festive decorations for years to come.

The white and silver color scheme of this collar complements a variety of Christmas tree themes and color schemes, making it easy to incorporate into your existing decor. Plus, its easy assembly and storage make it a practical choice for busy holiday enthusiasts.

Whether you're going for a winter wonderland theme or a more subtle holiday look, this snowflake design tree collar is a stylish and functional addition to your festive decorations. Its elegant design and durable construction make it a great choice for anyone looking to elevate their holiday decor.

Classic Elegance in Emerald Green

elegant emerald green style

Wrapping your tree with the Classic Elegance in Emerald Green tree collar brings a sophisticated touch to your holiday decor, evoking the luxurious feel of a winter forest. This stunning 34-inch tree collar is designed to add a touch of classic elegance to your Christmas decor. The rich emerald green color complements a variety of tree styles and decorations, making it a versatile option for any holiday setup. Crafted from durable materials, this tree collar provides a sturdy and stylish base for your tree, ensuring it remains secure and stable throughout the holiday season.

As a Christmas tree base collar, the Classic Elegance in Emerald Green is designed to conceal unsightly tree stands and create a polished, put-together look. The emerald green hue adds a pop of color to your holiday decor, creating a festive ambiance that's sure to impress.

Whether you're going for a traditional or modern look, this stylish tree collar is sure to enhance the festive feel of your home. So why settle for a plain tree stand when you can elevate your holiday decor with the Classic Elegance in Emerald Green tree collar?

Advertisement

Farmhouse Chic With Galvanized Steel

rustic farmhouse with metal

Add a rustic touch to your holiday decor with galvanized steel tree collars, which bring a modern farmhouse chic twist to your Christmas setup. These 34-inch tree collars provide ample coverage for trees up to 11 feet tall, guaranteeing your tree looks stunning from base to top.

The durable steel construction guarantees long-lasting use season after season, making it a worthwhile investment for your holiday decor. You'll love how easy it's to assemble these galvanized steel tree collars, which add a touch of industrial elegance to your holiday display.

By incorporating a galvanized steel tree collar into your decor, you'll enhance the overall aesthetic of your tree, creating a beautiful focal point in your home. The modern farmhouse chic look is perfect for those who want to add a rustic touch to their holiday decor without sacrificing style.

With its versatility and durability, a galvanized steel tree collar is an excellent choice for anyone looking to elevate their Christmas decor.

Whimsical Woodland Animal Print

playful forest creature design

For a more playful and whimsical take on your Christmas decor, you'll love the charming woodland animal print tree collar that brings a touch of the forest to your holiday setup. This 34-inch tree collar is perfect for larger Christmas trees and features a delightful design with various woodland animals like deer, foxes, and owls, adding a festive and playful touch to your holiday decor.

Here's a breakdown of this whimsical woodland animal print tree collar:

Feature Description Benefit
Material Durable and high-quality Functional and decorative
Design Woodland animal print Adds a unique and whimsical element
Size 34 inches in diameter Suitable for larger Christmas trees
Assembly Easy to assemble and store Stylish and practical solution

This tree collar is not only decorative but also functional, enhancing the overall look of your tree display. The woodland animal print adds a unique and whimsical element to your Christmas tree, perfect for nature-themed or rustic decor styles.

Advertisement

Coastal Vibes With Natural Jute

sustainable coastal decor elements

As you set out to create a coastal-themed Christmas display, consider incorporating the Coastal Vibes Natural Jute Tree Collar. This 34-inch diameter tree collar is crafted from natural jute material, offering a rustic charm that complements various tree styles and decorations. The neutral color of the jute collar guarantees it blends seamlessly with your existing decor, adding a touch of coastal vibes to your holiday display.

Here are three benefits of choosing the Coastal Vibes Natural Jute Tree Collar:

  1. Easy Assembly and Storage: This tree collar is easy to assemble and store, making it a convenient addition to your holiday decor.
  2. Rustic Charm: The natural jute material and neutral color of the collar add a touch of rustic charm to your tree display.
  3. Versatility: The Coastal Vibes Natural Jute Tree Collar complements a range of tree styles and decorations, making it a versatile addition to your holiday decor.

Vintage Glamour in Gold Sequins

sparkling gold sequin gown

You'll make a bold statement with the Vintage Glamour Gold Sequin Tree Collar, which wraps your tree in luxurious elegance and sophistication. This stunning tree collar features a dazzling gold sequin design that adds a touch of glamour to your Christmas decor.

Crafted to fit most tree bases up to 32 inches in diameter, this collar guarantees a seamless look that complements your tree's natural beauty. Easy to assemble and store, this tree collar is a convenient holiday decorating option that won't take up too much space.

With its elegant design and effortless installation, you'll elevate your holiday display and create a sophisticated ambiance that's perfect for the festive season. Whether you're hosting a holiday party or simply want to add a touch of luxury to your home, the Vintage Glamour Gold Sequin Tree Collar is the perfect accessory for your Christmas tree.

It's a stylish and eye-catching addition that's sure to impress your friends and family.

Scandinavian Minimalist in White

clean simple nordic style

If vintage glamour isn't your style, a Scandinavian Minimalist in White Tree Collar can bring a sleek, modern touch to your holiday decor. This stylish tree collar features a clean and minimalist design in white, perfect for complementing your Christmas decor. Made of durable materials, it's built to last and easy to assemble and store.

Here are three benefits of choosing a Scandinavian Minimalist in White Tree Collar:

Advertisement
  1. Modern elegance: The sleek design adds a touch of Scandinavian style to your holiday display.
  2. Easy to use: The tree collar is easy to assemble and store, making it a convenient addition to your Christmas decorations.
  3. Versatile: The 34-inch size is suitable for larger trees, and the white color complements a variety of decorating styles.

With its modern design and durable construction, this tree collar is an excellent choice for anyone looking to add a touch of Scandinavian chic to their holiday decor. Whether you're going for a minimalist look or want to add a pop of white to your Christmas tree, this tree collar is an excellent choice.

Country Cottage With Plaid Pattern

cozy plaid country retreat

This charming Country Cottage With Plaid Pattern tree collar brings a warm, rustic touch to your holiday decor, evoking feelings of coziness and traditional charm. As you adorn your tree with this stylish accessory, you'll create a warm and inviting atmosphere that's perfect for the holiday season.

The 34-inch tree collar features a charming country cottage design with a festive plaid pattern, adding a cozy and rustic touch to your Christmas decor. Made of durable materials, this tree collar guarantees longevity and enhances the overall appeal of your tree display. Plus, it's easy to assemble and fits most tree bases up to 32 inches in diameter for a seamless finish.

With its classic design, this tree collar is perfect for creating a warm and inviting holiday atmosphere in your home. You'll love how it brings a touch of rustic charm to your holiday decor, making it a great addition to your festive decorations.

Frequently Asked Questions

How Big Should a Christmas Tree Collar Be?

When choosing a Christmas tree collar, you're probably wondering how big it should be. The key is to take into account your tree's height, as the collar's size is based on that.

For trees between 7 and 11 feet tall, a 34-inch collar is a good fit. It can cover bases up to 32 inches in diameter, giving your tree a polished look.

Just make sure the collar fits snugly around the base to enhance the overall aesthetic.

Advertisement

Are Tree Collars Still Popular?

You might be wondering, are tree collars still the 'it' thing for Christmas decor? The answer is a resounding yes!

Despite the ever-changing trends, tree collars remain a popular choice for many. In fact, they've become a staple in modern holiday decorating, offering a sleek and polished look that's hard to resist.

How to Make an Inexpensive Tree Collar?

You're looking for an inexpensive tree collar solution. Repurpose a galvanized tub or bucket for a rustic look.

Alternatively, use a woven basket or large planter as a unique alternative.

If you're crafty, create a DIY collar using wood planks or lattice panels.

Advertisement

You can even wrap a decorative blanket or fabric around the base of the tree for a cozy look.

How Do I Make My Christmas Tree Collar Taller?

You're probably thinking, 'Why settle for a mediocre tree collar when you can have one that's towering above the rest?'

To make your Christmas tree collar taller, you're not limited to just one option. Consider using risers or platforms underneath the tree collar to add height, or opt for a taller design, like a 34-inch option, to increase the overall height.

Conclusion

As you step back to admire your Christmas tree, the 34-inch tree collar of your choice adds a finishing touch, like the perfect accessory to a stylish outfit.

Imagine the rustic charm of burlap accents or the vintage glamour of gold sequins complementing your festive decor.

Advertisement

Whatever your style, these tree collars bring a touch of sophistication, transforming your tree into a winter wonderland centerpiece that shines like a beacon of holiday joy.

Continue Reading

Home Decor

Make a Simple Buffalo Plaid Galvanized Pumpkin

Discover how to elevate a plain galvanized pumpkin into a unique buffalo plaid masterpiece with a few simple steps and creative embellishments.

Published

on

By

diy buffalo plaid pumpkin

We're excited to share our guide on transforming a plain galvanized pumpkin into a stunning buffalo plaid masterpiece. First, we prepare the pumpkin by cleaning it thoroughly and selecting the right adhesive fabric for the design. Next, we create a buffalo plaid pattern using painter's tape and black paint, applying horizontal and vertical stripes alternately. After adding a stem that complements the design, we apply fabric strips securely using hot glue. Finally, we add finishing touches like a buffalo plaid bow, faux greenery, and a wood stem for rustic charm. Now, let's get crafting and discover the creative possibilities!

Key Takeaways

• Clean and prepare a galvanized metal pumpkin to ensure a smooth surface for painting and decorating.

• Create a buffalo plaid pattern on the pumpkin using painter's tape and black paint, allowing each layer to dry completely.

• Add a realistic stem that complements the design and provides texture and realism to the seasonal decor piece.

• Apply buffalo plaid fabric strips securely to the pumpkin using hot glue, smoothing out wrinkles or air bubbles as needed.

Advertisement

• Embellish the pumpkin with a buffalo plaid bow, faux greenery, and berries to add a festive touch and rustic charm.

Prepare the Galvanized Pumpkin

We begin by selecting a galvanized metal pumpkin as the foundation of our project, making sure it's free of dirt, grime, and moisture. This base will provide a clean slate for our buffalo plaid design.

Before we start decorating, we need to make certain our pumpkin is spotless. A quick wipe with a damp cloth should do the trick. This step is essential, as any dirt or grime can impact the adhesion of our paint or fabric.

We're going for a classic look, so we'll focus on a black and white buffalo plaid pattern. While we could use acrylic paint to create the design, we might opt for adhesive buffalo plaid fabric instead. This will give our pumpkin a unique texture and visual interest.

Once we've applied our chosen design, we can further customize our pumpkin with ribbon or faux greenery. The possibilities are endless, and we can't wait to see our galvanized pumpkin transform into a stunning piece of seasonal decor.

Advertisement

Create Buffalo Plaid Pattern

buffalo plaid pattern design

With our galvanized pumpkin clean and ready, let's create the iconic buffalo plaid pattern that'll give our seasonal decor a rustic touch. To achieve this, we'll use black and white paint to create the buffalo plaid pattern. Here's a breakdown of the painting process:

Step Description
1 Apply painter's tape to create clean lines and crisp edges for the buffalo plaid pattern.
2 Paint horizontal stripes with black paint, allowing each layer to dry completely before adding the next.
3 Alternate painting horizontal and vertical stripes to achieve the buffalo plaid design.

Using a small paintbrush for precision, we'll paint the buffalo plaid pattern on the galvanized pumpkin. Remember to allow each layer of paint to dry completely before adding the next layer to prevent smudging or blending of colors. By following these steps, we'll achieve a beautiful buffalo plaid pattern that'll add a rustic touch to our seasonal decor.

Add Dimension With Stem

enhance with stem support

To take our buffalo plaid galvanized pumpkin to the next level, we're adding a stem that not only complements the plaid design but also brings a touch of realism to this seasonal decor piece. The addition of a dimensional stem elevates the visual appeal of our buffalo check pumpkin, making it stand out among other fall decorations.

When selecting a stem, consider the following factors:

  • Choose a stem that complements the buffalo plaid design, ensuring a cohesive look.
  • Opt for a realistic stem that mimics the texture and color of a real pumpkin stem.
  • Select a stem that adds a touch of realism and texture to the galvanized pumpkin.

Apply Fabric Strips Securely

fabric strips for wound

We'll start applying the buffalo plaid fabric strips to our galvanized pumpkin, making sure to secure them tightly to prevent any unraveling. To guarantee a polished look, we'll press down firmly on the fabric strips to make sure they adhere well to the galvanized surface. Any wrinkles or air bubbles must be smoothed out for a clean finish.

Step Action Tips
1 Apply hot glue to the pumpkin Use a low-temperature glue gun to prevent damage
2 Place fabric strip on pumpkin Align the buffalo plaid pattern carefully
3 Press down firmly on fabric Ensure the fabric adheres smoothly to the surface

As we apply the fabric strips, we can use a buffalo check ribbon to add a decorative touch. Securing the fabric strips with hot glue or a strong adhesive is crucial to prevent them from peeling off. By following these steps, we'll achieve a beautiful, evenly covered galvanized pumpkin with a unique buffalo plaid design.

Add Finishing Touches

polishing the final details

As we move on to the final stage of our project, we're excited to add those finishing touches that will elevate our simple buffalo plaid galvanized pumpkin from charming to stunning.

Now it's time to focus on the final flourish details, embellishing with ribbons, and adding twine accents that will give our pumpkin a rustic, homespun charm.

Final Flourish Details

Now that our galvanized pumpkin is transformed into a buffalo plaid beauty, let's incorporate some finishing touches to make it truly special. We're almost done, and these final flourishes will elevate our pumpkin from ordinary to extraordinary.

Advertisement

Here are a few ideas worth exploring:

  • Add a buffalo plaid bow for a festive touch, perfect for adorning your door or using as a centerpiece for your pumpkin wreath.
  • Ponder embellishing with faux greenery and berries to bring in a natural element, reminiscent of a fall morning.
  • Utilize a wood stem for a natural element that complements the galvanized pumpkin, adding a touch of rustic charm to your decor.

These small details will make our buffalo check pumpkin truly one-of-a-kind.

We can experiment with different bead colors or dye them to match our decor, adding a pop of color to our arrangement.

With these finishing touches, our simple buffalo plaid galvanized pumpkin is now a stunning piece of autumnal decor, ready to adorn our door, mantel, or coffee table.

Embellish With Ribbons

With our buffalo plaid pumpkin as the foundation, we're ready to tie everything together with a statement ribbon that adds a burst of color and texture to our autumnal decor.

We opt for a buffalo plaid ribbon, which complements our pumpkin's plaid design perfectly. To add some flexibility to our ribbon, we choose a wired ribbon, allowing us to easily shape it around the pumpkin. We experiment with different ribbon widths and patterns to create a unique look that's all our own.

Advertisement

To secure our ribbon in place, we use hot glue or double-sided tape, ensuring a lasting hold. For added visual interest, we consider layering multiple ribbons, creating a more intricate and textured design.

Add Twine Accent

What's the perfect way to add a rustic touch to our buffalo plaid pumpkin without overpowering its statement ribbon? We think a twine accent is the answer!

This simple yet effective detail can elevate the overall look of our galvanized pumpkin. To add a twine accent, we'll wrap twine around the stem of the pumpkin, securing it with hot glue to make sure it stays in place.

Here are a few tips to keep in mind:

  • Wrap multiple layers of twine for a thicker accent or keep it minimal for a subtle look
  • Experiment with different colors and textures of twine to match your decor style
  • Twine accents can easily be customized or removed for a new look

Display Your Masterpiece

create exhibit your art

Where will we showcase our beautifully crafted buffalo plaid galvanized pumpkin to maximize its visual impact?

We've put in the effort to create this stunning piece, and now it's time to display it proudly.

Advertisement

As we place our buffalo checked pumpkin on a mantel, shelf, or as a centerpiece, we're adding a rustic touch to our fall decor.

The combination of buffalo plaid and galvanized metal creates a stylish fall accent that's sure to impress.

By showcasing our masterpiece in a prominent spot, we're not only highlighting our crafting skills but also adding a trendy design element to our home.

As we step back to admire our handiwork, we can't help but feel a sense of pride in our creative endeavor.

According to DIY experts, 'displaying your crafts prominently can boost your confidence and inspire you to take on more projects.'

Advertisement

Frequently Asked Questions

How to Make Plaid Pumpkins?

"We're wondering how to make plaid pumpkins, and we're excited to learn! We'll start by choosing a pumpkin, then select a plaid pattern, and finally, add the design using paint, vinyl, or fabric for a unique fall decoration."

How to Make Fake Pumpkins Easy?

"Cut to the chase, we're all about simplicity! For fake pumpkins, we just grab foam or plastic ones from the craft store, and voilà! We're halfway to a stress-free, easy-peasy fall decoration that's a real showstopper."

Conclusion

As we step back to admire our handiwork, the galvanized pumpkin transformed into a symbol of cozy autumn nights, reminiscent of crackling fires and warm apple cider.

The buffalo plaid pattern wraps around the pumpkin like a warm blanket, evoking feelings of comfort and nostalgia.

Our DIY project has come to life, a demonstration of the power of creativity and resourcefulness.

Advertisement

Now, proudly display your masterpiece, a beacon of autumnal charm, and bask in the warmth of the season.

Continue Reading

Home Decor

7 Creative Repurposed Dresser Ideas

Unlock the hidden potential of your old dresser with these 7 creative repurposing ideas that will inspire you to think outside the box.

Published

on

dresser repurposing for creativity

You're likely sitting on a treasure trove of potential in your outdated dresser, with its sturdy frame and ample storage space waiting to be transformed into a unique and functional piece that showcases your creativity. Turn it into a kitchen island, adding a countertop and shelves for a stylish and practical space. Alternatively, turn drawers into shelves for a budget-friendly storage solution or upcycle it into a bench for additional seating. You can also create a cozy reading nook, upcycle it into a pet bed, turn it into a bathroom vanity, or convert it into a storage ottoman. The possibilities are endless, and a world of creative possibilities awaits you.

Key Takeaways

• Repurpose an outdated dresser into a unique kitchen island with a countertop and shelves for added storage and functionality.

• Transform dresser drawers into customized shelves for a budget-friendly and eco-friendly storage solution.

• Upcycle a dresser into a multi-functional bench with compact storage, perfect for additional seating and unique design.

• Turn a dresser into a cozy reading nook with pillows, blankets, and soft lighting for a comfortable retreat.

Advertisement

• Convert a dresser into a functional bathroom vanity with customizable paint and hardware for a cost-effective and stylish solution.

Kitchen Island Dresser Transformation

Transform an outdated dresser into a functional kitchen island by repurposing its sturdy frame and ample storage space into a unique and stylish addition to your kitchen. By starting this project, you'll create a functional and stylish kitchen island that provides extra prep space, storage for pots and pans, and a unique focal point in the kitchen. You'll utilize the dresser's sturdy construction and ample storage space to create a functional and stylish kitchen island.

As you commence this transformation, you'll remove the drawers and add a countertop to create a functional surface area. You can also install shelves for additional storage, making the most of the dresser's original storage space.

Don't forget to add wheels to the bottom of the dresser for mobility and flexibility in positioning the kitchen island. Finally, customize the kitchen island dresser by painting it a new color, distressing it for a rustic look, or adding decorative hardware for a personalized touch.

With a little creativity, you'll have a one-of-a-kind kitchen island that's both functional and stylish.

Advertisement

Turning Drawers Into Shelves

from drawers to shelves

After giving new life to an old dresser as a kitchen island, consider repurposing its drawers into functional shelves that offer a unique storage solution for your home.

By repurposing drawers into shelves, you can customize the size and layout of the shelves to suit your needs, creating a one-of-a-kind storage space for books, decor, or plants.

This creative DIY project allows you to upcycle old furniture and give it a new purpose while adding a decorative touch to your space. As a budget-friendly option, turning drawers into shelves is an innovative way to add personalized storage solutions to your home.

With repurposed dresser ideas, you can think outside the box and transform unused drawers into functional shelves that reflect your personal style. By embracing the art of repurposing, you'll not only reduce waste but also create a unique conversation piece that showcases your creativity.

Bench Made From Old Dresser

upcycled dresser turned bench

You can breathe new life into an old dresser by repurposing it into a functional bench that serves as both a seating and storage solution. By removing drawers, adding a cushion, and possibly new legs for support, you can transform an old dresser into a unique and functional piece of furniture. The top of the dresser becomes the seating area, and you can consider painting or staining the piece for a fresh look.

Benefits Features
Additional Seating Compact Storage
Unique Design Cost-Effective
Multi-Functional Easy to Upcycle

Cozy Reading Nook Dresser

perfect setup for reading

By repurposing an old dresser, you can create a cozy reading nook that's perfect for curling up with a good book. Remove the drawers and add cushions to transform the dresser into a comfortable seating area. You can utilize the structure of the dresser to create built-in seating for a more inviting space.

Here are some ideas to enhance your cozy reading nook:

  1. Add decor: Throw pillows, blankets, and a small bookshelf can add a personalized touch to your reading nook.
  2. Use the top as a tabletop: Repurpose the top of the dresser as a surface for placing books, a reading lamp, or a cup of tea.
  3. Incorporate soft lighting: Add table lamps or string lights to create a warm and cozy ambiance.
  4. Add a rug: A rug can tie the whole space together and make it feel more intimate.

Upcycled Dresser Pet Bed

upcycled dresser turned into pet bed

As you consider upcycling an old dresser into a pet bed, you'll want to think about creating a cozy corner for your furry friend to snuggle up in, complete with plush cushions and soft blankets.

To get started, you'll need to prioritize the essentials, such as a comfortable sleeping surface and a sturdy structure that can support your pet's weight.

Advertisement

Cozy Corner Creation

Transforming an old dresser into a cozy corner creation for your pet is a fantastic way to breathe new life into a discarded piece of furniture while providing a snug retreat for your furry friend to snuggle up in. By repurposing a dresser, you can create a unique and personalized pet bed that complements your home decor. This sustainable approach to upcycling reduces waste and showcases your creativity and craftsmanship.

Here are some benefits of creating a cozy corner creation for your pet:

  1. Customized comfort: Upcycled dresser pet beds can be tailored to your pet's preferences with cushions, blankets, and toys.
  2. Sustainable decor: Repurposing a dresser into a pet bed reduces waste and gives new life to old furniture.
  3. Personalized style: Your upcycled dresser pet bed can reflect your personal style and complement your home decor.
  4. Cozy retreat: Your pet will appreciate the snug and comfortable space to relax and unwind.

Pet Bed Essentials

To create a cozy and inviting upcycled dresser pet bed, you'll need to focus on incorporating the right pet bed essentials that cater to your furry friend's comfort and style. By repurposing old dressers into unique pet beds, you're not only reducing waste but also promoting sustainability. As a DIY enthusiast, you can customize the dresser pet bed to fit your pet's size and preferences, ensuring a comfortable and aesthetically pleasing sleeping area.

When designing your upcycled dresser pet bed, consider the materials and features that will provide your pet with a cozy retreat. Choose plush cushions and soft fabrics that will make your pet feel snug and relaxed. You can also add personal touches, such as a favorite toy or blanket, to make the space truly special.

Dresser Turned Bathroom Vanity

creative bathroom vanity idea

By repurposing a dresser as a bathroom vanity, you can create a one-of-a-kind focal point that adds character to your bathroom. This unique upcycling project not only adds style but also provides ample storage space for toiletries, towels, and other bathroom essentials.

Here are some benefits of converting a dresser into a bathroom vanity:

  1. Cost-effective: Upcycling a dresser saves you money compared to purchasing a new vanity.
  2. Customization: You can customize your dresser vanity with paint, hardware, and countertop materials to match your bathroom decor style.
  3. Unique focal point: A dresser turned bathroom vanity creates a one-of-a-kind focal point that adds character to your bathroom.
  4. Functional storage: You'll have plenty of storage space for all your bathroom essentials, keeping your bathroom organized and clutter-free.

Storage Ottoman From Dresser

repurpose dresser into ottoman

You can breathe new life into an old dresser by converting it into a stylish storage ottoman, perfect for stashing away blankets, pillows, or toys.

By repurposing the dresser, you'll create a unique piece that offers dual functionality: hidden storage and a comfortable seating option. Start by removing the drawers and utilizing the sturdy frame as the base for your ottoman.

Advertisement

Next, add padding and upholster the top with a fabric that matches your decor. You can customize the look by adding decorative elements like tufting or nailhead trim. The result is a one-of-a-kind storage ottoman that adds charm and organization to any room.

With this creative repurposing idea, you'll enjoy the benefits of extra storage and a cozy seating area. The ottoman's hidden storage compartment is perfect for keeping clutter at bay, while the plush top invites relaxation.

Frequently Asked Questions

How to Repurpose an Old Dresser?

You're curious about how to repurpose an old dresser, and that's a great question! You've likely got a piece of furniture collecting dust, and you're enthusiastic to give it new life.

Before you start, take stock of the dresser's condition, considering its size, material, and any unique features.

Think about your needs and interests – do you need more storage, a workspace, or a statement piece?

Advertisement

What to Put in a Dresser Besides Clothes?

As you gaze into the empty drawers, wondering what to fill them with, think beyond clothes. You're not limited to storing garments; imagine a treasure trove of linens, towels, and bedding, neatly folded and organized.

Perhaps you'll stash craft supplies, art materials, or hobby tools, keeping them within easy reach. Or, use the dresser as a storage haven for shoes, accessories, and handbags, freeing up closet space.

The possibilities are endless!

How Do You Make an Old Wooden Dresser Look Modern?

You're wondering how to give an old wooden dresser a modern makeover. Start by sanding down the existing finish and applying a fresh coat of paint in a trendy color, like navy blue or blush pink.

Update the hardware with sleek, metallic drawer pulls or knobs, and consider adding geometric patterns with stencils or painter's tape for a contemporary touch.

Advertisement

How Can I Make My Boring Dresser Look Better?

To give your boring dresser a makeover, start by adding a fresh coat of paint in a bold color or neutral shade to instantly update its look.

You can also replace outdated hardware with modern knobs or pulls to give it a new appearance.

Additionally, consider adding decorative elements, such as wallpaper or stencils, to create a unique design that reflects your personal style.

Conclusion

You've successfully transformed an old dresser into a functional piece of art, debunking the myth that repurposing is only for the crafty.

In reality, with a little creativity, anyone can breathe new life into a discarded dresser. By exploring these 7 creative repurposed dresser ideas, you've proven that upcycling isn't only eco-friendly but also a great way to add a personal touch to your home decor.

Advertisement

Continue Reading

Trending