TL;DR
The best way to quiet your rig isn’t foam — it’s distance. Placing your computer in a closet with proper ventilation and smart acoustic treatment keeps noise down and heat manageable, making your space silent and cool.
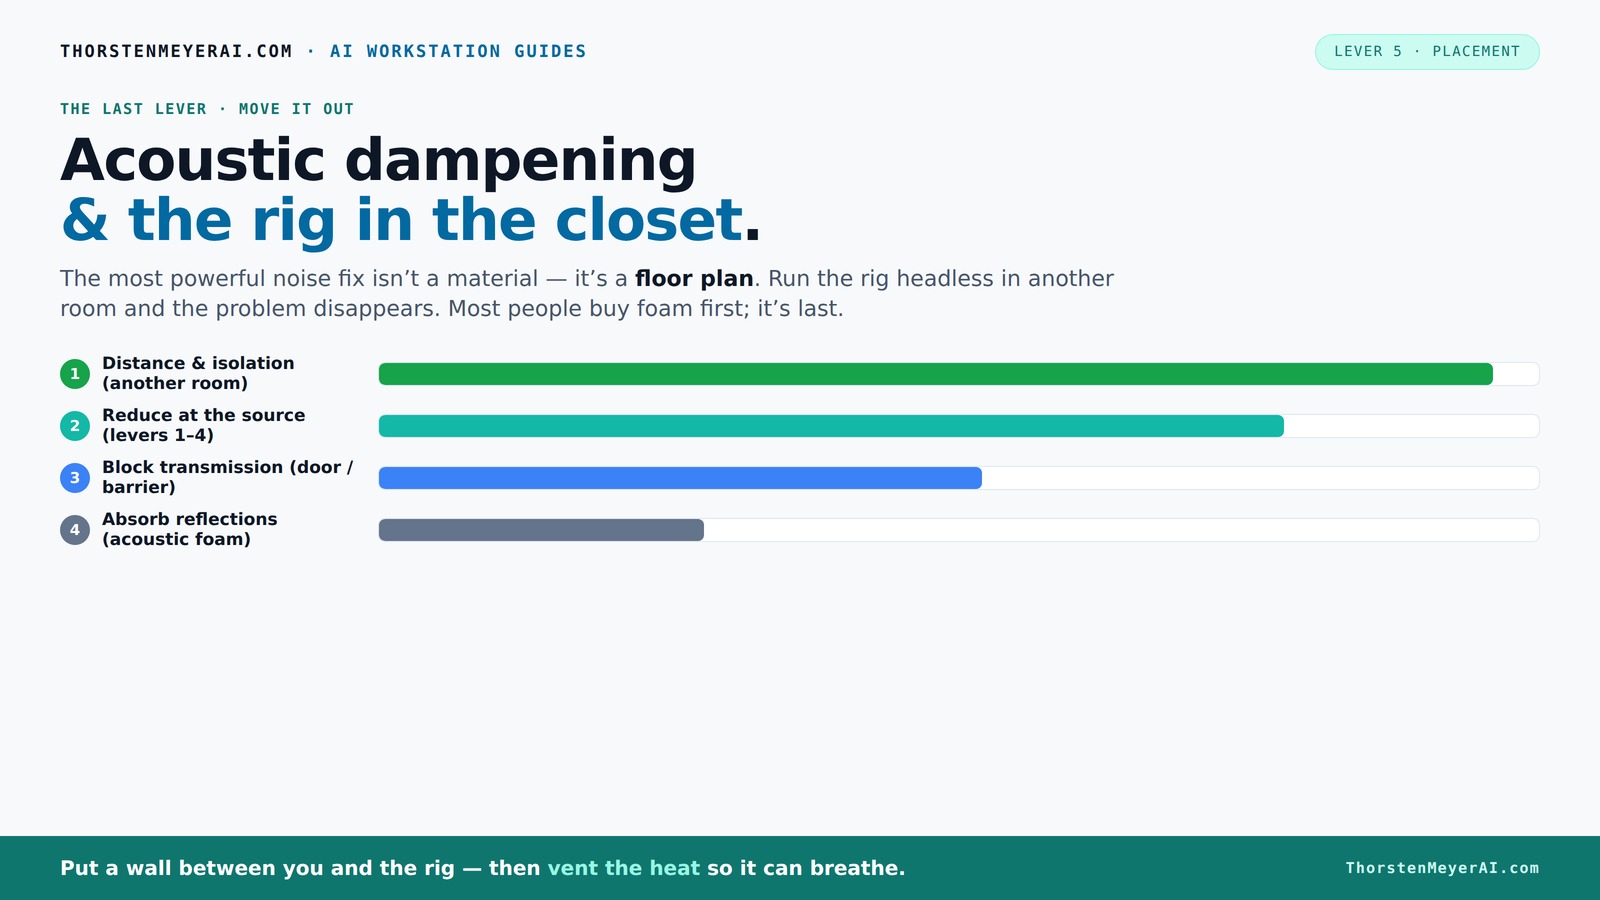
Acoustic dampening
& the rig in the closet.
The most powerful noise fix isn’t a material — it’s a floor plan. A rig you can’t hear because it’s in another room beats any amount of foam. Tap the approaches in Part 1 to see what actually works.
(another room)
(levers 1–4)
(door / barrier)
(acoustic foam)
Contain the noise, not the heat
Key Takeaways
- Distance your rig from your workspace — it’s the most effective noise reducer.
- Ventilate your closet properly — passive vents, exhaust fans, or purpose-built cabinets prevent overheating.
- Treat reflection points and gaps with foam, blankets, and weatherstripping for clear sound.
- Place your microphone close and off-axis to reduce room echo and improve clarity.
- DIY materials like blankets and foam are cheap, flexible, and often better than expensive gear for tiny spaces.
soundproof closet for recording
As an affiliate, we earn on qualifying purchases.
As an affiliate, we earn on qualifying purchases.
Why Moving Your Rig Is the Best Noise Hack You Can Do
If you want quiet, the first step isn’t fancy foam. It’s distance. By putting your PC or GPU rig in another room, even a closet, you cut the noise at its source. The sound waves lose energy the farther they travel. For example, a noisy rig in the next room is barely audible — way quieter than any foam can make your desk.
Most streamers and AI developers have already caught onto this. They run their high-power machines in basements, closets, or separate offices. Your laptop and network connection handle the rest. The only catch? Ventilation. But more on that below.
acoustic dampening panels for studio
As an affiliate, we earn on qualifying purchases.
As an affiliate, we earn on qualifying purchases.
The 'Rig in the Closet' Setup — How to Do It Without Melting Your Machine
Placing your rig in a closet is a smart, cheap fix. It’s nearly impossible to hear a loud GPU tower in another room. But don’t seal it shut — heat builds up fast. If your machine heats up, it throttles, fans scream, and noise wins again. The trick is ventilation.
Use passive vents, install a quiet exhaust fan, or even better, a purpose-built soundproof cabinet with ducted airflow. You’ll want to keep the temperature steady. An all-in-one (AIO) liquid cooler that exhausts heat outside can help, too. Remember, a sealed closet is a heat trap — avoid it.
Proper ventilation isn’t just about comfort; it’s a critical factor that directly impacts your hardware’s longevity and performance. For more tips, see woodworking techniques and workshop setup. Overheating not only causes noise spikes but can also shorten your machine’s lifespan or cause thermal throttling, reducing performance when you need it most. Balancing soundproofing with airflow is a tradeoff—too much sealing traps heat, while too little ventilation allows noise to escape. Finding that middle ground ensures your rig stays cool and quiet.
quiet computer enclosure for recording studio
As an affiliate, we earn on qualifying purchases.
As an affiliate, we earn on qualifying purchases.
Soundproofing vs. Acoustic Dampening: What You Actually Need in a Closet
Soundproofing means stopping sound from escaping or entering. Acoustic dampening softens reflections and reduces echo. In a small closet, both matter — but many get it backwards. You don’t need to fully soundproof; you just need to control reflections and leaks. Learn more about acoustic treatment at this guide on acoustic dampening and placement.
Use weatherstripping on the door, seal gaps around outlets, and add foam panels or blankets. Cover as much wall and ceiling as possible. For low-end bump, bass traps or thicker panels help. Just remember: foam absorbs, but it doesn’t block sound. To block, you need mass or a barrier.
Understanding the distinction is vital because full soundproofing can be expensive and complex, often involving dense barriers and specialized construction. In contrast, dampening focuses on reducing echo and reflections within the space, which is usually sufficient for voice or streaming work. Prioritizing dampening over full soundproofing saves money and effort while still greatly improving sound clarity. The key is to target the primary issues—reflections and leaks—without overengineering the solution.
sound isolation booth for home studio
As an affiliate, we earn on qualifying purchases.
As an affiliate, we earn on qualifying purchases.
Where to Place Your Microphone and Why Your Position Matters More Than You Think
The secret to cleaner recordings in a small space? Placement. Your mic position can make or break your sound. Keep the mic close to your mouth, slightly off-axis, and away from reflective surfaces. For example, a mic just inches from your lips, pointed slightly downward, captures your voice crisp and reduces room noise.
In a closet, avoid placing the mic directly facing a wall or corner. Use a small desk or stand, and consider a reflection filter if needed. The goal: minimize reflections bouncing into the mic, which causes echo and muddiness.
Proper placement reduces the pickup of unwanted room reflections and ambient noise, which can muddy your recordings. The closer the mic is to your source, the less room sound it captures, but you must balance proximity with plosives and breath sounds. Positioning slightly off-axis helps avoid harsh sibilance and plosive pops. This strategic placement can often eliminate the need for excessive acoustic treatment, making your setup more efficient and effective.
Treat the Closet’s Walls, Ceiling, and Corners — What Works Best
Small spaces reflect sound like crazy. Covering the walls and ceiling with foam, blankets, or panels cuts down on echo. For detailed DIY ideas, visit this resource on acoustic dampening. Focus on the first reflection points — the wall directly behind the mic and the ceiling. Use thick, dense materials for bass trapping in corners.
For instance, a DIY setup with moving blankets on walls and a thick rug on the floor can dramatically improve sound clarity. Remember: more coverage typically wins, especially in tiny closets.
Don’t forget the door gaps. Weatherstripping or acoustic sealant prevents sound leaks. Small tweaks here make a huge difference.
Deep treatment of a tiny closet involves not just covering surfaces but understanding how sound interacts within confined spaces. Placing absorptive materials at reflection points reduces echo and muddiness, but overdoing it can deaden the sound unnaturally. Strategic placement of bass traps in corners prevents low-frequency build-up, which can cause muddiness or boominess. Sealing gaps around doors and outlets prevents sound leaks that compromise your acoustic environment. These detailed considerations ensure your small space is optimized for clarity without sacrificing natural tone.
DIY vs. Pro Gear: What’s Worth It for a Closet Studio?
Cheap, flexible materials often beat expensive gear in small spaces. Blankets, foam panels, and rugs are your best friends. Check out product reviews and tips for home improvement for more ideas. They’re easy to move, cheap, and quick to set up. For example, a $50 bundle of acoustic foam or a handful of moving blankets can cut echo by half.
But if you want a serious setup, purpose-built soundproof booths with ducted ventilation are available. They cost a few hundred dollars but offer quiet, cool operation. Use DIY as a first step, then upgrade if needed.
Investing in quality DIY materials gives you a quick, budget-friendly way to improve your space. For more expert advice, visit Woodworks Library. However, professional booths and custom solutions offer better isolation and airflow, which can be crucial if you’re doing frequent, high-quality recordings. The tradeoff is cost versus convenience: DIY is accessible and flexible, while pro gear provides a higher level of control and sound isolation, especially in demanding scenarios. Prioritize your needs and budget to choose the right path.
Common Mistakes That Kill Your Closet Sound Quality
Don’t just stuff the closet with foam and hope for the best. Gaps, parallel walls, and poor placement ruin the sound. Avoid sealing the space completely without ventilation — heat kills the setup. Also, neglecting door leaks or treating only one wall leaves echoes bouncing around.
Example: A streamer sealed their closet with foam but forgot to add ventilation. Their PC overheated, fans roared, and the noise came back. Don’t make that mistake.
Beyond these pitfalls, ignoring the importance of reflection points and proper sealing can lead to muddy, indistinct recordings. Over-sealing without considering airflow can cause hardware overheating, while insufficient treatment leaves echoes and muddiness. Recognizing these common errors helps you design a balanced approach—ensuring your closet is both acoustically optimized and thermally safe.
Is a Closet Setup Good Enough for Voice-Overs, Streaming, or AI Work?
Absolutely, if you treat it right. Small, enclosed spaces naturally dampen room echo and produce a focused vocal sound. Many voice-over artists swear by closet booths. For streaming or AI inference, a quiet, cool rig in a closet allows you to work without noise distractions.
Just remember: ventilation is key, and placement matters. A well-treated closet with proper airflow beats a noisy, open room any day.
In fact, many professionals prefer closet setups because they offer a controlled environment that can be tailored to their needs without expensive studio spaces. The key is understanding the tradeoffs—compact size, easier treatment, and proximity to your microphone can enhance your recordings significantly. When properly designed, a closet becomes an ideal, low-cost studio that balances sound quality, ventilation, and convenience for a variety of recording tasks.