
We're excited to create a beautiful salt dough heart garland, a popular DIY craft that 71% of crafters have attempted at least once. To start, we'll combine flour, salt, and water to create a smooth dough, then roll it out and use heart-shaped cookie cutters to make our hearts. We'll bake them at 250°F for 2 hours, ensuring holes for hanging and preventing burning or misshaping. After painting and adding glitter, we'll thread the hearts onto sturdy thread, doubling up for added strength. Now, let's assemble our garland and get creative with displaying it – there's more to explore as we continue!
Key Takeaways
• Combine flour, salt, and water to create a smooth dough, then roll it out to cut out heart shapes using cookie cutters.
• Bake the hearts at 250°F for 2 hours, ensuring holes for hanging and preventing burning or misshaping.
• Paint the hearts with acrylic colors and add glitter for sparkle, allowing them to dry completely.
• Thread the hearts onto a sturdy thread, doubling it up for added strength, and adjust the spacing for a visually appealing garland.
• Hang the garland in a desired location, such as a mantel or window, and customize the length for the display area.

43.3in-59in Extendable Round Dining Table for 4-8,Modern Kitchen Oval Dining Table with Removable Leaves Space Saving,Wood Base with Storage Shelf for Kitchen Living Room (Walnut)
Retractable dining table for 4-8 people: Considering the use in different scenarios, the dining table adopts a retractable...
As an affiliate, we earn on qualifying purchases.
Preparing the Salt Dough Mixture
We combine 2 cups of all-purpose flour and 1 cup of table salt in a mixing bowl, the foundation of our salt dough mixture. This blend will eventually become the Salt Dough Heart garland we're aiming for.
As we slowly incorporate 3/4 cup of water into the dry ingredients, we stir until a dough begins to form. It's crucial to mix thoroughly to make sure all components are well combined. Once the dough starts to take shape, we knead it until it becomes smooth and pliable. This process helps remove any lumps and air pockets, resulting in a uniform texture.
As we work the dough, we're preparing it for the next step, where we'll roll it out to the desired thickness. Before we know it, we'll be using heart-shaped cookie cutters to create the Salt Dough Hearts for our garland. For now, we focus on kneading the dough to perfection, laying the groundwork for a beautiful, handmade decoration.
Muwuele Solid Wood Extendable Dining Table for 4-8 People with Seamless Extension from 47.2 to 63 Inches, Easy Assembly, Expandable Tables for Small Spaces, Dining Room, Kitchen, Living Room, Walnut
【TABLE ONLY & NO CHAIRS】This purchase includes the extendable dining room table only. Chairs shown are for display...
As an affiliate, we earn on qualifying purchases.
Cutting Out Heart Shapes
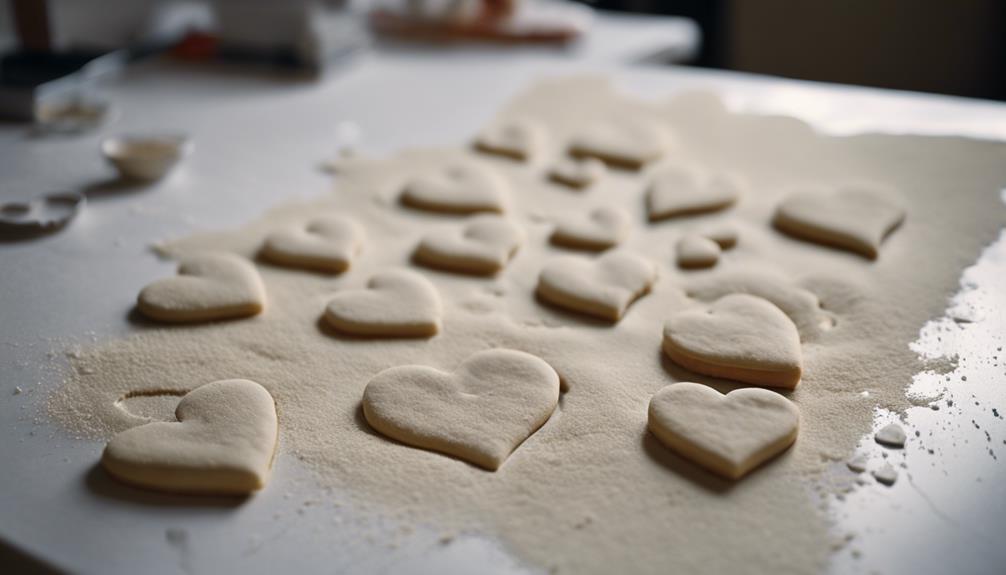
As we move on to cutting out heart shapes, we'll need to determine the best approach for achieving uniform hearts. We can use heart-shaped cookie cutters or create our own heart shape templates to guarantee consistency.
It's crucial to roll out the dough to an even thickness to prevent irregularities. By doing so, we'll be able to cut out hearts that are both visually appealing and identical in shape and size.
Heart Shape Templates
Using heart shape templates is a great way to guarantee our salt dough hearts turn out uniform and consistent, saving us time and effort in the process. By utilizing these templates, we can make sure that our hearts are identical in shape and size, which is especially important when creating a garland.
Heart shape templates come in various sizes and styles, allowing us to customize the shape of our hearts to fit our desired design. We can print or hand-draw our templates, depending on our personal preference and available resources. These templates provide a guide for precise cutting, ensuring that our hearts are cut accurately and uniformly. This is particularly useful when working with materials like dough, which can be tricky to cut into precise shapes.
In fact, using heart shape templates is similar to using cookie cutters to cut out shapes from dough – it provides a reliable guide for achieving the desired shape. By utilizing heart shape templates, we can create beautiful, uniform hearts that will make our salt dough heart garland truly special.
Rolling Out Dough
Roll out the salt dough on a floured surface to a uniform thickness of about 1/4 inch to guarantee our hearts turn out evenly. This is an important step in our salt dough recipe, as it ensures our heart-shaped ornaments will be consistent in size and shape. Now, use a heart-shaped cookie cutter to cut out heart shapes from the rolled dough. You can also use a glass or a knife to create irregular shapes, but we're aiming for uniformity here.
| Heart Shape | Size | Quantity |
|---|---|---|
| Small | 2 inches | 12 |
| Medium | 3 inches | 8 |
| Large | 4 inches | 6 |
As we cut out our hearts, make sure to leave enough space between each shape to prevent them from sticking together during baking. Use a straw or toothpick to create a hole near the top of each heart for hanging later. Don't forget to re-roll any excess dough to maximize the number of hearts you can make. With our hearts cut out, we're one step closer to creating our beautiful salt dough heart garland.

41 in-78 in Extendable Dining Room Table for 4-8, Round Expandable Kitchen Table with Fluted Base, Modern Farmhouse Oval Dinner Tables for Dining Room Kitchen Living Room (Natural)
【Versatile Expandable Design】This expandable round oval dining table transforms from a cozy 41-inch round table for 4 into...
As an affiliate, we earn on qualifying purchases.
Baking the Heart Ornaments
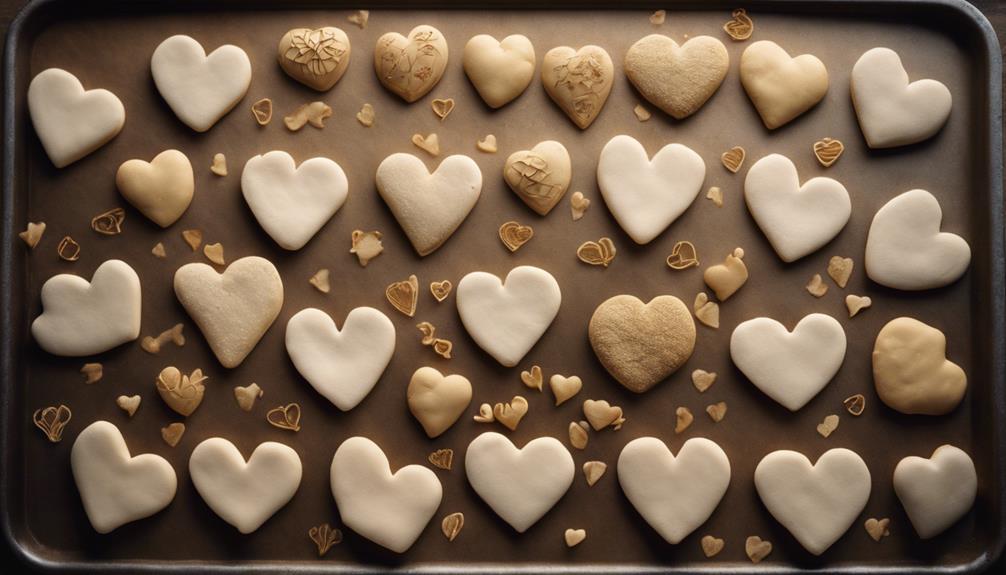
We place the heart ornaments on parchment-lined baking sheets, ensuring the holes for hanging are large enough before baking. This prevents the ornaments from sticking to the baking sheet and makes it easier to handle them after baking.
We then bake the ornaments at a low temperature of 250°F for approximately two hours, or until they're hard to the touch. It's vital to maintain this low temperature to prevent the ornaments from burning or becoming misshapen.
Once baked, we let the ornaments cool down completely on the baking sheet. This step is important, as it allows the ornaments to set properly and prevents them from breaking or cracking.
After they've cooled, we can start thinking about decorating them with acrylic paints and adding a touch of glitter for extra sparkle. We'll explore these decorating options in more detail later, but for now, we're excited to see our ornaments take shape.
Extendable Dining Room Table for 4-6, 47-65 Inch Rectangle Kitchen Dining Table with Large Storage, Fluted Sliding Door, Expandable Mid Century Modern Dinner Furniture, Living Room, Walnut, Brown
Extendable dining table: Its ingenious slide-and-lock mechanism features smooth, silent glides, effortlessly transforming your rectangular dining table from...
As an affiliate, we earn on qualifying purchases.
Painting and Adding Glitter

Now that our salt dough hearts are baked and cooled, we're ready to express our creativity by painting them with vibrant acrylic colors. This is where we get to add some personality to our garland!
To add some extra sparkle, we'll sprinkle glitter over the hearts while the paint is still wet. This will give our garland a touch of shine and make it stand out.
Here are some tips to keep in mind while painting and adding glitter:
- Use a small paintbrush to carefully apply paint to intricate details on the hearts for a polished look.
- Experiment with different paint colors and glitter combinations to create a unique and personalized salt dough heart garland.
- Allow the paint and glitter to dry completely before handling the hearts to prevent smudges or smearing.
- While the paint is still wet, sprinkle glitter over the hearts to add a touch of sparkle and shine.
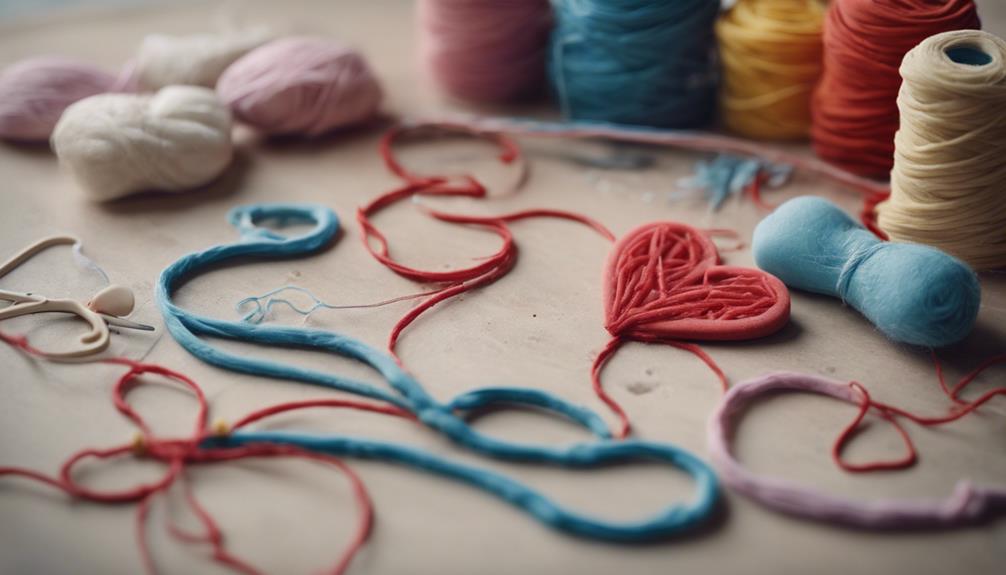
Creating the Garland String

Now that our salt dough hearts are painted and glittered to perfection, we're ready to create the garland string that will bring our decoration together.
When selecting a thread, we'll want to choose a twine or ribbon that complements our heart designs, and then measure it to our desired length, taking into account the spacing and overall aesthetic we want to achieve.
Thread Selection
Selecting the right thread is crucial, as it will hold our entire garland together, so let's choose a sturdy one. We want a thread that's durable enough to support the weight of our salt dough hearts.
Here are some key considerations for thread selection:
- Choose a sturdy thread like baker's twine or jute for durability.
- Consider the color of the thread to complement the salt dough hearts.
- Make sure the thread is long enough to accommodate all the hearts for the garland.
- Use a needle to easily thread the hearts onto the string, and consider doubling up the thread for added strength when hanging the garland.
String Measurement Tips
We typically begin by measuring the length of our garland, taking into account the space where we plan to display it. When making salt dough heart garland, getting the string measurement just right is crucial. To do this, we use a ruler or measuring tape to determine the desired length.
We also add a bit of extra length to our string, considering the spacing between each heart ornament and allowing for tying knots or hanging the garland. The type of ribbon or twine we choose should complement the color and style of our salt dough hearts, which we've carefully crafted using our favorite salt dough recipe.
Before assembling the garland, we double-check the length of the string to make sure it fits our desired display area. By taking these steps, we can create a beautiful, well-proportioned garland that showcases our handmade salt dough hearts.
Tying the Knot
With our string measured and ready, we cut a length of twine or ribbon to the desired size for our garland. This will give us a sturdy base to thread our beautiful salt dough hearts onto.
To create our garland, we'll follow these simple steps:
- Thread the salt dough hearts onto the twine or ribbon, spacing them evenly to achieve a balanced look.
- Tie a knot at each end of the garland to secure the hearts in place, ensuring they don't slip off.
- Hang the completed garland in your desired location for a festive touch, adjusting the spacing of the hearts on the string to achieve your desired look.
- Finally, step back and admire your handiwork!
Assembling the Heart Garland
Now that our heart shapes are dry and ready, we can start threading them onto twine or ribbon to create our garland.
We're getting close to finishing our salt dough ornaments, and it's exciting!
For a balanced look, we'll guarantee even spacing between each heart as we thread them onto the twine or ribbon. A simple knot will secure each heart in place on the garland.
We can customize the length of the garland to fit our desired display area – whether it's a mantel, doorway, or wall.
As we assemble our heart garland, we can envision it adding a festive touch to our home for Valentine's Day.
With our salt dough heart garland, we'll create a beautiful and unique decoration that will make our home stand out.
Tips for Displaying Your Garland

As we finish assembling our heart garland, let's think creatively about how to showcase it in our home. With Valentine's Day just around the corner, we want to create a romantic atmosphere that sets the mood for love.
When it comes to displaying our garland, the possibilities are endless.
Here are some ideas to get us started:
- Hang your salt dough heart garland on a mantel for a cozy Valentine's Day display.
- Add a festive touch to your windows by draping the garland along the edges.
- Create a romantic atmosphere by hanging the garland above your bed's headboard.
- Incorporate the garland into your party decor by hanging it along the walls or doorways.
Variations and Creative Ideas

Let's take our salt dough heart garland to the next level by exploring some creative variations and ideas that add a personal touch.
We can try using different shapes like stars, animals, or flowers for a unique garland that still exudes a fun Valentine's vibe.
Experimenting with scents like lavender or peppermint in the dough adds a fragrant touch, making our garland truly one-of-a-kind.
We can also personalize the garland by painting the hearts in different colors or patterns, giving it a more eclectic feel.
Adding beads, sequins, or buttons onto the garland creates a visually appealing texture that catches the eye.
For a thoughtful gift or party favor, consider making mini salt dough heart garlands that air dry to perfection.
These mini ornaments can be customized with names or messages, making them a heartfelt gesture.
Frequently Asked Questions
How Do You Make a Heart Out of Salt Dough?
We mix 1/2 cup of salt, 1/2 cup of warm water, and 1 cup of flour to create a pliable dough, then roll it out to cut out heart shapes with a cookie cutter.
What Do You Seal Salt Dough With?
"Sealing salt dough is like adding the final brushstroke to a masterpiece – it brings it to life! We seal our creations with clear acrylic sealer, applied with a brush in a well-ventilated area, to protect them from moisture and preserve their finish."
How Do You Stick Salt Dough Together?
We stick salt dough together by applying a small amount of water to the edges, pressing firmly, and blending with extra dough for a seamless finish, ensuring a strong bond when baked.
How to Make Salt Dough Step by Step?
"We're making salt dough from scratch! We mix flour, salt, and water to form a dough, then knead and roll it out to desired thickness – it's a fun, creative process!"
Conclusion
In the end, we've created a beautiful salt dough heart garland that adds a personal touch to any room.
For instance, Emma, a busy mom of two, used this DIY project to create a customized garland for her daughter's birthday party, which became a delightful conversation starter.
By following these steps, you can easily replicate this project and make it your own.
As Emma puts it, 'This garland has become a treasured keepsake, reminding us of the special bond we share.'