

We're transforming old pallet wood into a rustic Christmas tree collar, reducing waste and giving new life to discarded materials. We start by searching for free or inexpensive pallets, disassembling them carefully to salvage usable wood. After measuring our tree stand, we customize the collar size, cut the pallet wood pieces precisely, and sand them for smoothness. We then assemble the panels, sand and finish the wood, and attach the collar to the tree. With painting and staining options, we can customize the look. Adding decorative touches like ribbons and embellishments completes the rustic charm. Now, let's get creative and see how we can elevate our holiday decor.
Key Takeaways
• Repurpose wooden pallets to create a unique and eco-friendly Christmas tree collar that reduces waste and adds rustic charm to holiday decor.
• Disassemble pallets carefully to salvage usable wood, removing nails or staples for a smooth surface, and sanding to remove splinters and rough edges.
• Measure and cut pallet wood pieces to fit your tree stand, using a circular saw and safety goggles for precise cuts, and sanding cut edges for smoothness.
• Assemble panels using brad nails or wood screws, angling for added stability, and consider applying wood glue for reinforcement, leaving space for clean corner assembly.
• Finish with sanding and staining options, such as chalk paint, dark walnut stain, or whitewashing, to enhance the rustic look and add a personal touch.
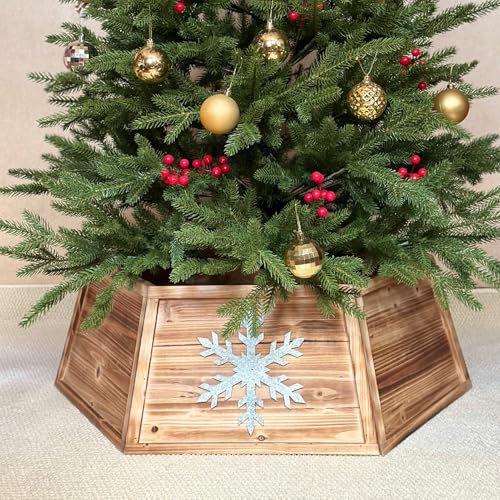
KeVerilive Wooden Tree Collar,28.7" Snowflake Christmas Tree Base Cover, Hexagon Natural Wood Christmas Tree Box Stand,Farmhouse Rustic Tree Collars for Artificial Trees
Perfect Size for Most Artificial Trees:This 28.7" hexagonal Christmas tree collar fits tree stands 9"–27" wide and trees…
As an affiliate, we earn on qualifying purchases.
As an affiliate, we earn on qualifying purchases.
Gathering Pallet Wood Materials
We scour local businesses and warehouses for free or inexpensive pallets with sturdy, intact wooden boards that can be repurposed for our tree collar project. We're on the hunt for pallets that are still in good condition, with wooden boards that can be disassembled and reused.
By repurposing pallet wood, we're not only reducing waste but also giving new life to old materials. When we find suitable pallets, we carefully disassemble them to salvage the usable wood. Removing nails or staples from the pallet wood is essential to guarantee a smooth surface for our tree collar.
We take the time to sand the pallet wood pieces to remove splinters and rough edges, preparing them for construction. With our pallet wood materials gathered and prepared, we're one step closer to creating a beautiful and eco-friendly tree collar for the holiday season.

GREEN ALLUVIUM 28 Inch Handwoven Wicker Christmas Tree Collar – Adjustable Foldable Basket Base with Cord Cut Out, Rustic Farmhouse Decorative Cover for 7.5ft–9ft Artificial & Pencil Trees
Universal Fit – Fits most tree bases, both real and artificial. Designed for stands up to 28" wide…
As an affiliate, we earn on qualifying purchases.
As an affiliate, we earn on qualifying purchases.
Measuring Your Christmas Tree

Before building our tree collar, we need to measure the width and height of our Christmas tree stand to determine the appropriate size for our DIY project. We want to make sure a snug fit around the stand, so measuring accurately is vital.
Take out your tape measure and record the dimensions of your tree stand. Typically, a tree collar panel can be around 17 inches wide and 14 inches tall, but we need to customize it to our specific tree stand. Consider the gaps between the boards, as we want a comfortable fit without being too loose or too tight.
If needed, we can use dismantled pallet boards to achieve the perfect fit. Remember, measuring correctly will save us time and effort in the long run.

Handcrafted Olive Wood Star Ornament – Unique 2.56”x2.76” Eco-Friendly Christmas Tree Decor, Authentic Mediterranean Craft, Sustainable Holiday Decoration, Perfect Eco Gift for Christmas
🌟 UNIQUE CHRISTMAS DECOR – Adorn your tree with the charm of the Mediterranean. Each 2.56" x 2.76"…
As an affiliate, we earn on qualifying purchases.
As an affiliate, we earn on qualifying purchases.
Cutting Pallet Wood Pieces

With our tree stand measurements in hand, we're ready to cut the pallet wood pieces to size for our custom tree collar. We'll be using a circular saw to make precise cuts, guaranteeing our pieces fit together seamlessly.
Before cutting, we measure and mark the pallet wood to make certain accurate and precise pieces. Safety first, we wear safety goggles and gloves to protect ourselves from potential injuries.
As we begin cutting, we make sure to sand the cut edges of the pallet wood pieces to smooth out any roughness or splinters. This attention to detail will pay off in the end when our tree collar comes together.
We double-check our measurements to confirm the pallet wood pieces are cut at the correct angles and dimensions. With each cut, we're one step closer to completing our unique and rustic tree collar.

Glitzhome Christmas Tree Collar, Christmas Tree Base Cover, 22" L Washed White Wooden Tree Collars for Artificial Trees Decorative Tree Stand Cover Christmas Tree Skirt Collar
※ Material: This tree collar is made with solid wood and stained in white finish, reusable and durable.
As an affiliate, we earn on qualifying purchases.
As an affiliate, we earn on qualifying purchases.
Assembling Tree Collar Panels

Now that we've cut our pallet wood pieces, it's time to assemble our tree collar panels.
We'll start by following some essential tips to guarantee a sturdy and attractive assembly, including dry-fitting our panels and using brad nails or wood screws to secure them together.
Panel Assembly Tips
We assemble the tree collar panels by first dry-fitting them together to make sure a proper fit. This essential step guarantees that the panels align seamlessly, preventing any gaps or misalignments that could compromise the overall structure of our wood pallet Christmas tree collar.
Once we're confident in the fit, we secure the panels together using brad nails or wood screws, taking care to angle them for added stability. For an extra layer of strength, we consider applying wood glue along with the nails or screws. This not only reinforces the joint but also helps to create a more polished, professional finish.
When assembling the panels, we make sure to leave space for clean corner assembly, allowing the edges to meet neatly and creating a cohesive, well-crafted look. By following these panel assembly tips, we can ensure our tree collar is sturdy, visually appealing, and ready to adorn our festive holiday tree.
Measuring and Cutting
Measure the width and height of our existing tree stand to determine the ideal size of our tree collar panels, taking into account the standard dimensions of around 17 inches wide and 14 inches tall. We'll use these measurements to cut our pallet wood into the required pieces.
To assemble the panels, we'll need to cut 12 boards that are 17 inches long and 6 boards that are 14 inches long. When measuring and cutting, consider leaving gaps between the boards to guarantee a custom fit around the tree stand. This will allow us to adjust the panels to fit snugly around the stand.
If needed, we can dismantle pallets to obtain the required wood. By doing so, we'll create a unique and rustic tree collar that complements our Christmas decor. Remember to take precise measurements to achieve a seamless fit.
With our pallet wood cut to size, we're one step closer to creating a beautiful and functional tree collar.
Sanding and Smoothening Wood

Now that we've assembled our tree collar panels, it's time to focus on sanding and smoothening the wood to achieve a beautiful finish.
We'll explore the significance of selecting the right sandpaper and share some valuable tips on preparing the wood surface for painting or staining.
Sandpaper Selection Guide
When it comes to sanding wood for a Christmas tree collar, selecting the right sandpaper is important, as it can make all the difference in achieving a smooth, polished finish.
As we work on our Wood Pallet Tree, we need to get it right. Our sandpaper selection guide will help us navigate the process.
For initial sanding, we opt for lower grit numbers (around 80-100) to remove rough surfaces and imperfections. This is vital for a smooth foundation.
Next, we move to medium grit sandpaper (around 120-150) to further smooth out the wood, preparing it for painting or staining.
Finally, we finish with fine grit sandpaper (around 220-240) for a polished surface.
Remember, it's important to sand in the direction of the wood grain to prevent scratching and achieve a uniform finish. We should also regularly change sandpaper sheets to maintain effectiveness and prevent clogging for best sanding results.
Wood Surface Prep Tips
We begin prepping our wood pallet surface by tackling any imperfections and rough spots through the essential process of sanding and smoothening.
Sanding is an important step in wood surface prep, as it removes imperfections and creates a smooth texture, allowing our paint to adhere better and guaranteeing a professional-looking finish. We use sandpaper with varying grits, starting with a coarse grit to remove rough spots and progressing to a finer grit for a polished finish.
When sanding, we make sure to sand in the direction of the wood grain to prevent scratches and achieve a uniform appearance. Proper sanding techniques are crucial, as they help us achieve a flawless finish on our DIY project.
By smoothening the wood surface, we ensure a strong bond between the wood and the paint, resulting in a durable and long-lasting finish. As experts agree, 'sanding is essential for preparing the wood surface' (Woodworking Magazine), and we couldn't agree more.
Adding Decorative Touches

As we add the finishing touches to our wood pallet Christmas tree collar, we can get creative with decorative elements that reflect our personal style. With our pallet wood tree collar taking shape, it's time to add those extra flourishes that make it truly special.
We can personalize our wood Christmas tree collar with our favorite colors, patterns, or designs to match our decor. Consider distressing the wood for a rustic look or adding a glossy finish for a more polished appearance. We can also use Mod Podge to adhere decorative elements like glitter, fabric, or decals to the collar.
If we're feeling adventurous, we can experiment with different techniques such as distressing, antiquing, or decoupaging to enhance the overall look of the tree collar. By adding these decorative touches, we can create a one-of-a-kind wood pallet Christmas tree collar that showcases our unique style and adds a personal touch to our holiday decor.
Attaching Collar to Tree

As we move forward with attaching our wood pallet Christmas tree collar to the tree, we'll need to focus on two key points:
- Securing the collar base
- Adjusting the tree fit
We'll want to guarantee the collar is snug around the base of the tree, allowing enough room for the tree stand to sit inside, and then securely attach it using screws or nails. By doing so, we'll maintain balance and visual appeal, while also creating a sturdy base for our festive tree.
Secure the Collar Base
With our wooden tree collar base in hand, we firmly fasten it to the tree stand using screws or nails, guaranteeing a sturdy foundation for our festive creation. To confirm a snug fit, we adjust the collar to the desired height around the base of the tree, double-checking the stability to prevent any wobbling or shifting.
| Step | Action | Tool |
|---|---|---|
| 1 | Attach collar to tree stand | Screws or nails |
| 2 | Adjust collar to desired height | Hands |
| 3 | Double-check stability | Visual inspection |
We also consider adding felt or rubber pads under the base to protect the floor and provide additional stability. A nail gun can be a useful tool for this step, as it allows for quick and secure fastening. As we securely attach the collar base, we can rest assured that our wooden tree collar will stand tall and proud throughout the holiday season.
Adjust the Tree Fit
We'll now secure the collar to the tree itself, ensuring a snug fit around the base. To make this happen, we'll attach the collar to the tree stand or base using screws or nails for stability.
It's important that the collar is centered and sits flush against the tree stand, ensuring a seamless fit. If needed, we'll add additional support to secure the collar in place.
After adjusting the collar, we'll double-check the fit and stability before decorating the tree. This step is essential to guarantee the collar doesn't shift or topple over, compromising the overall look and safety of our tree.
Painting and Staining Options
We can choose from a variety of painting and staining options to give our wooden tree collar a unique and personalized look. For a distressed, shabby chic appearance, consider using chalk paint on our Wood Christmas tree collar. This will add a touch of vintage charm to our holiday decor.
Alternatively, we can stain our tree collar with a dark walnut finish for a rich, elegant appearance that's perfect for a sophisticated holiday gathering. If we prefer a more rustic, farmhouse style, we can experiment with whitewashing techniques to achieve a distressed, weathered look.
Additionally, we can use acrylic paint to add intricate designs or patterns to personalize our tree collar. Once we've chosen our preferred painting or staining method, it's crucial to apply a clear sealant or polyurethane coat to protect the finish and guarantee it lasts throughout the holiday season.
Adding Ribbons and Embellishments

By adding ribbons in various colors and textures, we can elevate our wooden tree collar from ordinary to extraordinary, creating a truly unique holiday centerpiece. To take our tree collar to the next level, we can incorporate ribbons and embellishments in a way that reflects our personal style.
Here are some tips to keep in mind when adding ribbons and embellishments:
- Mix and match different ribbons and embellishments to create a unique and festive design.
- Secure ribbons and embellishments with hot glue or adhesive tape for a secure attachment.
- Experiment with different placement and combinations of ribbons and embellishments to achieve the desired look.
- Consider using decorative embellishments like ornaments, pine cones, or faux berries to personalize your tree collar.
Displaying Your Tree Collar

Now that our tree collar is decorated, it's time to put it on display around the base of our Christmas tree, where it can beautifully conceal the tree stand and add a touch of rustic charm to our holiday decor.
We're excited to showcase our handmade wood pallet Christmas tree collar, which not only adds a decorative touch but also helps to hide the tree stand. By using a tree collar, we can create a polished and finished look that complements our holiday theme. Plus, tree collars come in various sizes and styles to suit different tree sizes and decor themes, so we can choose the one that fits our style best.
We opted for a wooden pallet tree collar, which adds a rustic charm to our Christmas tree display. With its natural, earthy tone, it blends seamlessly with our holiday decor. By placing our tree collar around the base of our tree, we can enjoy a beautiful, cohesive look that adds to the festive atmosphere.
Frequently Asked Questions
What Can I Use Instead of a Christmas Tree Collar?
We're looking for alternatives to traditional tree collars, so we consider using wooden crates, woven baskets, galvanized tubs, or even DIY fabric skirts to add a personal touch to our Christmas tree's base.
How Do You Make a Wooden Christmas Tree Collar?
"We're literally bursting with excitement to create our own wooden Christmas tree collar! We measure our tree stand, cut and assemble pallet boards, and secure them with brad nails and wood glue for a sturdy structure."
How to Make an Inexpensive Tree Collar?
We're on a budget, so we're making our own inexpensive tree collar by upcycling old materials, getting creative with DIY skills, and repurposing items we already have at home to save money.
What Size Tree Collar for 7ft Tree?
We're figuring out the ideal size for our 7ft tree's collar, and we've determined a panel size of 17ft wide and 14ft tall would be perfect, giving us a sturdy base for our festive tree.
Conclusion
With our wood pallet Christmas tree collar complete, we can confidently say it's a unique and eco-friendly way to upgrade our holiday decor. One might argue that pallet wood is too rustic for a festive centerpiece, but the smooth, sanded finish and optional staining prove otherwise.
As DIY Network expert, Matt Blashaw, notes, 'Repurposing pallet wood reduces waste and adds a touch of rustic charm.' By following these steps, we've not only created a beautiful tree collar but also done our part for the environment.