
TL;DR
A DIY project featured by HotHumblePie shows how to repurpose a cleaned coffee can as vintage-style countertop storage. The method uses primer, acrylic paint, a decoupaged paper label and a fitted lid; food-storage suitability and the finished container’s durability are not specified.
HotHumblePie has demonstrated a DIY project that turns an emptied coffee can into vintage-style countertop storage, using paint, a decoupaged paper label and a separate lid. The project offers a way to reuse a tin as a decorative container for dry goods, though the instructions do not establish whether the finished can is suitable for direct food contact or long-term storage.

Get furniture and decor delivered free with Prime
- Fast, free delivery on millions of items
- Prime Video, Amazon Music and more included
- Member-only deals all year
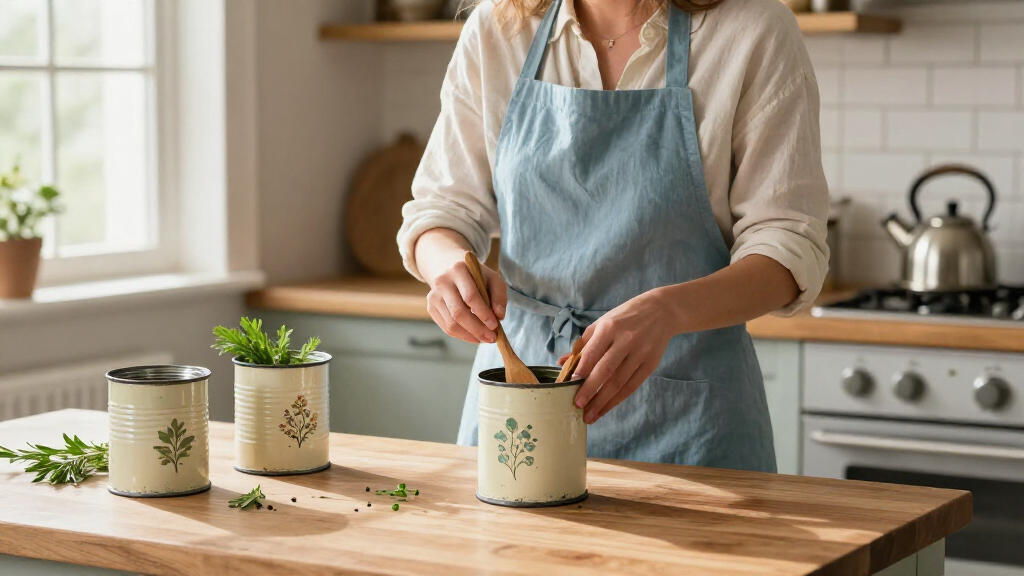
The project starts with an empty, thoroughly cleaned tin. The maker removes the original label and adhesive residue, then applies white primer to the outside with a paint sponge. After the primer dries, acrylic paint is lightly applied to alternating ridges to create soft stripes. The tutorial describes the paint as a stain-like finish rather than a solid, sharply defined coat.
For the front decoration, a printed label is cut out and attached with decoupage medium, such as Mod Podge, and a wet sponge. The completed can is topped with a lid sized to fit its opening. A small piece of ribbon tied around the lid’s handle is an optional finishing detail shown in the design.
Materials include the can, primer, acrylic paint, a paint sponge, decoupage medium, a wet sponge and a printed label. The lid must be sourced separately: the instructions recommend measuring the can’s diameter before looking for a rustic wooden lid, while noting that a canning lid may suit some sizes. The design can be varied with different paint colors and labels, including labels made or selected to match the contents.
Give Coffee Tins a Second Life Vintage countertop storage
HotHumblePie shows how to turn a cleaned coffee can into decorative storage with paint, a paper label and a fitted lid. The finished container’s food safety and durability are not established.
Build the vintage look
A ridged tin creates soft stripes when acrylic paint is lightly applied to alternating ridges.
Remove the label and adhesive, clean the tin, then sponge white primer onto the outside.
After the primer dries, lightly paint alternating ridges. Attach a printed label with decoupage medium.
Measure the opening and find a matching lid. Ribbon around the handle is optional.
Gather the supplies
The project uses common craft materials; the lid must be sourced to fit your can.
Can and primer
Use an empty, thoroughly cleaned coffee can and white primer.
Paint and paper
Gather acrylic paint, a paint sponge, decoupage medium, a wet sponge and a printed label.
Fitted lid
Measure the can’s diameter first; a rustic wooden lid or, for some sizes, a canning lid may fit.
Choose a practical use
The tutorial describes countertop storage, but does not test the finished container.
- Decorative holder for coffee, tea or sugar packages
- Custom colors and labels can identify contents or add vintage style
- Direct food contact is not confirmed
- Airtightness, moisture resistance and finish durability are unspecified
A Second Use for Coffee Tins
The project gives an everyday container a decorative second use and may help organize small countertop staples such as coffee, tea or sugar. It also relies on readily available craft materials rather than a specialized storage product, although the cost will depend on what materials and a properly sized lid are already on hand.
Its practical limits matter. The instructions focus on appearance and do not describe sealing, moisture resistance, food-contact testing or cleaning the finished container. Readers should not assume that a paper label, craft paint and decoupage finish make the tin suitable for storing food directly. Using it as an outer decorative holder for sealed packages avoids relying on an unverified interior surface.
Products Worth Considering
Google Nest Smart Thermostat, Programmable Wi-Fi, Charcoal

Google Nest Smart Thermostat, Snow

Philips Hue Bridge Pro Smart Lighting Hub
As an affiliate, we earn on qualifying purchases.
How the Painted Stripe Effect Works
The look depends on the coffee can’s ridged exterior. Applying paint lightly to alternating ridges creates a striped effect while leaving the design softer than a full coat. The project pairs that finish with a vintage-style label and a contrasting lid, drawing on a farmhouse aesthetic rather than changing the can’s basic structure.
Labels can identify the contents or serve mainly as decoration. The instructions mention printable vintage designs available online and suggest that makers can create their own using a photo-editing app. The article also points to French-style drink labels as one possible decorative option, but does not name a particular supplier or require a specific design.
“Apply acrylic paint lightly to alternating ridges so the color looks soft and rustic rather than like a harsh stripe.”
— HotHumblePie, as described in the DIY instructions
Food Use and Finish Durability
The instructions do not specify whether the painted and decoupaged tin is safe for direct food contact, airtight or resistant to moisture. They also give no testing or care guidance for the finish, and do not say how well the paper label or paint will hold up to repeated handling or cleaning. The project is presented as countertop storage, but the intended contents and storage conditions are not tested in the description.
The exact lid dimensions and availability will vary with the can used. No budget, measured completion time or performance comparison is provided, so descriptions of the project as inexpensive or quick should be understood as general characterizations, not documented estimates.
Measure Before Choosing a Lid
Anyone following the project can begin by cleaning a tin and measuring its opening, then find a lid that fits before choosing paint and a label. The steps require drying time between primer and paint, so the actual completion time depends on the products used and their drying instructions. No additional release, product test or follow-up from HotHumblePie is specified.
For practical use, keep unverified craft finishes away from food itself and use the tin as an outer holder for packaged goods unless the materials are confirmed as suitable for direct food contact. The article provides no further safety or care recommendations.
Source: rss
Key Questions
What materials are needed for the coffee-can storage project?
The listed supplies are a cleaned tin, white primer, a paint sponge, acrylic paint, decoupage medium, a wet sponge and a printed label. A fitted lid is also needed, and ribbon is optional.
Can any lid be used?
The lid must fit the can’s opening. Measure the diameter first; the instructions suggest a rustic wooden lid or, depending on the can’s size, a canning lid.
Can the finished tin hold food directly?
The instructions do not confirm that the paint, decoupage medium or label are suitable for direct food contact. Consider using the tin as a decorative outer holder for sealed packages rather than placing food directly inside.
How can the design be customized?
Change the acrylic paint color and printed label. Labels can identify the contents, such as coffee or tea, or add a decorative vintage look.
Source: hunker.com