To quiet a squeaky floor, start by identifying where the noise occurs, then tighten loose nails or screws securing the subfloor. You can also sprinkle powdered graphite or talcum powder into gaps to reduce friction, or insert shims or blocks between the joists and subfloor for added stability. For a more long-lasting fix, consider injecting construction adhesive or adding extra support like plywood layers. Keep an eye on these tips to learn more ways to keep your floors quiet.
Key Takeaways
- Identify the source of squeaks by walking slowly and listening closely, noting specific spots or movement patterns.
- Tighten loose nails or screws, or replace nails with screws to secure subfloor to joists effectively.
- Apply powdered graphite or talcum powder into gaps to reduce friction causing squeaks.
- Insert shims, wooden blocks, or use construction adhesive to stabilize loose or flexing floor components.
- Regularly inspect and maintain the floor, including tightening fasteners and controlling moisture, to prevent future squeaks.
floor squeak repair kit
As an affiliate, we earn on qualifying purchases.
As an affiliate, we earn on qualifying purchases.
Identifying the Source of the Squeak

Have you ever wondered what’s causing that annoying squeak under your floor? The first step is floor squeak diagnosis, which involves pinpointing the exact noise source. To do this, walk slowly across the area, listening carefully for when the squeak occurs. Pay attention to whether the sound happens when you step on a specific spot or as you shift your weight. You might need to use a helper to observe from below or run your hand along the floorboards to feel for movement. Noise source detection can be tricky, but focusing on the squeak’s pattern and location helps identify whether the problem is a loose board, a gap, or a nail issue. Accurate diagnosis makes fixing the squeak much easier and more effective. Incorporating an understanding of characteristics of a healthy floor, such as the presence of loose or creaky components, can further aid in identifying the root cause.
wood floor shims and blocks
As an affiliate, we earn on qualifying purchases.
As an affiliate, we earn on qualifying purchases.
Tightening Loose Nails and Screws

Start by locating any loose nails or screws in the squeaky area. Once you’ve identified them, grab the right tools—like a hammer or screwdriver—to tighten or secure them properly. This simple step can make a big difference in stopping the noise. Additionally, understanding industry trends can help you choose the most effective repair methods for your specific flooring.
Locate Loose Fasteners
To effectively quiet a squeaky floor, begin by inspecting the area for loose fasteners. Look for protruding or missing nails and screws along the floor surface. Focus on the connections between the subfloor and the underlying floor joist, as these are common sources of squeaks. Tap the floor gently to identify areas that produce a hollow or creaking sound, indicating loose subfloor fastening. Use a flashlight if needed to see beneath the surface and locate fasteners that aren’t snug. Once identified, tighten any loose nails or screws with the appropriate tools. If nails won’t hold, consider replacing them with screws for a more secure connection. Properly fastening the subfloor to the floor joist reduces movement and eliminates squeaks effectively. Additionally, vertical storage solutions can help keep the work area organized, making it easier to access and work on the floor.
Secure With Proper Tools
Tightening loose nails and screws is essential for stopping squeaks in your floor. To do this effectively, you need to select the right tools, such as a hammer, screwdriver, or drill, based on the fastener type. Proper tools make the job easier and guarantee secure fastening. Before you begin, follow safety precautions: wear safety glasses and work carefully to avoid injury. Check for any damaged or rusted fasteners and replace them if necessary. When tightening, avoid overdriving nails or screws, which can cause damage. Use a screwdriver or drill with a clutch setting to prevent stripping. Taking these steps ensures your fasteners stay tight, reducing squeaks and extending the life of your floor. Proper tool selection and safety are key to a successful fix. Additionally, understanding celebrity transformations can inspire confidence in tackling home repairs with a fresh perspective.
powdered graphite for squeaky floors
As an affiliate, we earn on qualifying purchases.
As an affiliate, we earn on qualifying purchases.
Using Powdered Graphite or Talcum Powder

To use powdered graphite or talcum powder effectively, you need to apply it directly into the gaps where the squeak occurs. Make sure you spread the powder evenly and work it into the seams for the best results. Doing this not only silences the squeak but also helps prevent future noises. For a more durable fix, consider upgrading components like hinges or joints that may be contributing to the squeak.
Applying the Powder Correctly
Applying powdered graphite or talcum powder effectively requires careful attention to detail. To guarantee your floor squeak remedies work, focus on proper powder application techniques. Begin by locating the squeaky spots and removing any debris or dust. Use a squeeze bottle or a small brush to apply the powder directly into the cracks and gaps where the floorboards meet. Be thorough but avoid overdoing it—excess powder can create messes or clog the joints. Once applied, walk gently across the area to help the powder settle into the seams. Repeating this process may be necessary for stubborn squeaks. Proper application ensures the powder penetrates deeply, reducing friction and noise. Additionally, understanding the importance of soundproofing can help prevent future squeaks and improve overall floor performance. Remember, patience and precision are key to successful floor squeak remedies.
Preventing Future Squeaks
Even if you’ve successfully stopped the squeak now, it’s smart to take steps that prevent future noise issues. Using powdered graphite or talcum powder can help with various flooring types by reducing friction and noise. To maximize effectiveness, consider these noise reduction techniques:
- Regularly inspect your floors for looseness and tighten any loose boards.
- Apply powdered graphite or talcum powder along seams where two boards meet.
- Use shims or nails to secure squeaky areas, especially in wooden flooring.
- Keep high-traffic areas well-maintained to avoid wear that can cause future squeaks.
- Incorporate soundproofing methods that can further dampen noise and enhance comfort.
construction adhesive for flooring
As an affiliate, we earn on qualifying purchases.
As an affiliate, we earn on qualifying purchases.
Applying Shims or Wooden Blocks

When you notice a squeaky floor, inserting shims or wooden blocks can be an effective fix. First, locate the squeak by gently walking over the problem area. Once identified, access the space beneath the floor, often near the floor joist. Insert wooden shims or small wooden blocks between the floor joist and the subfloor where the squeak occurs. Tap the shims gently with a hammer until they fit snugly, applying pressure to eliminate gaps. Secure the shims in place with nails or screws if needed, but often a tight fit is enough. This method reduces movement between the floor joist and the subfloor, stopping the squeak. Be precise and cautious to avoid damaging the wood or creating uneven surfaces. Incorporating automation techniques can also help in diagnosing and preventing future squeaks by monitoring vibrations and movement in the flooring.
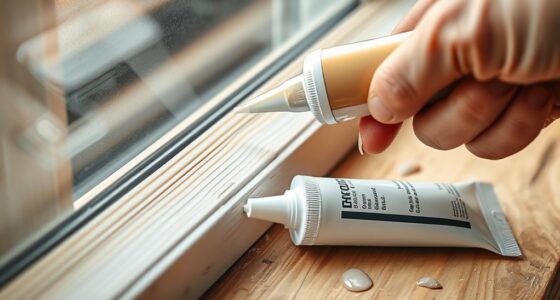
Injecting Construction Adhesive for Stability

To enhance stability and reduce squeaking, injecting construction adhesive between the floor joist and the subfloor can be highly effective. This method creates a strong bond that dampens movement and minimizes squeak reduction. Begin by locating the squeaky spots and drilling small holes through the subfloor near the joists. Then, follow these steps:
- Inject a high-quality floor adhesive into the holes using a caulk gun.
- Spread the adhesive evenly along the joist-to-subfloor interface.
- Press the subfloor firmly to ensure proper adhesion.
- Clean any excess adhesive to prevent messes and ensure a smooth finish.
- Using construction adhesives designed for flooring can provide a more durable and long-lasting bond.
This technique helps secure loose boards, providing long-lasting stability and considerably reducing squeaks over time.
Installing Additional Support Beams or Plywood

Adding extra support beams or plywood is a practical way to reinforce your flooring and eliminate squeaks caused by flexing or weak spots. You can achieve this through joist reinforcement, which involves installing additional joists or sistering existing ones to strengthen the floor structure. A plywood overlay is another effective method; by adding a thick layer of plywood over the existing subfloor, you distribute weight more evenly and reduce movement that causes squeaks. Secure the plywood with screws, ensuring it’s tightly fastened to the joists beneath. This not only stabilizes the floor but also minimizes flexing, which is a common cause of squeaks. Understanding structural integrity is key when undertaking these reinforcement projects to ensure safety and effectiveness. Both strategies provide a solid foundation for quieter, more stable flooring, especially in areas prone to movement.
Preventative Tips to Maintain a Quieter Floor

Regular maintenance is key to keeping your floors quiet over time. To prevent squeaks, consider these tips:
Regular maintenance helps keep your floors quiet and squeak-free over time.
- Install soundproof mats in high-traffic areas to absorb footstep noise and reduce vibrations.
- Enhance floor insulation by adding underlayment, which helps stabilize the subfloor and minimizes movement.
- Periodically check and tighten loose nails or screws that may cause creaking sounds.
- Keep the subfloor dry and free of debris, as moisture can weaken support and lead to squeaking.
Frequently Asked Questions
How Long Does Each Floor Squeak Repair Typically Last?
The longevity of your floor squeak repair varies, but typically, it lasts between 5 to 15 years depending on repair durability and floor conditions. If you use high-quality materials and proper techniques, you can extend this lifespan. Regular maintenance can also help prevent new squeaks. Keep in mind that hardwood floors may need more frequent fixes, while concrete or engineered floors tend to hold squeak repairs longer.
Can Certain Flooring Types Be More Prone to Squeaking?
Yes, certain flooring materials are more prone to squeaking. For example, hardwood floors often squeak due to expansion and contraction, especially if not installed properly. Installation techniques matter too; if nails or adhesives aren’t used correctly, squeaks can develop over time. Laminate or vinyl floors are less likely to squeak since they’re less sensitive to movement. Choosing the right flooring material and proper installation can markedly reduce squeaking issues.
Is It Safe to Use Household Products Like WD-40 on Floors?
A stitch in time saves nine, so you ask if household chemicals like WD-40 are safe on floors. While WD-40 can reduce squeaks, it’s not designed for flooring and may damage surfaces or finishes. Always follow safety precautions—use sparingly, avoid excessive application, and test in a small area first. For safety, consider specialized floor products or consult a professional to prevent unintended harm.
How Often Should I Inspect My Floors for Squeaks?
You should inspect your floors for squeaks at least every few months, especially if you notice increased floor movement or creaking sounds. Regular squeak detection helps catch issues early before they worsen. Walk across your floors gently and listen for new or worsening squeaks. If you detect any, address them promptly to prevent further damage. Staying proactive guarantees your floors stay quiet and in good condition longer.
Are There Professional Services for Persistent Squeaks?
Imagine your floor as a symphony of stability, yet stubborn squeaks disrupt its harmony. Yes, professional services exist for persistent squeaks, offering expert floor repair options that go beyond DIY squeak fixes. Skilled technicians can identify hidden issues, like loose boards or subfloor problems, and restore tranquility. If DIY attempts fail, calling in pros guarantees your floor’s music plays smoothly again, giving you peace of mind and a silent, stable surface.
Conclusion
By following these simple steps, you can substantially reduce or eliminate floor squeaks and enjoy a quieter home. Did you know that squeaky floors can decrease property value by up to 10%? Taking a little time now can save you money and hassle later. Regular maintenance, like tightening nails and adding support, keeps your floors smooth and silent. Don’t wait—start fixing those squeaks today and restore peace and quiet to your space!